• Skip to primary navigation
  • Skip to main content
  • Skip to primary sidebar
  • Skip to footer
  • Recipes
  • Shop
  • About
  • Contact Me

Grab the Mangos

  • Recipes
    • Main Dish
      • Beef
      • Chicken
      • Seafood
      • Vegetarian
    • Breakfast
    • Side Dishes
    • Dessert
      • Cakes
      • Cookies
      • Brownies + Bars
    • Salads
    • Drinks
    • Snacks
    • Bread
    • Sauces
  • Healthy Living
  • About
  • Shop
    • Appliances
    • Baking
    • Beautiful Kitchen
    • BIPOC Owned Favorites
    • Dishware
    • Eco Healthy Kitchen
    • Food Photography
    • Foods You’ll Love
    • Kitchen Tools + Gadgets
    • Organizing
    • Pots and Pans
  • Contact Me
menu icon
go to homepage
  • Recipes
  • Shop
  • About
  • Contact Me
    • Facebook
    • Instagram
    • Pinterest
  • subscribe
    search icon
    Homepage link
    • Recipes
    • Shop
    • About
    • Contact Me
    • Facebook
    • Instagram
    • Pinterest
  • ×

    Recipes

    Skillet Dutch Baby (German Pancake)

    January 16, 2019

    Skillet Dutch Baby Recipe (German Pancake)

    Oh man, this skillet dutch baby recipe is one of our favorite recipes as a family, but it is definitely my favorite recipe as a mom. I make this for every special occasion and even sometimes when we just need a treat on weekends. It is so simple and easy to make and no one has to be in the kitchen all morning to make it. Make it while the coffee is brewing!

    Making It:

    This skillet Dutch baby or German pancake, is sort of like a souffle and sort of like an omelette. It gets a ton of air mixed into it from the blender which helps it to rise up like a pancake cloud in the oven. This is also why it will make a difference if your eggs are room temperature or not. Just leave them out on the counter over night and you're good to go in the morning.

    Skillet Dutch Baby easy and fast recipe.  Made either sweet or savory.  Delicious breakfast german pancake.

    All you have to do is turn on the oven, let the butter melt in the pan while you blend the ingredients together, and then place it all back into the oven to get super fluffy and delicious.

    This post may contain affiliate links at no cost to you! They just help to keep the sight running and delivering free content. Thanks!

    Cast Iron Skillet:

    We make ours in our AWESOME cast iron skillet. Seriously, amazing tool. If there was one kitchen tool I couldn't live without, I think it would be my cast iron skillet. I use it for everything from baking bread and desserts to braising short ribs and frying chicken. It is so great and I highly recommend getting one if you don't already have one.

    Benefits of cooking in Cast Iron:

    • Extra Flavor- cast iron is porous so it absorbs amazing flavor that gets into the rest of your foods.
    • Naturally non-stick and won't leech chemicals into foods. Healthier.
    • Will leech Iron into the food which again makes it healthier as most people are deficient in Iron.
    • So so versatile. Seriously, use that baby for everything.

    Toppings:

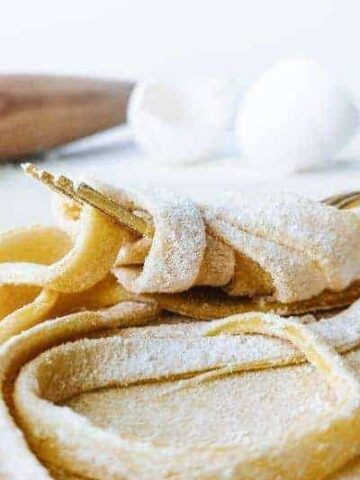
    We love powdered sugar on our skillet dutch baby, but anything tastes great on it. Try it with:

    • Powdered sugar
    • Our Strawberry Sauce
    • Fresh or Dried Herbs
    • Cheeses
    • Sauted Veggies
    • Lox
    • Fried Egg
    • Meats
    • etc...
    Skillet Dutch Baby easy and fast recipe.  Made either sweet or savory.  Delicious breakfast german pancake.

    This is definitely a recipe to hold onto!

    Tag us on Instagram @grabthemangos and give us a rating and review right here in the comments! And don't forget to pin and save it for next time!

    If you love this recipe, try out our Waffles and Strawberry Sauce next!

    Skillet Dutch Baby Recipe (German Pancake)

    Skillet Dutch Baby (German Pancake)

    Yield: 6 servings
    Prep Time: 5 minutes
    Cook Time: 20 minutes
    Total Time: 25 minutes

    This Skillet Dutch Baby (German Pancake) recipe is so quick and easy to make it is perfect for weekend mornings! Pair with loads of your favorite toppings and enjoy with some coffee for breakfast and you are set 🙂

    Ingredients

    • 6 Eggs, room temperature
    • 1 cup Milk, See Notes for Dairy Free
    • 1 cup Flour, See Notes for Gluten Free
    • ½ teaspoon Salt
    • 1 teaspoon Cinnamon
    • 1 teaspoon Nutmeg
    • 4 tablespoon Butter, melted

    Instructions

    1. Pre-heat oven to 425.
    2. Place all ingredients (EXCEPT butter) into a blender and process until smooth. 
    3. Place the butter onto a cast iron skillet and place in the oven to heat up and melt butter. 
    4. Once butter is melted, pour batter into the skillet and bake for 20-25min until the pancake is large and fluffy. 
    5. Top with powdered sugar, syrup, almond butter, jam, lemon... anything that sounds the best to you and enjoy!

    Notes

    This recipe can be made gluten free by substituting Bob's Red Mill 1-1 Ratio Gluten Free Flour.  It can also be made Dairy Free by substituting Almond Milk or Oat Milk.  You can do both substitutions at the same time too! 

    Nutrition Information:
    Yield: 6 Serving Size: 1 slice
    Amount Per Serving: Calories: 239Total Fat: 14gSaturated Fat: 7gTrans Fat: 0gUnsaturated Fat: 5gCholesterol: 210mgSodium: 347mgCarbohydrates: 19gFiber: 1gSugar: 0gProtein: 10g

    Nutritional information is not always 100% accurate.

    © CradleKitchen
    Category: Breakfast

    The Best Split Pea Soup

    January 11, 2019

    warm delicious split pea soup with ham bone

    This split pea soup is my all time favorite thing to look forward to after the holidays. We always volunteer to take the ham bone home after Christmas or New Years for this soup! My whole family loves it, even the 3 year old just gobbles it up.

    warm delicious split pea soup with ham bone

    Making the soup:

    Start off with some rainbow carrots (my favorite- but you can use just normal carrots too), some celery, and some onion all cooking in butter and garlic. This is going to fill your kitchen with all that savory goodness aroma.

    Once the veggies and butter have been cooking for 5-10 minutes, add in the ham bone or ham hocks along with your chicken broth, water, seasonings, and of course split peas. These little guys are so so packed full of protein and nutrient goodness but taste like a good old warm in your tummy comfort food in this soup.

    Let all the goodness come to a boil and then reduce it to a simmer on low heat for about an hour and a half. Check the soup and add in your diced ham. I prefer to let mine cook for another half hour at least to get a smoother texture and thickness and just a little more flavor.

    Topping split pea soup:

    Once you like where your soup is at, remove the ham bone (our dog, Donut, looks forward to this whenever we make it), and don't forget to remove the bay leaves as well. Top this with:

    • Garlic Butter Croutons
    • Himalayan Pink Salt
    • Fresh Black Pepper
    • Goat Cheese
    • Drizzle of Olive Oil
    • Everything Bagel bits (trust me- delicious to dip in the soup)

    Vegetarian Option:

    If you need your split pea soup to be vegetarian, no problem! Obviously, leave the ham and bone out and replace the chicken broth with vegetable broth. There you go!

    Tag us on Instagram @grabthemangos and give us a rating and review right here in the comments! And don't forget to pin and save it for next time!

    If you love this recipe, be sure to check out our Sweet Onion Chicken Noodle Soup recipe that was featured on the Feed Feed next!

    warm delicious split pea soup with ham bone

    The Best Split Pea Soup

    Yield: 6 people
    Prep Time: 20 minutes
    Cook Time: 2 hours
    Total Time: 2 hours 20 minutes

    This is hands down the best split pea soup! With a hambone and chunks of ham throughout the soup, the flavor is amazing. You can make it vegetarian by leaving the ham out of course and using vegetable broth. This soup is healthy and easy!

    Ingredients

    • ¼ cup Butter
    • 3 medium Carrots
    • 4 medium Celery
    • 1 medium Onion
    • 2 cloves Garlic, minced
    • 2 teaspoon Thyme
    • 1 teaspoon Salt
    • 1 teaspoon Pepper
    • 1 Ham Bone , (or ham hocks, or thick diced ham)
    • 4 cups Chicken Broth
    • 3 cups Water
    • 1 lb Green Split Peas
    • 2 Turkish Bay Leaves
    • ½ cup Diced Ham, if using ham bone or ham hocks

    Instructions

    1. In a large stock pot or dutch oven melt the butter on medium heat. 
    2. Dice the vegetables into small pieces and add them to the pot with butter to cook. 
    3. Add the garlic and salt and pepper. 
    4. Once the veggies have gotten slightly soft and savory, add the ham bone (or whatever style you are going with) along with the water, broth, split peas, and rest of the spices and bay leaves.
    5. Bring to a boil.
    6. Reduce to a simmer and cook for 1hr and 30min.  If you like it to be thicker or with a smoother texture cook 30min longer or until it's what you prefer.  
    7. Take the ham bone or ham hocks out if you have use this method. 
    8. Add ½ cup of diced ham (if using the ham bone or ham hocks method) 30min before soup is done cooking.  (If using plain diced ham only- cook in the soup for the last full hour)
    9. Season with extra salt and black pepper to taste and top with butter and garlic croutons.  Enjoy getting warm with this amazing soup!

    Notes

    *Ham brings plenty of it's own salt into the soup, so be sure to do most of the salt adding afterwards to taste.
    *Ham hocks or diced ham can be used in the same way as the bone.

    Nutrition Information:
    Yield: 6 Serving Size: 2 cups
    Amount Per Serving: Calories: 287Total Fat: 12gSaturated Fat: 6gTrans Fat: 0gUnsaturated Fat: 5gCholesterol: 67mgSodium: 1658mgCarbohydrates: 22gFiber: 8gSugar: 5gProtein: 23g

    Nutritional information is not always 100% accurate.

    © CradleKitchen

    Sour Cream Quiche with Sweet Potato Crust

    January 8, 2019

    sour cream quiche with sweet potato crust

    This is our family's all time favorite sour cream quiche with sweet potato crust recipe. It is so simple and easy to make with ingredients you normally have on hand anyways. The flavors are melt in your mouth delicious!

    sour cream quiche with sweet potato crust

    A sweet potato crust:

    Starting with the sweet potato crust (umm yes please), shred about 3-4 sweet potatoes and cook in a pan with olive oil and some salt and pepper until almost mushy. This may take about 10-12 minutes. Once they are ready to go, press them into bottom and sides of a pie dish using a spoon. Bake this at 400 for about 15 minutes (longer if you want it even more crisp).

    sour cream quiche with sweet potato crust

    This sweet potato crust is so savory with a very subtle sweetness. Honestly, it's just so much simpler and easier than a pastry dough pie crust that I tend to use this for a lot of my savory pie crusts. If you have one of the power shredders that are out there these days it only makes this job easier and quicker. I use my Cuisinart Slicer/Spiralizer/Shredder and it is honestly one of my favorite kitchen tools ever! This thing can help you make so many dishes so quickly. It shreds up these sweet potatoes (which can be a pain because they are tough) and does it in seconds. Highly recommend!

    sour cream quiche with sweet potato crust

    Sour Cream Quiche:

    While the pie crust is baking, start cooking up your choice of vegetables and/or meat. This is what makes this meal a go to for us. You can throw in whatever you like that you have on hand and it always turns out! I would cut everything to be bite size before tossing it in though. While they cook all together in the pan, whisk together the eggs and add the sour cream to make an amazingly cream and fluffy filling.

    sour cream quiche with sweet potato crust

    Once the crust is done, place the veggie and meat mixture in the bottom of the crust and pour the egg mixture over it evenly. Bake at 375 for 35-45 minutes until you don't see a jiggle in the center when it comes out- place tin foil over the top if you are worried about burning any crust that might be peaking out. Enjoy the cravings for this sour cream quiche with sweet potato crust when you've finished it all up!

    Dairy-Free Option:

    Ok, so my husband is actually lactose intolerant but he's one of those people that just doesn't care and will eat all the ice cream loaded with whipped cream if it's in front of him and then just suffer the consequences later and say it was all worth it. But recently we realized both kids seem to have a pretty bad intolerance to dairy as well and since they are little and I don't want them hurting or ruining their health, I made an executive decision (I mean I am the cook around here anyways lol) to just set us all on the dairy-free path. So the only dairy I still get when I'm food shopping is the Kerry Gold grass fed butter because a little bit of that still has good health benefits and doesn't hurt their tummies.

    Because of this development, I had to come up with the dairy free version of this recipe which we love just as much! If you are in this boat with us, here you go:

    Replace the sour cream with one can of coconut cream. Use only the thick creamy part, not the liquid part in the can (you can put that away for some smoothies). Mix it all together well. Don't worry if it doesn't combine perfectly and there are small bits of coconut cream in the eggs still- it all bakes together just fine. And that's it. You can't even taste the coconut flavor at all and it is still creamy and delicious! The original recipe I came up with before the switch over to dairy free but the pictures in this recipe are actually the dairy free quiche. If that doesn't convince you, I don't know what will! Enjoy 🙂

    sour cream quiche with sweet potato crust

    Tag us on Instagram @grabthemangos and give us a rating and review right here in the comments! And don't forget to pin and save it for next time!

    sour cream quiche with sweet potato crust

    Sour Cream Quiche with Sweet Potato Crust

    Yield: 6 servings
    Prep Time: 30 minutes
    Cook Time: 45 minutes
    Total Time: 1 hour 15 minutes

    This is the quiche of your dreams! So easy and simple. A savory sweet crust with a creamy and fluffy filling that melts in your mouth.  Dairy free option too!

    Ingredients

    Sweet Potato Crust

    • 3-4 Sweet Potatoes
    • 2 tablespoon Olive Oil
    • 1 teaspoon Minced Garlic
    • 1 teaspoon Salt
    • 1 teaspoon Black Pepper

    Sour Cream Quiche

    • 6 large Eggs
    • ½ cup Sour Cream, *Dairy- Free Option*
    • ½ cup Diced Ham or Bacon
    • ½ cup Preferred Veggies , onions, broccoli, peppers... etc.
    • 1 teaspoon Garlic Powder
    • 1 teaspoon Paprika
    • Salt and Pepper , to taste

    Instructions

    Sweet Potato Crust

    1. Pre-heat oven to 400.
    2. Shred the sweet potatoes and cook on medium heat in the olive oil with the garlic, salt, and pepper until almost completely soft.  
    3. Press the cooked sweet potatoes into a pie pan using a spoon until the pie dish is covered in this crust. 
    4. Bake the sweet potato crust for 15min to get it slightly crispy and set. 

    Sour Cream Quiche

    1. Pre-heat oven to 375.
    2. Cook vegetables of choice (we like onions, broccoli, peppers...) with the ham or bacon in a pan on medium-high heat until cooked. 
    3. Place the veggie and meat combination in the sweet potato pie crust.
    4. In a large bowl beat the eggs.  Add the sour cream and seasonings and beat well. 
    5. Pour the egg and sour cream mixture over the veggies and meat in the pie crust. 
    6. Bake for 35-45 minutes until cooked through and no longer runny in the center. 
    7. Let rest for 5 minutes.  Serve hot and enjoy! 

    Notes

    *Dairy Free Option: 1 can of coconut cream replaces the sour cream.  Only use the thick creamy part of the can.  Save the liquid for another recipe or smoothie! 

    © CradleKitchen
    Category: Breakfast

    Easy Rolling Pin Noodles

    January 8, 2019

    a golden fork swirled in fresh made egg noodles

    I don't know about you but if I could, without my heart probably eventually giving out on me, I'd eat pasta every day. I know my kids definitely would because they ask me for pasta every day. Honestly who doesn't like pasta? It's one of the best feel good, fill my belly up, "yes I'll take extra parmesan" meals ever especially when it's as simple as these easy rolling pin noodles.

    Egg Noodles From Scratch

    So I figured out this recipe because my 3 year old absolutely always wants to help cook. Meaning I have to find ways to let her actually cook during the process. This whole process is perfect for just that. It is easy, fun, and relatively quick.

    Combine the flour and salt and pour onto a clean counter, creating a well in the center for the eggs and oil. You can also use a bowl but the counter is more fun! It works a little easier to beat the eggs and oil together first and then add to the well, but you can also add the eggs and oil and just start mixing by hand into the flour like pictured below.

    eggs and oil in a mound of flour

    After forming the dough let it rest to allow some gluten to form and make the dough easier to work with. Rolling it out will be a pain if you skip this resting period.

    hands mixing noodle dough
    ball of pasta dough

    No Machine Needed Noodles

    Roll the dough out onto a floured surface and go as thin as you can with it. This is different every time for me but it tastes amazing either way. Then begin to cut the strips of pasta. They will probably not be perfect strips. We prefer using the pizza cutter method and we definitely get all different sizes of noodles going on.

    Boiling the same way you boil regular store bought pasta- cooked to al dente or your preference and topped with your favorite toppings- these easy rolling pin noodles are so easy, can be made in advance and frozen, and are absolutely worth it.

    More Sweet recipes for you to love

    • The Best Gnocchi
    • Sweet Potato Gnocchi
    • Zucchini Noodles
    • Sweet Onion Chicken Noodle Soup

    Tag us on Instagram @grabthemangos and give us a rating and review right here in the comments! And don't forget to pin and save it for next time!

    a golden fork swirled in fresh made egg noodles

    Easy Rolling Pin Noodles

    Yield: 4 people
    Prep Time: 20 minutes
    Cook Time: 8 minutes
    Total Time: 28 minutes

    Easy homemade pasta without a machine is our favorite recipe! It is so easy and makes noodles, shapes, ravioli is a favorite of ours! Top with your favorite sauces and you are good to go!

    Ingredients

    • 1 cup All Purpose Unbleached Flour
    • 1 teaspoon salt
    • 2 large Eggs
    • 1 tablespoon Olive Oil

    Instructions

    1. Mix flour and salt together.  
    2. Make a well in the flour mixture and add the beaten eggs plus olive oil. 
    3. Combine until dough forms.  If it seems too dry and is not coming together well, add 1 tablespoon of water at a time until dough comes together well. 
    4. Wrap the dough in saran rap and let rest for 15 minutes. 
    5. Once rested and more pliable, roll out onto a floured surface as thin as you can. At least ¼ inch.  
    6. Using a pizza cutter or a long sharp knife, start to make the long thin strips of pasta. 
    7. If freezing, coat the noodles in a thin coat of flour to prevent sticking.  If cooking right away, place into a boiling pot of water with a drizzle of olive oil and cook until al dente (or about 8 minutes). 
    8. Serve with your favorite sauce or toppings and enjoy the taste of homemade fresh pasta! 

    Recommended Products

    As an Amazon Associate and member of other affiliate programs, I earn from qualifying purchases.

    • King Arthur Flour All-Purpose Flour, 10 Pound
      King Arthur Flour All-Purpose Flour, 10 Pound
    • Pasta Machine, Made in Italy, Includes Cutter, Hand Crank, and Instructions, Silver
      Pasta Machine, Made in Italy, Includes Cutter, Hand Crank, and Instructions, Silver
    Nutrition Information:
    Yield: 4 Serving Size: 4 people
    Amount Per Serving: Calories: 179Total Fat: 6gSaturated Fat: 1gTrans Fat: 0gUnsaturated Fat: 4gCholesterol: 93mgSodium: 618mgCarbohydrates: 24gFiber: 1gSugar: 0gProtein: 6g

    Nutritional information is not always 100% accurate.

    © Miriam Reeves
    Cuisine: Italian / Category: Main Dish
    • « Go to Previous Page
    • Page 1
    • Interim pages omitted …
    • Page 3
    • Page 4
    • Page 5

    Primary Sidebar

    gluten free recipes

    Vegan Quinoa Bowl in a white bowl

    Vegan Quina Bowls

    Reuben dip in a cast iron skillet with a wood woven charger under the pan

    Ultimate Reuben Dip - With Deli Corned Beef

    glass of the best dairy free eggnog with almond milk and sprinkled nutmeg and a cinnamon stick

    The Best Dairy Free Eggnog with Almond Milk

    bowls of creamy dairy free roasted butternut squash soup

    Roasted Butternut Squash Soup - dairy free

    I'm Renee and welcome! Grab the Mangos focuses on affordable, simple, and easy-to-make recipes. Let's make delicious food together with easy steps and simple ingredients so you have one less stress in your life.

    More about me →

    NEW RECIPES

    • Christmas Tree Cupcakes on a white wood surface.
      Christmas Tree Cupcakes
    • Wood bowl of Christmas Trail Mix.
      Christmas Trail Mix: The Ultimate Holiday Snack Mix
    • Apple cider donut Bundt cake on a wood cake stand.
      Apple Cider Bundt Cake (Gluten Free Option Included)
    • pumpkin spice syrup in a jar with a lid and tag and a jar without a lid.
      Homemade Pumpkin Spice Syrup Recipe: A Perfect Fall Treat

    TREADING RECIPES

    • stack of heath bar cookies with one bite taken out.
      Heath Bar Cookies
    • holding a wood bowl of gnocchi.
      Best Gnocchi Recipe
    • mahi mahi in a cast iron skillet with mango chunks and cilantro
      Hawaiian Style Mahi Mahi Recipe
    • rolled out pizza dough
      Super Easy Pizza Dough

    Footer

    ↑ back to top

    About

    • About
    • Privacy Policy
    • Disclaimer

    Newsletter

    • Sign Up! for emails and updates

    Contact

    • Contact

    As an Amazon Associate, I earn from qualifying purchases.

    Copyright © 2020 Brunch Pro on the Brunch Pro Theme