• Skip to primary navigation
  • Skip to main content
  • Skip to primary sidebar
  • Skip to footer
  • Recipes
  • Shop
  • About
  • Contact Me

Grab the Mangos

  • Recipes
    • Main Dish
      • Beef
      • Chicken
      • Seafood
      • Vegetarian
    • Breakfast
    • Side Dishes
    • Dessert
      • Cakes
      • Cookies
      • Brownies + Bars
    • Salads
    • Drinks
    • Snacks
    • Bread
    • Sauces
  • Healthy Living
  • About
  • Shop
    • Appliances
    • Baking
    • Beautiful Kitchen
    • BIPOC Owned Favorites
    • Dishware
    • Eco Healthy Kitchen
    • Food Photography
    • Foods You’ll Love
    • Kitchen Tools + Gadgets
    • Organizing
    • Pots and Pans
  • Contact Me
menu icon
go to homepage
  • Recipes
  • Shop
  • About
  • Contact Me
    • Facebook
    • Instagram
    • Pinterest
  • subscribe
    search icon
    Homepage link
    • Recipes
    • Shop
    • About
    • Contact Me
    • Facebook
    • Instagram
    • Pinterest
  • ×

    Recipes

    Gluten Free Granola- Peanut Butter + Banana

    January 27, 2020

    a bowl of yogurt and homemade peanut butter banana granola

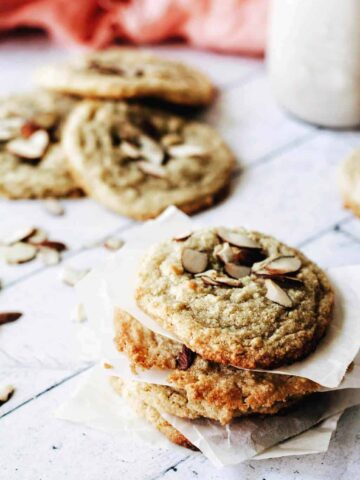
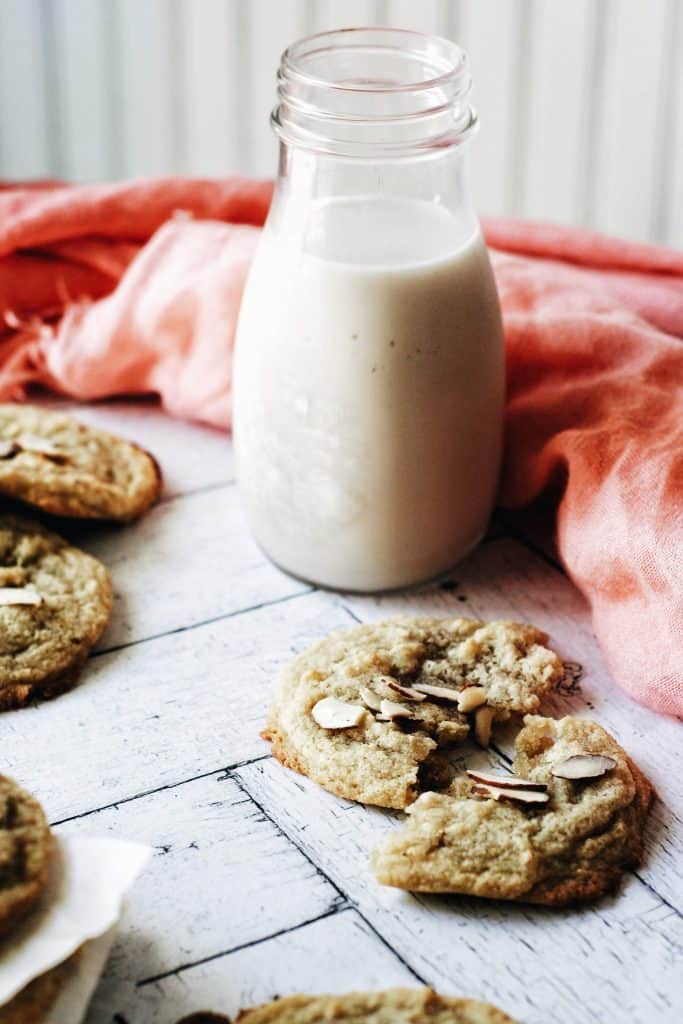
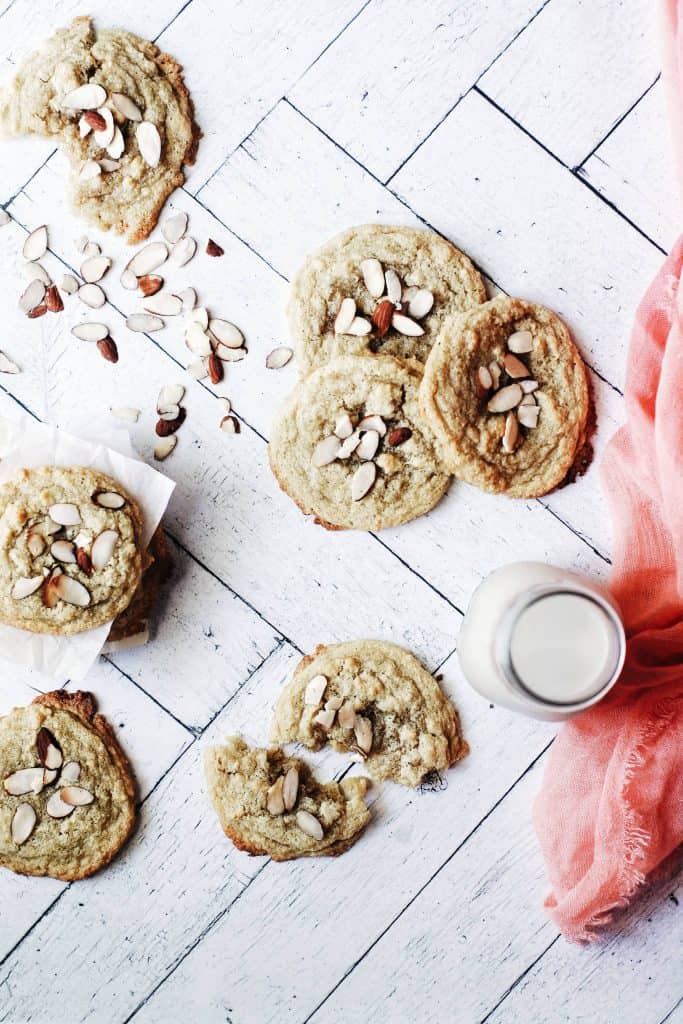
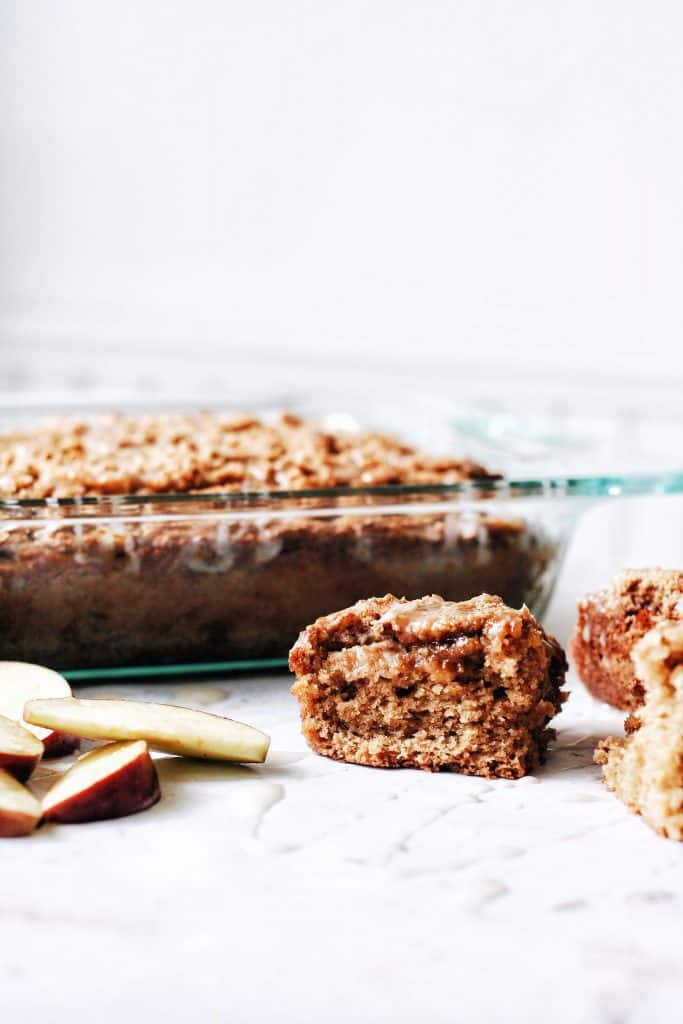
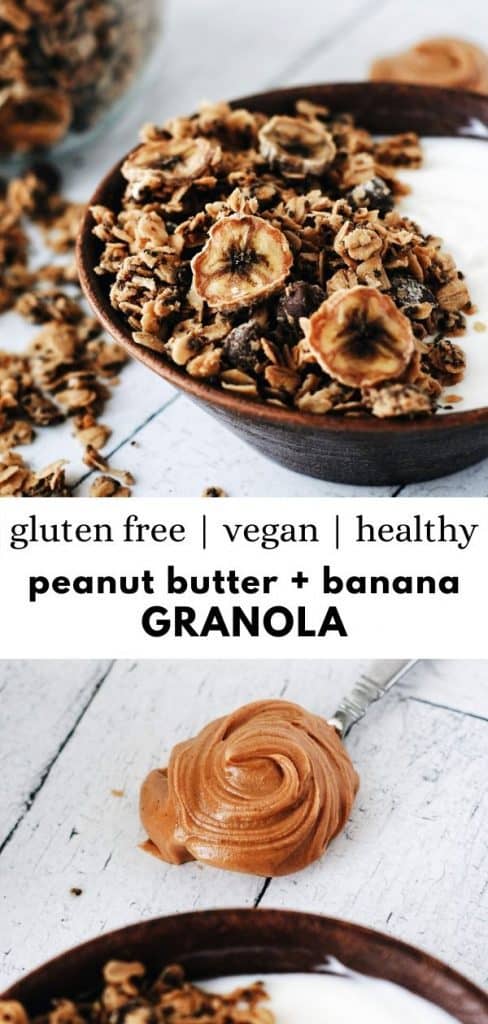
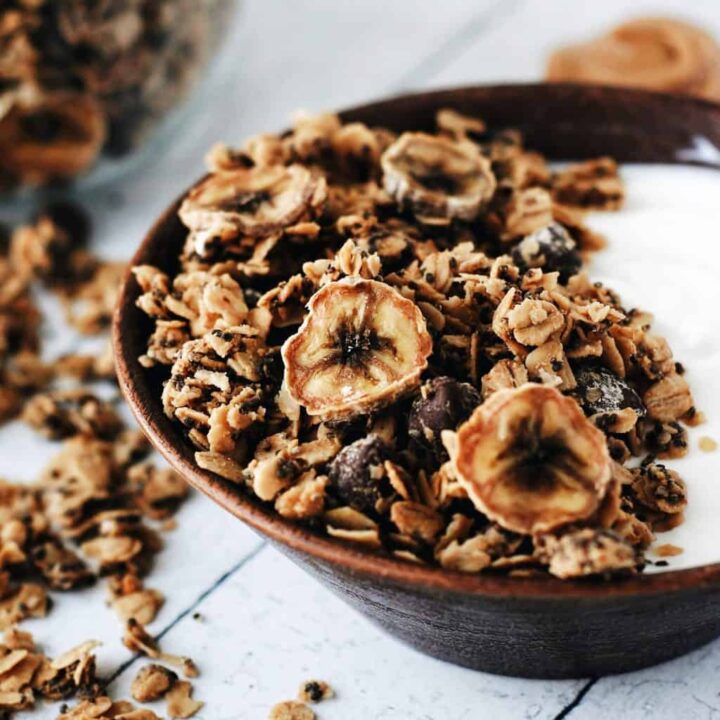
    This peanut butter and banana granola is a super simple and easy to make recipe. Filled with creamy peanut butter and banana slices that dry up perfectly in the oven, plus of course, chocolate chips. This gluten free granola is a healthy, delicious, crunchy, peanut butter and banana filled treat. Top yogurt, smoothie bowls, or just eat by the handful!

    Best Gluten Free Granola

    Gluten free granola is honestly easier to make at home yourself than it is to find in the stores. Plus you get a LOT more than the little bags at the store. This particular recipe is so simple and easy. Only 6 ingredients, all healthy and delicious.

    a spoonful of swirled creamy peanut butter

    In a bowl, mix together peanut butter (we prefer creamy, but crunchy works well too), gluten free rolled oats, chia seeds, a little extra virgin olive oil, and dark chocolate chips/chunks. Once these ingredients have been mixed together really well, spread out nice and evenly on a baking sheet lined with parchment paper. This helps nothing to stick and helps it to bake evenly. Place the sliced banana right on top of the spread out granola. Then all you have to do is let it bake in the oven for about 2 hours.

    When it comes out of the oven, you're going to want your gluten free granola to rest and cool down. This helps the granola to get nice and crunchy.

    close up of crunchy healthy gluten free peanut butter and banana gluten free granola

    Why is granola bad for you at the store?

    So why make homemade granola instead of just buy it? Besides the fact that you get so much more when you just make it at home, granola at the store is generally super bad for you. It is LOADED with sugar among other weird ingredients.

    It is generally hard to find a good gluten free granola, although Aldi's does carry some in their Live G Free brand. But even if you find the granola of your dreams and it is gluten free, it's probably loaded up with tons of sugar. You may as well sprinkle crushed Oreo's on your green smoothie.

    chocolate chunks in a homemade granola

    A lot of times, the granola at the stores carry unhealthy oils along with them, high amounts of calories, and like we've stated, loads of sugar with "healthy" sounding names. That's why recipes like this one are so nice to have because it is SO EASY, takes 5 minutes to get into the oven, and you know exactly what's in it.

    granola in a jar

    Why is this granola good for you?

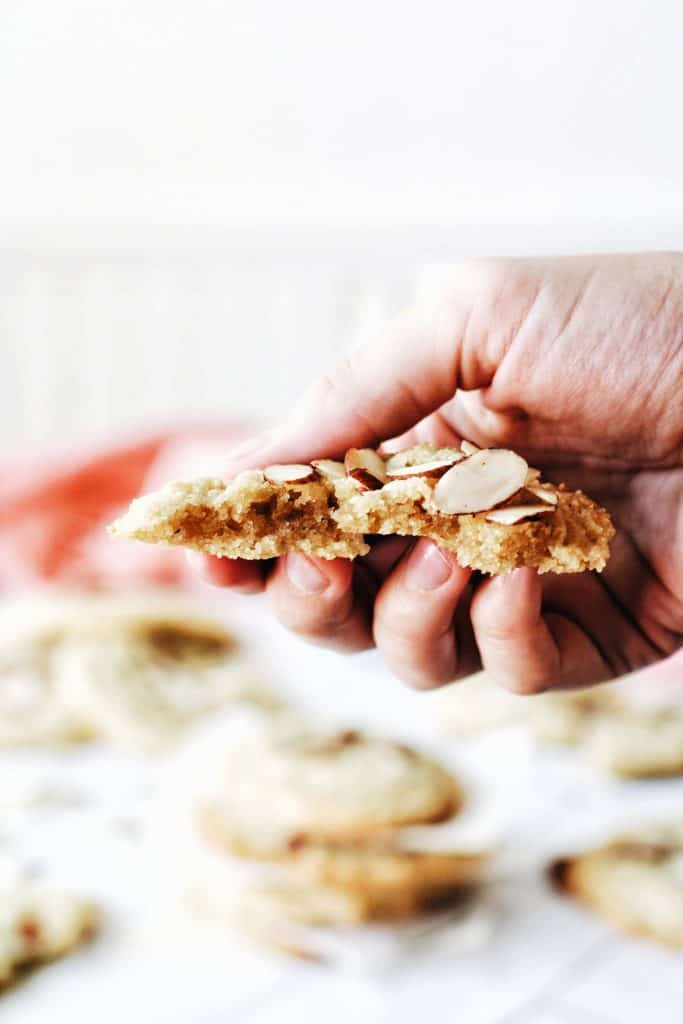
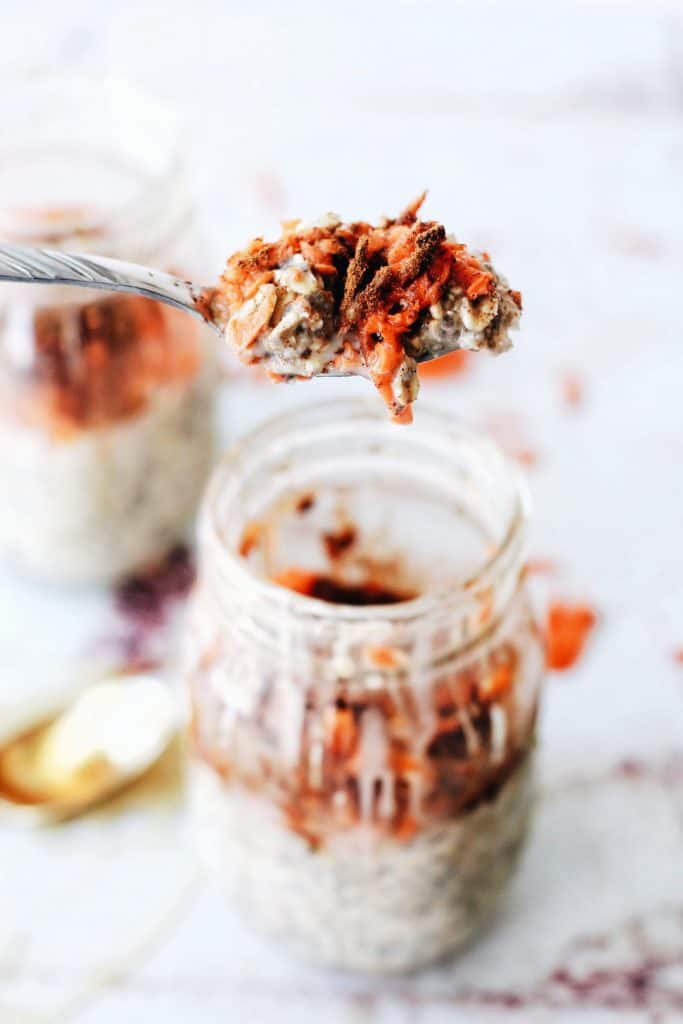
    This crunchy peanut butter granola with bananas is really nice and healthy for you. It's filled with fiber and iron from the rolled oats, protein and heart healthy fats from the peanut butter, omega-3 fatty acids along with more iron and fiber plus calcium from the chia seeds, plus the flavor and vitamins like C and manganese in bananas. The list goes on and on for a lot of the health benefits of these ingredients.

    bananas and granola in a bowl of yogurt with a spoonful of swirled peanut butter

    More than that though, this gluten free granola is YUMMY! It's got all the best flavor combo's- peanut butter and banana, peanut butter and chocolate... YUM. And honestly, healthy should taste goooood!

    a spoonful of peanut butter and banana homemade granola with yogurt

    Tag us on Instagram @grabthemangos and give us a rating and review right here in the comments! And don't forget to pin and save it for next time!

    This homemade gluten free granola recipe is full of peanut butter, chia seeds, rolled oats, and topped with banana slices. Healthy, easy, vegan, and simple to make!

    More Sweet recipes for you to love

    • Tahini Walnut Granola
    • Carrot Cake Overnight Oats
    • Pumpkin Pie Oatmeal
    • Gluten Free Cinnamon Rolls
    a bowl of yogurt and homemade peanut butter banana granola

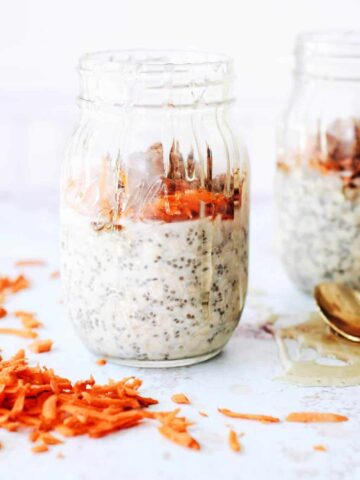
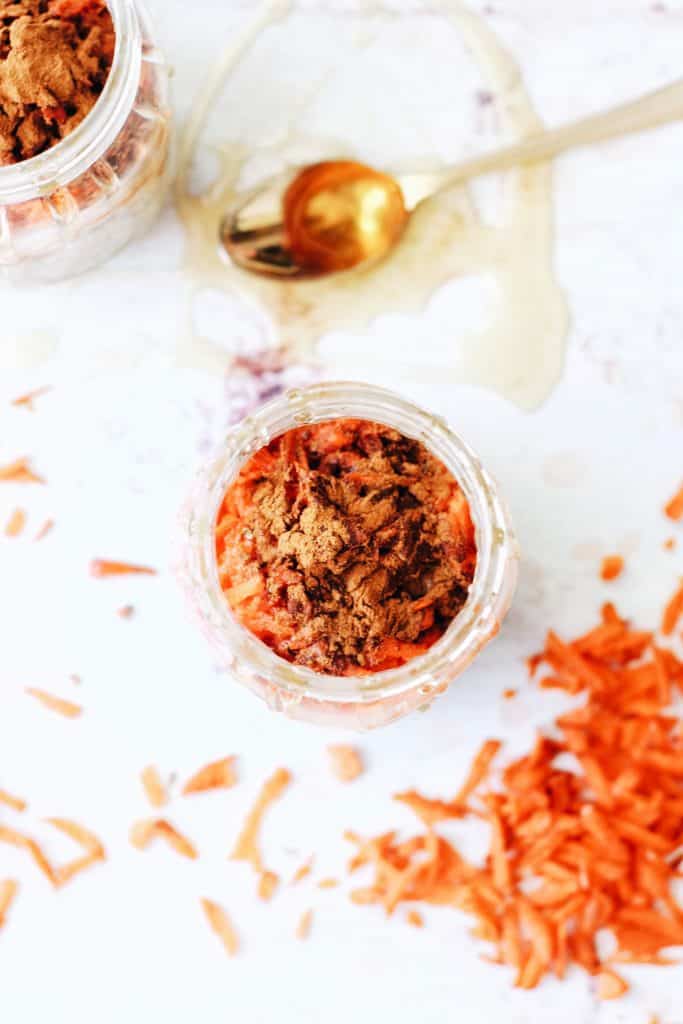
    Gluten Free Granola- Peanut Butter and Banana

    Yield: 3-4 cups
    Prep Time: 5 minutes
    Cook Time: 2 hours
    Total Time: 2 hours 5 minutes

    This homemade gluten free granola recipe is full of peanut butter, chia seeds, rolled oats, and topped with banana slices. Healthy, easy, vegan, and simple to make!

    Ingredients

    • 2 cups Gluten Free Rolled Oats
    • ⅓ cup Chia Seeds
    • ⅓ cup Peanut Butter
    • 2 tablespoon Extra Virgin Olive Oil
    • ½ cup Dark Chocolate Chips/Chunks
    • 1 sliced Banana (or more optional)

    Instructions

    1. Pre-heat oven to 250.
    2. In a mixing bowl, mix together everything except the banana slices.
    3. Spread the granola mixture evenly over a baking sheet lined with parchment paper.
    4. Then place the banana slices over the top.
    5. Bake for 1.5 hours for a more chewy softer granola OR 2 hours for a more crunchy granola.
    6. Let it cool completely on the baking sheet to let it set. Store in an air tight container and enjoy!
    Nutrition Information:
    Yield: 10 Serving Size: 1
    Amount Per Serving: Calories: 223Total Fat: 13gSaturated Fat: 3gTrans Fat: 0gUnsaturated Fat: 8gCholesterol: 1mgSodium: 45mgCarbohydrates: 24gFiber: 5gSugar: 6gProtein: 6g

    Nutritional information is not always 100% accurate.

    © Miriam Reeves
    Cuisine: American / Category: Breakfast

    Cherry Dump Cake (Gluten Free + Dairy Free)

    January 20, 2020

    cherry dump cake in a white bowl ready to eat

    Cherry dump cake... the easiest, sweet, versatile, scrumptious dessert ever. With only three ingredients, anyone can make this cake. A cherry pie filling covered in a gluten free (or normal) vanilla box cake mix, and then refined coconut oil layered over the top to get that golden brown cake that melts in your mouth.

    Why is it called Dump Cake?

    What is a dump cake? A dump cake is super similar to a cobbler. Fruit filling on the bottom and a cake layer on top. Dump cakes are called dump cakes because they are literally dumped into the cake pan. No bowls or mixing required. Easy peasy!

    hand dumping cherry pie filling into a white baking dish

    This cake is one of our favorite recipes for an easy weekend dessert. You can use any fruit filling you want and it's always good. Feel free to mix up the flavor of the cake too.

    Dump Cake Flavor Ideas:

    • Cherry and Chocolate
    • Apple filling and Caramel cake
    • Strawberry and Fun Fetti
    • Pumpkin and Cinnamon Swirl

    The list is endless for the different flavor combinations. But for today we went with our classic, Cherry and Vanilla combo.

    back lit cherry filling in a dish spread out for a cake

    Growing up, we were REALLY poor. But, I remember eating this cake a lot and after making it again for my own family out of nostalgia, I realized why. It is so cheap and so easy. This cake is literally foolproof. It's perfect for making with kids or for special holidays and date nights, even if you aren't a baker at all.

    Don't think this cherry dump cake isn't fancy enough though. Add a little coconut whipped cream or vanilla ice cream, and oh my gosh, this cake absolutely melts in your mouth and is so dangerously delicious. We even made it as our big Christmas dessert this past year. That's how good it is.

    baked golden brown cherry dump cake

    A lot of gluten free cakes and desserts are weird and difficult to make with weird flours and ingredients. This is not that. No extra effort than a regular cherry dump cake!

    Easy, 3 Ingredient, Cherry Dump Cake

    Like I said before, no bowls, no mixing, only 5 minutes! Let's make a Cherry Dump Cake.

    In a 13x9 inch cake pan, dump 2 cans of cherry pie filling and spread evenly. Over the top of the cherry filling, pour a gluten free vanilla cake mix evenly over the top. Take ¾ cup of refined coconut oil (butter also works if you aren't dairy free), and place small lumps all over the cake mix. These pieces of coconut oil or butter will melt in the oven and cook into the cake mix as it all comes together.

    spreading cherries out in a dish
    pouring cake mix over cherries for dump cake
    putting coconut oil (or butter) over the cake mix for a dump cake recipe
    back lit picture of a spoon scooping out a scoop of cherry dump cake

    Bake this cake at 350 for 40 minutes. About half way through (at 20 minutes), check the cake and fill in any big dry cake spots you see with a little bit of coconut oil or butter again. Let it finish baking until the top is golden brown and cherry is peeking through the top. Let it cool (it is like lava hot when it comes out), and serve with ice cream or our FAVORITE coconut whipped cream from Minimalist Baker. Enjoy!

    a large scoop coming out of cherry dump cake

    Tag us on Instagram @grabthemangos and give us a rating and review right here in the comments! And don't forget to pin and save it for next time!

    This super easy recipe cherry dump cake is made with a gluten free vanilla box cake mix and cherry pie filling. Only 3 ingredients and so so delicious!
pinterest pin

    More Sweet recipes for you to love

    • Chickpea Orange Glazed Bars
    • Healthy Gluten Free Banana Bread
    • Gluten Free Chocolate Chip Cookies
    • Super Moist Carrot Cake Cupcakes
    cherry dump cake in a white bowl ready to eat

    Cherry Dump Cake (Gluten Free + Dairy Free)

    Yield: 1 Cake
    Prep Time: 5 minutes
    Cook Time: 40 minutes
    Total Time: 45 minutes

    This super easy recipe cherry dump cake is made with a gluten free vanilla box cake mix and cherry pie filling. Only 3 ingredients and so so delicious!

    Ingredients

    • 2 cans Cherry Pie Filling
    • 1 Gluten Free Vanilla (or yellow) Boxed Cake Mix
    • ¾ cup Refined Coconut Oil (or butter)

    Instructions

    1. Pre-heat oven to 350.
    2. In a 13x9 inch cake pan, dump the cherry pie fillings in and spread evenly.
    3. Pour the dry cake mix over the top evenly.
    4. Place small lumps of the coconut oil (or butter) all over the top of the cake evenly.
    5. Bake for 20 minutes and check to make sure there are no dry spots on the cake. If there are add a little bit of oil (or butter) to those spots and finish baking for another 20 minute until golden brown.
    6. Let it cool and serve with ice cream or coconut whipped cream and enjoy!
    Nutrition Information:
    Yield: 9 Serving Size: 1
    Amount Per Serving: Calories: 535Total Fat: 20gSaturated Fat: 16gTrans Fat: 0gUnsaturated Fat: 2gCholesterol: 0mgSodium: 448mgCarbohydrates: 85gFiber: 2gSugar: 25gProtein: 3g

    Nutritional information is not always 100% accurate.

    © Miriam Reeves
    Cuisine: American / Category: Dessert

    Fried Zucchini Fritters (Gluten Free)

    January 14, 2020

    fried zucchini fritters in a dish with celery stalks

    There's something about "fritters" that just makes you think- homey, southern, and deliciously easy, right? Zucchini fritters are one of my favorite things to make. A good, spiced up, veggie filled fritter is a keeper for those weeknight dinners. Top it off with some sour cream, chives, or even some whipped butter (like a true southerner, everything needs butter). No matter how you eat these, everyone will love them!

    Crispy Zucchini Fritters

    Growing up in the south, basically everything but especially veggies, were just loaded up with butter when you made them. Not so healthy, but then again live a little right? My kids love when I make vegetables for them because they know I'll make sure they taste good. Most of the time, I manage to keep the veggies healthy too by not overdoing the butter but again, live a little.

    a bite of a zucchini fritter with a stack of fritters in the background

    This zucchini fritter recipe is completely gluten free and can be dairy free depending on what you cook the batter in. I prefer to use Ghee these days because I like the health benefits and I like the taste even more.

    To get these fritter nice and crisp on the outside, there are a couple of tips/tricks.

    • Make sure you flatten the batter down slightly with a spoon by spreading it out when you pour it into the pan.
    • Squeeze out your zucchini really well to dry it up.
    • Make sure you have a medium heat setting.
    • And finally, make sure you cook it in something like ghee, butter, or a good olive oil or coconut oil. (if you don't want coconut taste, use refined coconut oil)
    basket of zucchini fritters

    Super Easy Fritters

    Let's make some delicious zucchini fritters! Start out by grating your zucchini. I used about 2 medium sized zucchini. Using a cheese cloth or a thin clean rag, squeeze all the juice out of your grated zucchini as well as you can. This doesn't have to be perfect so just try to get out as much liquid as you can for a crisper fritter.

    looking from the top down at a stack of zucchini fritters with butter

    In a mixing bowl, combine the dried grated zucchini with chopped celery, onions, minced garlic, and beaten eggs. Mix together and then add in your flour and spices. So easy right?

    In a frying pan or skillet, heat 2 tablespoon of Ghee or your choice of oil over medium heat. Making sure the oil is nice and hot before putting the batter in also helps to make sure they become crispy.

    all the zucchini fritters done and crispy in a dish ready to serve

    Using a quarter cup, pour batter into the pan and spread into a nice thin circle. Let it fry for 2-3 minutes with the lid on the pan, then flip and let it fry for 2-3 minutes with the lid off. You want golden brown sides.

    When they are done, place on a paper towel on a plate and serve hot with your choice of toppings (sour cream, chives, whipped butter... etc). Enjoy!

    Tag us on Instagram @grabthemangos and give us a rating and review right here in the comments! And don't forget to pin and save it for next time!

    This fried zucchini fritter recipe is so easy to make, completely gluten free, and so YUMMY! The best zucchini recipe.

    More Sweet recipes for you to love

    • Salmon Patties with Yogurt Sauce
    • Chickpea Orange Bars
    • Apple Zucchini Bread
    • Zucchini Noodles with Lemon Butter Sauce
    fried zucchini fritters in a dish with celery stalks

    Fried Zucchini Fritters (Gluten Free)

    Yield: 8
    Prep Time: 15 minutes
    Cook Time: 10 minutes
    Total Time: 25 minutes

    This fried zucchini fritter recipe is so easy to make, completely gluten free, and so YUMMY! The best zucchini recipe.

    Ingredients

    • 2 Medium Zucchini
    • 2 Eggs
    • ½ cup Chopped Celery
    • ½ cup Chopped Onion
    • 2 Minced Garlic Cloves
    • ¾ cup Bob's Red Mill Gluten Free Flour
    • ¼ cup Almond Flour
    • ½ teaspoon Salt
    • ½ teaspoon Black Pepper
    • ½ teaspoon Cumin
    • ½ teaspoon Paprika
    • ½ teaspoon Chili Powder
    • 2 tablespoon Ghee or Olive Oil for frying

    Instructions

    1. Grate your zucchini into a cheesecloth or thin clean rag.
    2. Over the sink, squeeze the zucchini dry and try to get as much of the liquid out through the cloth as you can.
    3. Place dried zucchini in a bowl and add beaten eggs, onions, celery, and minced garlic. Mix together.
    4. Next, add your gluten free flour and almond flour, plus all your spices.
    5. Mix together into a thick batter.
    6. Heat your ghee or oil over medium heat in a frying pan or skillet.
    7. Once heated, use a ¼ cup to scoop the batter into the frying pan and spread into a nice thin pancake shape.
    8. Place the lid on the pan and fry for 2-3 minutes.
    9. Once the bottom is golden brown, flip and leaving the lid off, fry for another 2-3 minutes again until golden brown.
    10. When done, place the fritters on a paper towel on a plate and serve hot with sour cream and chives, whipped butter, or anything else you prefer. Enjoy!
    Nutrition Information:
    Yield: 8 Serving Size: 1
    Amount Per Serving: Calories: 157Total Fat: 8gSaturated Fat: 3gTrans Fat: 0gUnsaturated Fat: 5gCholesterol: 55mgSodium: 179mgCarbohydrates: 17gFiber: 2gSugar: 2gProtein: 5g

    Nutritional information is not always 100% accurate.

    © Miriam Reeves
    Cuisine: American / Category: Main Dish

    Chickpea Glazed Orange Bars -Gluten Free

    January 8, 2020

    chickpea orange glazed bars with orange slices on top

    It's citrus season! The dead of winter over here in Minnesota. Perfect time to brighten up these dreary cold days with some of these chickpea glazed orange bars. These sweet things are so easy to make, full of that bright orange flavor, and are so creamy and dreamy, it's hard not to eat the whole batch in one sitting! Topped with an orange glaze, these delicious little bars are gluten free and delicious of course.

    Orange Bars Recipe

    These glazed orange bars are gluten free of course, but the secret ingredient (not so secret- it's in the title), is chickpeas. Blended up smooth, chickpeas are a favorite of mine in gluten free and dairy free baking because they bring that creamy smooth texture to things like these bars. Chickpeas are the key to perfectly silky smooth glazed orange bars.

    orange bars cut and ready to be glazed

    Not quite like lemon bars, these have a cheesecake creamy texture and aren't quite as tart. We LOVE everything lemon in a dessert (especially lemon bars), but oranges are the way to go for a unique citrus dessert and these worked perfectly with some naval oranges.

    Making this recipe is nice and easy! In a blender or food processor, combine the chickpeas, eggs, sugar, fresh orange juice, zest, and ghee. We love using ghee instead of butter because of the flavor and the fact that it is lactose and casein free. Ghee gives these bars so much extra flavor and texture!

    glazed and garnished with oranges- gluten free creamy orange bars

    Gluten Free Dessert Bars

    Once you've blended up your orange and chickpea mixture, pour it into a big bowl and mix in your almond and coconut flours plus your baking powder. Using just almond flour and coconut flour is what helps give these bars a light and creamy texture instead of a bread/cake-like texture.

    a bite taken out of an orange bar with an orange slice

    Pour and spread your batter into an 8 by 8 inch greased baking pan. Spread it all out evenly and bake at 350 for 40 minutes or until the edges are slightly golden brown and a toothpick inserted in the middle comes out clean.

    Simple Orange Glaze Recipe

    hand pouring orange glaze over gluten free chickpea orange bars

    Once your bars have cooled, whip up this delicious glaze for the top. Mix together 1 cup of powdered sugar, some orange zest, and 1-2 tablespoon of Orange Juice. Start with just 1 tablespoon and add another if you feel it needs it. Then get to work pouring it all over your delicious creamy orange bars. Enjoy!

    Tag us on Instagram @grabthemangos and give us a rating and review right here in the comments! And don't forget to pin and save it for next time!

    These gluten free glazed orange bars are made with creamy chickpeas and loads of orange citrus flavor! Creamy and silky texture and topped with a sweet orange glaze.

    More Sweet recipes for you to love

    • Chickpea Cardamom Blondies
    • Molasses Oatmeal Cookies
    • 3 Ingredient Fudge Brownies
    • Gluten Free Banana Bread
    chickpea orange glazed bars with orange slices on top

    Chickpea Glazed Orange Bars -Gluten Free

    Yield: 9 bars
    Prep Time: 15 minutes
    Cook Time: 40 minutes
    Total Time: 55 minutes

    These gluten free glazed orange bars are made with creamy chickpeas and loads of orange citrus flavor! Creamy and silky texture and topped with a sweet orange glaze.

    Ingredients

    • 1 can (drained) Chickpeas
    • ½ cup Sugar
    • ¼ cup Ghee
    • 1 cup Orange Juice (about 3 oranges)
    • 3 Eggs
    • ½ cup Almond Flour
    • ⅓ cup Coconut Flour
    • ½ teaspoon Baking Powder
    • 1 teaspoon Orange Zest
    • Glaze:
    • 1 cup Powdered Sugar
    • ¼ teaspoon Orange Zest
    • 1 tablespoon Orange Juice

    Instructions

    1. Pre-heat oven to 350.
    2. In a blender or food processor, combine the chickpeas (drained), sugar, ghee, juice, eggs, and zest. Combine until nice and smooth.
    3. Pour the chickpea mixture into a bowl and mix in your coconut flour, almond flour, and baking powder.
    4. Pour and spread your batter into a greased 9 by 9 inch baking pan.
    5. Bake for 40 minutes or until a toothpick inserted in the center, comes out clean.
    6. Let it cool completely while you make the glaze.
    7. Pour the glaze over the bars once cooled and enjoy!
    Nutrition Information:
    Yield: 9 Serving Size: 1
    Amount Per Serving: Calories: 236Total Fat: 11gSaturated Fat: 5gTrans Fat: 0gUnsaturated Fat: 6gCholesterol: 77mgSodium: 54mgCarbohydrates: 31gFiber: 1gSugar: 27gProtein: 5g

    Nutritional information is not always 100% accurate.

    © Miriam Reeves
    Cuisine: American / Category: Dessert

    Hawaiian Style Mahi Mahi Recipe

    January 4, 2020

    mahi mahi in a cast iron skillet with mango chunks and cilantro

    This Mahi Mahi recipe is so yummy and easy to make. Hawaiian style recipe for a tropical fish only seems fitting right? This recipe is made with tamari, a rich and dark, gluten free soy sauce. Along with mango's to brighten and sweeten the dish up, this tropical recipe is delicious! Even my kids gobbled it up and they are picky about fish recipes. Flaky, tender, and quick and easy Mahi Mahi.

    skillet seared mahi mahi with hawaiian sauce and mangos

    Pan Seared Mahi Mahi

    Mahi Mahi is a super cool looking tropical fish. Seriously look it up- very cool and almost alien-like looking. Mahi Mahi is very similar in texture to swordfish and is super good for grilling or pan searing.

    As a tropical fish, Mahi Mahi tastes a bit stronger than something like cod but has a really nice flavor for something like the marinade in this recipe.

    The best part of this fish is how easy it is to cook. We use a cast iron skillet but a normal pan would work as well. (side note: highly recommend getting a cast iron skillet if you don't have one) To pan sear this fish and cook it through so it's nice and flaky, you only need a couple minutes on each side.

    a bite of mahi mahi with mangos and cilantro

    The beauty of using a cast iron pan is how the heat transfer works. When searing your Mahi Mahi, let it sear on medium heat for about 2 minutes before checking it. If it won't release from the skillet, it needs a little longer. Once it starts to release from the pan, that's when you should flip it for another 2 minutes or so.

    Mahi Mahi Marinade Recipe

    This post may contain affiliate links. If you click and buy, I may make a commission at no cost to you. See my policy for more information.

    The sauce for this recipe is full of flavor! You can use it to marinade the fish or just pour it over the top while cooking if you don't have the time and either way it is amazing.

    mahi mahi with mangos and cilantro in a cast iron skillet

    In a glass measuring jar or bowl, combine your tamari soy sauce (the best soy sauce even if you aren't gluten free), garlic, honey, gluten free rice vinegar, and gluten free flour. Super easy, just whisk it together thoroughly.

    Note: rice vinegar is not always gluten free, we find our FAVORITE gluten free rice vinegar through Thrive Market, where you can also find Tamari soy sauce.

    Get up to $20 in shopping credit when you purchase a Thrive Market Membership! (1 month, 3 month, and 1 year memberships available)

    close up of cilantro on a hawaiian pan seared mahi mahi with mango chunks

    Like I said above, you can either marinate your fish fillets in the sauce for a few hours before cooking, or just pour the sauce over the top of the fish when you cook it in the skillet. Add your mangoes right after the sauce so the juices can really seep through into the flavor.

    Such an easy recipe and you can garnish with some cilantro if you're a cilantro lover. Tastes amazing!

    Tag us on Instagram @grabthemangos and give us a rating and review right here in the comments! And don't forget to pin and save it for next time!

    This pan seared mahi mahi is so easy to make and so good! Made with a delicious Hawaiian sauce plus mango chunks to brighten it up. This is the best! Pinterest pin.

    More Sweet recipes for you to love

    • Smoked Salmon Crepes
    • Stir Fried Noodles
    • Easy Ramen Noodle Soup
    • Shrimp Fried Rice with Lemon

    Shop the post

    mahi mahi in a cast iron skillet with mango chunks and cilantro

    Hawaiian Style Mahi Mahi Recipe

    Yield: 3 fillets
    Prep Time: 10 minutes
    Cook Time: 6 minutes
    Total Time: 16 minutes

    This pan seared mahi mahi is so easy to make and so good! Made with a delicious Hawaiian sauce plus mango chunks to brighten it up. This is the best!

    Ingredients

    • 3 Mahi Mahi Fillets (skinless)
    • 1 tablespoon Coconut Oil
    • ½ cup Tamari (gluten free soy sauce)
    • 1 tablespoon Gluten Free Flour
    • 1 Garlic clove (minced)
    • 1 tablespoon Honey
    • 1 tablespoon Gluten Free Rice Vinegar
    • 1 cup Mango Chunks

    Instructions

    1. Making the Sauce: In a glass measuring cup or a bowl, whisk your tamari soy sauce, garlic, honey, gluten free rice vinegar, and gluten free flour together well.
    2. You can use this sauce to marinate your fish fillets for a couple hours before pan searing and cooking or you can pour it right over the fillets in the pan.
    3. In a skillet or frying pan, heat coconut oil over medium heat.
    4. Sear your fish on each side for about 2-3 minutes each. Note: if the fish doesn't want to release from the pan and is sticking, give it more time until it releases fairly easily and you can flip.
    5. If you didn't marinade, you can pour your sauce over the fish immediately.
    6. Add the mango chunks immediately as well and let the juices seep into the sauce and the fish.
    7. Fish should be flaky and tender when done covered in the sticky sauce.
    8. Top with some cilantro (optional) and enjoy!

    Recommended Products

    As an Amazon Associate and member of other affiliate programs, I earn from qualifying purchases.

    • San-J Tamari Gluten Free Soy Sauce,  Black Bottle, 10 Ounce
      San-J Tamari Gluten Free Soy Sauce,  Black Bottle, 10 Ounce
    • Stone-Derived Non-Stick Coating from Germany, Lava Black
      Stone-Derived Non-Stick Coating from Germany, Lava Black
    • Sea Best All Natural Mahi Mahi Fillets, 16 Ounce
      Sea Best All Natural Mahi Mahi Fillets, 16 Ounce
    Nutrition Information:
    Yield: 3 Serving Size: 1
    Amount Per Serving: Calories: 309Total Fat: 6gSaturated Fat: 4gTrans Fat: 0gUnsaturated Fat: 1gCholesterol: 149mgSodium: 2862mgCarbohydrates: 19gFiber: 1gSugar: 14gProtein: 44g

    Nutritional information is not always 100% accurate.

    © Miriam Reeves
    Cuisine: Hawaiian / Category: Main Meals

    Easy Ramen Noodle Soup Recipe

    December 30, 2019

    homemade ramen noodle soup with avocados and chop sticks

    Who didn't eat those weird little extreeeemely cheap packets of fake ramen noodles at some point in their lives? Usually when people think of ramen noodles, they think of those little packets of instant, gross, but somehow comforting, noodles. This easy ramen noodle soup recipe is levels above that for taste and health (let's be real those packets did everything for the bank account and nothing for your actual health). But we have kept the simplicity and ease in this ramen noodle soup recipe. This is my go to for an easy delicious weeknight dinner!

    Quick Ramen Noodles

    This post may contain affiliate links. If you click and buy, I may make a commission at no cost to you. See my policy for more information.

    Traditional ramen noodle takes around 3 days to make. It's an entire process which is AMAZING and you should definitely try getting some at some point in your life. But, I don't have the time for 3 day long meal with everything and everyone else I need to take care of.

    close up of easy ramen noodle soup with avocados and broth

    This is actually one of our go to favorite meals when it's a quick or late dinner type of night. This meal is dairy free, gluten free, and super customize-able.

    We use the BEST gluten free noodles ever from Thrive Market. Their Millet and Brown Rice Ramen Noodles are completely amazing and gluten free, keto friendly, delicious noodles. They are also super affordable at only $4.49 and there are four single serving blocks of noodles inside the bag- win!

    Lotus Foods Organic Millet & Brown Rice Ramen 10 oz bag

    If you don't have a Thrive Market membership, I highly recommend it especially if you are going (or are) on a special diet like gluten free, dairy free, keto, whole 30... etc. You can shop for things by diet and everything is wholesale priced. Get up to $20 in shopping credit when you purchase a Thrive Market Membership! (1 month, 3 month, and 1 year memberships available).

    Read more about going gluten free easily and on a budget to get the tips, why's, and even a shopping list!

    bowl full of ramen noodles and peas with tamari and broth

    How to Make Easy Ramen Noodle Soup

    So how do you make the BEST, easy, and quick ramen soup? Using your gluten free and amazing Millet and Brown Rice Noodles from Thrive Market (or whatever gluten free ramen noodles you prefer), boil them according to the package instructions. When they are done make sure to rinse in cold water.

    millet and brown rice ramen noodles gluten free

    While they are cooking, get started on that delicious broth. This broth uses chicken broth (vegetable broth works too if you want it to be vegan) and Tamari soy sauce. Tamari soy sauce is the gluten free version of soy sauce but it is also a richer and darker soy sauce than the regular kind. Honestly, use it even if you aren't gluten free. It's just that good.

    In a large sauce pot, saute your veggies (onions, sliced mushrooms, diced carrots, peas...) in some coconut oil. Once those have cooked almost all the way through and are softening, add your broth and Tamari. Heat on medium heat and add your ginger and umami. The umami seasoning gives this dish that real depth of flavor that is so yummy in a homemade real ramen noodle soup.

    mushroom and company umami seasoning blend from trader joes

    Serve noodles in a bowl and pour the broth mixture over the top until it resembles noodle soup. To store this away for left overs, keep the noodles and the broth mixture seperate. This way the the noodles don't become soggy and gross.

    hand using chop sticks to eat ramen noodle soup

    Enjoy with a soft boiled egg, our favorite- avocado, chicken, pork, fish, or any other delicious toppings you can think of!

    Tag us on Instagram @grabthemangos and give us a rating and review right here in the comments! And don't forget to pin and save it for next time!

    This easy ramen noodle soup recipe is gluten free and can be made with chicken, beef, shrimp, or even vegetarian. This healthier quick ramen noodle recipe is the best!

    More Sweet recipes for you to love

    • Healthy Gluten Free Banana Bread
    • Gluten Free Chocolate Chip Cookies
    • The Best Split Pea Soup
    • Dairy Free White Chicken Chili
    homemade ramen noodle soup with avocados and chop sticks

    Easy Ramen Noodle Soup Recipe

    Yield: 2
    Prep Time: 10 minutes
    Cook Time: 10 minutes
    Total Time: 20 minutes

    This easy ramen noodle soup recipe is gluten free and can be made with chicken, beef, shrimp, or even vegetarian. This healthier quick ramen noodle recipe is the best!

    Ingredients

    • 2 Blocks of Millet and Brown Rice Ramen Noodles (or enough of your favorite ramen for 2 people)
    • 1 tablespoon Coconut Oil
    • ¼ cup Peas
    • ½ Diced Yellow Onion
    • 1 Garlic Clove (minced)
    • ½ cup Broth
    • ¼ cup Tamari soy sauce
    • 1 tablespoon Gluten Free Rice Vinegar
    • ½ teaspoon Ground Ginger
    • ½ teaspoon Umami Seasoning
    • Optional Toppings: Avocado, Boiled Egg, Chicken, Beef, Shrimp... etc.

    Instructions

    1. In a large pot, boil water and cook ramen noodles as instructed on the packaging.
    2. While the noodles cook, in a sauce pan, saute your onions, peas, and garlic in 1 tablespoon coconut oil.
    3. Once the onions seem translucent and the veggies are cooked and softening, add your broth, tamari, and vinegar and heat over medium/high heat until simmering.
    4. Turn heat down and add your spices cooking for a few minutes to really get those flavors combined.
    5. Once done, ladle the broth mixture over the noodles in individual bowls. Keep whatever you don't eat separate so that the noodles don't become soggy and gross.
    6. Add your choice of yummy toppings and enjoy!
    Nutrition Information:
    Yield: 2 Serving Size: 1
    Amount Per Serving: Calories: 1014Total Fat: 48gSaturated Fat: 17gTrans Fat: 0gUnsaturated Fat: 26gCholesterol: 177mgSodium: 3857mgCarbohydrates: 99gFiber: 13gSugar: 6gProtein: 47g

    Nutritional information is not always 100% accurate.

    © Miriam Reeves
    Cuisine: Chinese / Category: Main Dish

    How to go Gluten Free Easily and On a Budget

    December 23, 2019

    gluten free groceries

    My very first non-recipe post. I have had this blog for almost a full year. Woohoo! It's only been gluten free since June, 2019, though. So going gluten free very suddenly and very thoroughly (as in no cheat days allowed over here), is still very fresh in my head space and in my home. This is my guide from someone who is currently experiencing this life change for how to go gluten free easily and on a budget. And trust me, it's not as scary or difficult as it sounds!

    Pin and save for later!

    how to go gluten free easily and on a budget guide for pinterest

    Gluten Free Guide!

    Get our gluten free shopping list guide for each meal of the day!

    Thank you!

    Be sure your check your promotions, sometimes we land there!

    .

    Why to go Gluten Free

    So let me preface this by saying, I am not a doctor. At all. I don't even have any aspirations to be a doctor. I am, however, a mom to a 4 year old little girl who started having severe stomach pains, hours of burping, constipation, visible bloating, and nausea just to name a few symptoms around Christmas of 2018 (this time last year).

    girl cutting gingerbread cookies out

    She got x-rays, blood work, a physical, and of course a test for just about every food intolerance. BINGO! There it was - severely intolerant to gluten and very sensitive to casein (a protein found in dairy). I started a food journal and everything for her just to figure all of this out. Every time this poor girl would eat a single bite of toast all of the sudden she was groaning about stomach pain, she couldn't stop burping, her stomach was visibly distended, and I was trying to comfort her while not imagining the worst.

    What does this all mean? Well, we went gluten free the very day the test was done and we got the results. I think you should always talk to a doctor before starting a drastic diet like this one. But if you are having any of these symptoms, start a food journal. Bring it with you to the doctor and explain, with evidence, why you think you need to go on a diet like this one or at least get some tests done.

    apples and fruits stacked up with groceries

    We don't know if my daughter has full on celiacs yet. We are still on this journey. But what I have found is that going gluten free does not always equal healthy living. You have to be careful, read labels, and not just assume the label "gluten free" equates to "healthy." That would be like assuming "fruit snack" are as healthy as fresh fruit. Just nope. But otherwise, it's a fairly simple change that we think has changed our diets and lives for the better, because it does lead you towards foods that are naturally healthier.

    What foods to avoid when Gluten Free

    There are foods to always avoid when you are gluten free because, well, they contain gluten. Let's break them down:

    • Wheat, Barley, Rye, and Triticale (a cross between wheat and rye)
    • Oats can be up for debate- They are naturally gluten free but most of the time are processed in a facility with gluten. We tend to play it safe and get the Aldi's Live G Free brand of certified gluten free rolled oats.
    • Different names for wheat to watch out for:
      • Durum, Einkorn, Emmer, Kamut, Spelt

    It may all seem like a lot to remember, but trust me, I don't remember all of these things every time I go shopping. When I look at a label I scan it for the allergens in bold at the bottom. (you learn to see the "gluten free" label really fast) If it says "contains" or even "may contain" wheat then definitely skip out on it. If it doesn't say that, then look through the ingredient list or ding ding ding!! you have the world in your pocket. Look up that product quick and ask google if it contains gluten.

    gluten free millet brown rice ramen noodles next to a gluten free cake mix

    These days it's actually become fairly easy to go gluten free because most things have a gluten free label somewhere on them, even the things that don't need it. Eggs are naturally gluten free (face palm). Be careful not to pay extra for things that obviously won't have gluten in them.

    That being said, be careful with things like - breading, seasonings, things with vinegar (ketchup, mustard, bbq sauce, pickles... etc.), and sauces. These all can contain gluten where you wouldn't expect it.

    Best Place to Buy Gluten Free

    This post may contain affiliate links. If you click and buy, I may make a commission at no cost to you. See my policy for more information.

    The easiest way to go gluten free without any extra effort and while staying super cost efficient is by doing it with Thrive Market. This membership is super affordable and honestly made every stress I had about how to go gluten free melt away. With thrive market you can shop for everything you need right under "gluten free diet." All your gluten free shopping in one easy place.

    bottle of tamari soy sauce surrounded by other gluten free groceries

    Is Thrive Market worth the Membership?

    The best part about a Thrive Market membership is the savings. Like MAJOR savings. Get up to $20 in shopping credit when you purchase a Thrive Market Membership! (1 month, 3 month, and 1 year memberships available). The membership itself is super affordable and Thrive guarantees that you will make your membership cost back in savings. Most people make it back within two orders. The cool part? They will reimburse you the difference of whatever you don't make back. That's how great they are. So not only do they have the option to shop only gluten free foods (such a time saver and stress relief), they make it extremely affordable. Everything they sell is sold at wholesale prices. This is major in the gluten free world especially where everything tends to be a little more pricey.

    Needless to say, we order a lot from Thrive Market every month. Things like ketchup, pickles, mustard, and even vitamins (yep, even vitamins and supplements can be hiding gluten in the fillers). Thrive makes it easy by showing you gluten free without you having to hunt it down.

    What foods you CAN eat when gluten free

    This is the part that really makes the difference. If you have plenty of gluten free foods you like stocked up in your kitchen, you honestly won't notice that you've even gone gluten free.

    Gluten Free Guide!

    Get our gluten free shopping list guide for each meal of the day!

    Thank you!

    Be sure your check your promotions, sometimes we land there!

    .

    Foods to stock up on and eat when you are going gluten free:

    • Protein like meats, fish, or tofu.
    • Veggies
    • Fruits
    • Things made with potatoes, corn, or corn flour have become a norm for us (ex: plain corn tortilla chips, plain potato chips, things like veggie straws or chickpea cheeto puffs, pop corn... etc.)

    If you want to be healthy while figuring out how to go gluten free, remember that simply avoiding gluten doesn't always make the diet healthy. Most of the gluten free processed and pre-made foods out there still have unhealthy fillers and ingredients. The same living healthy and balanced rules apply. Eat lots of fruits, veggies, and protein, and when going for dessert (which IS a part of a healthy diet so don't stop treating yourself) think of things like ice cream or sorbet.

    Once again, Thrive Market wins and has tons of gluten free groceries and options. One of our favorite finds- their sugar free (gluten free) Ketchup. Did you know that ketchup has more sugar in it than a chocolate chip cookie? Yeah it shocked me too, but they sneak it in. Well Thrive's Primal Ketchup doesn't and it tastes incredible. That's just one example!

    box of frozen fruit bars and gluten free groceries and foods

    How to actually go Gluten Free easily

    Alright, so finally, now that the technicals are out of the way and we are all on the same page, let's talk about how to actually do this whole process.

    My simple advice- donate or give away everything in your pantry with gluten first. If it's there, you'll either cave and eat it because you are used to it, or you won't have space for what you need in your new diet and things can get confusing.

    gluten free flour and almond flour

    Get rid of it all. Once you have purged, you can go shopping for your new gluten free diet. Break it down by meals and don't forget snacks. Make sure it's all stuff you love to eat anyways. You will soon get used to buying specific brands that you trust, looking for the right ingredients in the blink of an eye... etc. Honestly, to make this jump you need to trust yourself to be creative and make it work. Shop from places like Thrive Market and make it easier and less complicated.

    If you have kiddos and are going gluten free with/for them, the best tip I have is to always have a gluten free snack they like on hand especially when you are going out. It can be really hard for them to see other kids eating snack they can't have anymore. So a good way to make sure they never feel left out or upset about it (at least not too much), is to make sure you have something similar for them that is gluten free.

    Another amazing resource for getting gluten free foods to keep your life happy and sane is Three Bakers Gluten Free Bakery. If you just need those breads, pizza doughs, buns, etc. you have to try out Three Bakers stuff. Not only are they a great resource for gluten free baked goods, they have articles on healthy eating and even more resources for gluten free life on their blog.

    How to keep it on a budget

    Last but not least, gluten free can be expensive right? I've already mentioned how much money (and sanity) Thrive Market can save. Beyond that to help you save even more, this is my super simple and straightforward advice on this point: don't replace, remove. Don't replace bread with super expensive gluten free bread. Trust me, we used to eat sandwiches every day for lunch almost so I know this may seem daunting. Now, instead we eat tasty chicken salads, lettuce wraps, soups, and honestly a lot of leftovers. But not sandwiches. Our gluten free breads have become treats we buy rarely. So instead of thinking about how much more expensive gluten free versions are, don't replace- remove.

    Try some of our favorite gluten free recipes so you can see how painless and actually tasty this process is- no weird, unheard of ingredients:

    • 3 Ingredient Brownies
    • Gluten Free Cornbread Muffins
    • Quiche with Sweet Potato Crust
    • Gluten Free Chocolate Chip Cookies
    • Chocolate Coconut Bread
    • Gluten Free Sweet Potato Gnocchi

    If you want this broken down into a full shopping list, we have our Gluten Free Shopping List of ideas broken down meal by meal including snacks and desserts and which stores they can be found at. Check it out!

    Gluten Free Guide!

    Get our gluten free shopping list guide for each meal of the day!

    Thank you!

    Be sure your check your promotions, sometimes we land there!

    .

    Gluten Free Healthy Banana Bread

    December 19, 2019

    gluten free chocolate chip banana bread with a bite out of it

    Everyone needs a great banana bread recipe. It's just a staple. This gluten free healthy banana bread recipe is so easy to make, extra moist, and honestly the best. A healthy banana bread recipe is something I can get on board with because we scarf it down when it's in our house. That thing doesn't stand a chance. It never lasts more than two days maybe so it's nice when you know it's not loaded up with sugar. We love banana bread for breakfast, snacks, running out the door... etc. This recipe is gluten free and dairy free and is our favorite with chocolate chips.

    How to make Healthy Banana Bread

    So this recipe is super simple. Some tips for using bananas in baking: make sure they are beyond just ripe. That is the most important part of using bananas in baking. Make sure your bananas are at the "peel is turning brown" point. This gives the bread so much flavor and makes it extra moist and delicious.

    close up of melted chocolate chips inside healthy banana bread

    This banana bread is healthy because it has far less sugar than other recipes. In fact it uses maple syrup, not processed and refined sugar. So a little gluten free flour, almond flour, eggs, and of course over-ripe bananas, and you have a delicious healthy banana bread ready to eat.

    Easy Gluten Free Banana Bread

    In a large bowl, beat your bananas, eggs, and extra virgin olive oil together using either a fork to mash it all together or electric beaters. Add your coconut milk- ONLY the creamy top part which is about ⅓ cup of coconut milk. Save the watery part for smoothies. The best brand to use is definitely Thai Kitchen's coconut milk with it's amazingly creamy texture.

    Pour in the maple syrup, salt, and vanilla and blend all together. In the same bowl (this is a one bowl recipe because it's the best), add your gluten free flour. I highly recommend Bob's red Mill 1-1 ratio gluten free flour blend. It works so well and doesn't make the bread a brick.

    whole loaf of banana bread

    Add your almond flour, coconut flour, and baking soda as well. Combine all together and mix well to make your batter come together. Here is where we always add a cup of dark chocolate chips, but it is optional. Trust me though, treat yourself and always put the chocolate chips in.

    Pour your batter into a greased bread loaf pan and bake at 350 for about an hour. If you insert a toothpick or butter knife into the center of the bread at the end of baking and it comes out clean, it's done. If not add about 10 more minutes and check again.

    sliced chocolate chip gluten free healthy banana bread loaf

    Tip: if you've added the chocolate chips, remember to look for batter on the toothpick not just melted chocolate. Melted chocolate is great, raw batter is not so much.

    Make sure to let your loaf cool and set before cutting into it and eating. Enjoy!

    Tag us on Instagram @grabthemangos and give us a rating and review right here in the comments! And don't forget to pin and save it for next time!

    pinterest pin for gluten free and dairy free healthy chocolate chip banana bread

    More Sweet recipes for you to love

    • Chocolate Coconut Bread
    • Apple Zucchini Bread
    • Banana Oat Pancakes
    • Gluten Free Chocolate Chip Cookies
    gluten free chocolate chip banana bread with a bite out of it

    Gluten Free Healthy Banana Bread

    Yield: 1 loaf
    Prep Time: 10 minutes
    Cook Time: 1 hour
    Cool Time: 30 minutes
    Total Time: 1 hour 40 minutes

    This healthy banana bread loaf recipe is made with no sugar, gluten free, dairy free, and of course with the option of chocolate chips. Made with almond flour and coconut flour as well as extra virgin olive oil and maple syrup for a super delicious and moist banana bread!

    Ingredients

    • 3 Over Ripe Bananas
    • 2 Eggs
    • ½ cup Extra Virgin Olive Oil
    • 1 teaspoon Vanilla
    • ⅓ cup Coconut Milk (only the top creamy part, not the watery part)
    • ½ cup Maple Syrup
    • ½ cup Almond Flour
    • ⅓ cup Coconut Flour
    • 1 cup Bob's Red Mill Gluten Free Flour
    • Pinch of Salt
    • 1 teaspoon Baking Soda
    • (optional: 1 cup Chocolate Chips)

    Instructions

    1. Pre-heat oven to 350.
    2. In a large mixing bowl, mash together the bananas, olive oil, and eggs until creamy.
    3. Add the vanilla, maple syrup, and creamy top part of the coconut milk (save the watery part for smoothies).
    4. Blend all of this together well.
    5. Add your flours, baking soda, and salt to the liquid mixture and mix thoroughly into a batter.
    6. Optional: add your chocolate chips here and fold in well.
    7. Pour into a greased bread loaf pan.
    8. Bake at 350 for 1 hour or until a toothpick or butter knife, inserted in the middle, comes out clean (ignore melted chocolate- look for no raw batter).
    9. Once done, let it cool and set for at least 30 minutes before cutting and eating.
    10. Enjoy!
    Nutrition Information:
    Yield: 5 Serving Size: 1
    Amount Per Serving: Calories: 594Total Fat: 34gSaturated Fat: 8gTrans Fat: 0gUnsaturated Fat: 25gCholesterol: 74mgSodium: 319mgCarbohydrates: 65gFiber: 5gSugar: 30gProtein: 10g

    Nutritional information is not always 100% accurate.

    © Miriam
    Cuisine: American / Category: Bread

    Gluten Free Thumbprint Cookies (Dairy Free)

    December 12, 2019

    blueberry thumbprint cookies gluten free and dairy free spread out

    Christmas cookie season is in full swing and I can tell you we have already eaten WAY too many. Then again, is there such a thing as too many Christmas cookies? I don't think so. These gluten free thumbprint cookies are some of our favorites to make. Each time we fill them with something different from the blueberry preserves (pictured) to butterscotch chips melted in a puddle in the center (so good). No matter what you fill it with (and we have LOTS of ideas for you), these cookies are somehow gluten and dairy free and yet taste like the perfect buttery crumbly cookie you love!

    The Best Gluten Free Christmas Cookies

    This is our first holiday season and Christmas that we are gluten free. My 4 year old still can't even stomach gluten (she is in a lot of pain if she eats it at all and it won't stay down). While it's so sad to me that she has to deal with this, I'm honestly so grateful that we are living in a time where people are so aware of "gluten free" that it's very easy to live with once you get the hang of it.

    buttery dairy free thumbprint christmas cookies with blueberry preserve filling back-lit

    While she still misses things like having sandwiches whenever she wants for lunch or being able to get the chicken nuggets if we go out for the occasional junk food, she is honestly a champ.

    So of course, I was not going to let my champ go without Christmas cookies this year. We have already made our soft and chewy almond sugar cookies, molasses oatmeal cookies, gingerbread cookies and house, and now these gluten free thumbprint cookies!

    thumbprint cookie with a bite taken out of it and jam spilling out

    Blueberry Thumbprint Cookies Recipe

    These gluten free thumbprint cookies are made with a combination of Bob's Red Mill 1-1 gluten free flour and Almond Flour. They are also made dairy free with refined coconut oil which leaves them with zero coconut flavor. Instead they have a rich, almost buttery, flavor that is ahhmazing.

    In a medium mixing bowl, combine your gluten free flour, almond flour, baking powder, and salt. Whisk these together well to get any clumping out of the almond flour especially. In a separate large mixing bowl, cream together your solid refined coconut oil, egg, sugar, and vanilla. Make sure to keep the coconut oil solid the same way you would for butter. Simply use a spoon to scoop it into your measuring cup and press into it. Give it a few pokes all the way through too to make sure their aren't any hidden air bubbles.

    pressing a thumb into the center of a gluten free cookie

    Add the flour mixture to the creamed sugar mixture and combine well to form a nice soft dough. Roll into balls or use a cookie scooper and place on a parchment lined baking sheet about an inch apart from each other. Using your thumb, press an indent into the middle of the cookie about half way down. You basically want enough of a crater there to hold some jam or your filling of choice.

    filling a thumbprint cookie with blueberry preserves

    We prefer to fill the cookies first and then bake, but you can definitely bake and then fill if you like that better. Either way you get a delicious cookie! Bake these at 350 for 13-14 minutes until the edges are just beginning to brown. Let them cool and then dig in and sing jingle bells at the TOP of your lungs. Only way to do it 😉 Enjoy!

    gluten and dairy free thumbprint cookies with jam

    Tag us on Instagram @grabthemangos and give us a rating and review right here in the comments! And don't forget to pin and save it for next time!

    These gluten free thumbprint cookies are so delicious! Totally gluten and dairy free and filled with blueberry preserves with lots of other options too.

    More Sweet recipes for you to love

    • Gluten Free Almond Cookies
    • Healthier Gingerbread House and Cookies
    • Chickpea Molasses Oatmeal Cookies
    • The Best Gluten + Dairy Free Chocolate Chip Cookies
    blueberry thumbprint cookies gluten free and dairy free spread out

    Gluten Free Thumbprint Cookies (Dairy Free)

    Yield: 12-15 cookies
    Prep Time: 10 minutes
    Cook Time: 13 minutes
    Total Time: 23 minutes

    These gluten free thumbprint cookies are so delicious! Totally gluten and dairy free and filled with blueberry preserves with lots of other options too.

    Ingredients

    • 1 ¼ cup Bob's Red Mill Gluten Free Flour
    • ½ cup Almond Flour
    • ½ teaspoon Baking Powder
    • Pinch of Salt
    • ¾ cup Refined Coconut Oil
    • 1 Egg
    • 1 teaspoon Vanilla
    • ½ cup Sugar

    Instructions

    1. Pre-heat oven to 350.
    2. In a medium mixing bowl, combine the gluten free flour, almond flour, baking powder, and salt. Whisk well to get rid of any clumps.
    3. In a separate large mixing bowl, combine coconut oil (not melted), sugar, vanilla, and egg with a hand mixer. Cream for at least 2 minutes to get it really smooth.
    4. Add the flour mixture into the sugar mixture and combine into a nice soft dough.
    5. Using a cookie scooper or your hands to make little dough balls, place on a baking sheet lined with parchment paper at least 1 inch apart.
    6. Using your thumb, press into the center of each cookie only about half way down.
    7. Fill the small crater with your filling of choice and bake for 13-14 minutes until the edges have just begun to brown.
    8. Let them set and cool and then enjoy!

    Notes

    Filling Ideas:

    Blueberry Preserves (as pictured)

    Spiced Orange Marmalade

    Raspberry Jam

    Apricot Jam

    Chocolate Chips

    Butterscotch Chips

    Peanut Butter chips

    Nutella

    Lemon Curd

    Nutrition Information:
    Yield: 15 Serving Size: 1
    Amount Per Serving: Calories: 181Total Fat: 13gSaturated Fat: 9gTrans Fat: 0gUnsaturated Fat: 3gCholesterol: 12mgSodium: 30mgCarbohydrates: 14gFiber: 1gSugar: 7gProtein: 2g

    Nutritional information is not always 100% accurate.

    © Miriam
    Cuisine: American / Category: Cookies

    Gluten and Dairy Free Chocolate Chip Cookies

    December 9, 2019

    gluten free chocolate chip cookie with dairy free melted chocolate chips

    The ultimate, easy, and absolutely delicious classic chocolate chip cookie is finally right here for you to get you through the rest of winter. This gluten free and dairy free chocolate chip cookies recipe is so scrumptious! No weird un-heard of ingredients; no tricks; no veggies thrown in; and not "healthy". Just the chocolate chip cookie you want, love, and NEED without the dairy and/or gluten that may kill your stomach. Perfect!

    The Best Chocolate Chip Cookies

    This recipe is only for those people who want their cookies to stay cookies. I am all for eating healthy. We strive for intuitive and balanced eating in our house. Which means- not making absolutely everything healthy. You can find a lot of healthy recipes and healthy versions of this and that on this blog. But chocolate chip cookies are sacred. They need to stay piles of cookie dough and chocolate chips to stuff our faces with while drinking our morning coffee before our kids find us in the morning.

    stack of chocolate chip cookies

    So let's make some classic gluten and dairy free chocolate chip cookies!

    Which gluten free flour is best for cookies?

    My all time favorite gluten free flour for cookies (or baking in general) is Bob's Red Mill 1-1 Ratio Gluten Free Flour. This is my own opinion, not paid or sponsored at all. I truly love their products in general but we always have at least 2 bags of this flour in our house.

    I always like to do a combination of this gluten free flour and some almond flour. I have found that this really helps to lighten it up (gluten free baking can be dense) and give it a nice texture as well.

    melted gooey chocolate chips in a cookie

    Which chocolate chips are gluten free AND dairy free?

    Most Nestle chocolate chips say gluten free on them and are gluten free. The trick is which are also dairy free. Obviously milk chocolate isn't going to work out for truly dairy free chocolate chip cookies.

    a partly eaten chocolate chip cookie with melted chocolate dripping down

    I have seen big bags of vegan chocolate chips at Costco so you can always look there. But if you want to just order some right your house so you don't even have to go outside- these (linked) Lily's dark chocolate chips are what we buy.

    What can replace butter in cookies?

    Coconut Oil is the best butter replacement. If you don't want any kind of coconut flavor in your cookies, no problem. Get the refined coconut oil (or triple refined) and you won't taste anything but a perfect dairy free chocolate chip cookie. They sell this at Target, Walmart or of course Amazon.

    platter full of chocolate chip cookies

    When measuring out your coconut oil, simple spoon it into your measuring cup. Make sure to press it down and give it a few pokes to get rid of any trapped air bubbles that may happen. Easy and simple and much easier (and cheaper) than trying to find a good vegan butter in my opinion.

    How to make dairy free Chocolate Chip Cookies

    In a medium bowl, mix together your gluten free flour, almond flour, baking soda, and salt. Whisk it together thoroughly to get any clumps out. In a separate large bowl, cream together your coconut oil, sugar, brown sugar, eggs, and vanilla with beaters until smooth. Slowly add the flour mixture into the creamed sugar mixture and form a soft cookie dough. Add in your chocolate chips and fold all together.

    close up of the best gluten and dairy free chocolate chip cookies

    Using a cookie scooper or a spoon, scoop tablespoon sized scoops onto a baking sheet about an inch apart. Bake at 375 for about 9 minutes until the edges are golden brown. Let them cool and set before eating (or don't, we don't judge), and enjoy!

    Tag us on Instagram @grabthemangos and give us a rating and review right here in the comments! And don't forget to pin and save it for next time!

    These chocolate chip cookies are totally gluten free and dairy free and amazing! Crisp golden brown edges with a soft and gooey center full of chocolate. YUM!

    More Sweet recipes for you to love

    • Gluten Free Gingerbread House (and cookies)
    • Dairy Free Flaky Pie Crust
    • Dairy Free Eggnog
    • Gluten Free Almond Cookies
    gluten free chocolate chip cookie with dairy free melted chocolate chips

    Gluten and Dairy Free Chocolate Chip Cookies

    Yield: 15-18 cookies
    Prep Time: 15 minutes
    Cook Time: 9 minutes
    Total Time: 24 minutes

    These chocolate chip cookies are totally gluten free and dairy free and amazing! Crisp golden brown edges with a soft and gooey center full of chocolate. YUM!

    Ingredients

    • 2 cups Bob's Red Mill Gluten Free Flour
    • ¼ cup Almond Flour
    • 1 teaspoon Baking Soda
    • 1 cup Refined Coconut Oil (not melted)
    • 2 Eggs
    • ¾ cup Sugar
    • ¾ cup Brown Sugar
    • 1 teaspoon Vanilla
    • 1 cup Dairy Free Chocolate Chips

    Instructions

    1. Pre-heat the oven to 375.
    2. In a medium mixing bowl, whisk together the gluten free flour, almond flour, and baking soda.
    3. In a large bowl, cream together the coconut oil (not melted), sugar, brown sugar, eggs, and vanilla.
    4. Slowly mix the flour mixture into the oil and sugar mixture to form a soft cookie dough.
    5. Add in the chocolate chips and fold all together.
    6. Using a cookie scooper or a spoon, scoop approximately a tablespoon of dough onto a baking sheet at least 1 inch apart.
    7. Bake for 8-10 minutes until the edges get golden brown.
    8. Let them cool and enjoy!
    Nutrition Information:
    Yield: 12 Serving Size: 1
    Amount Per Serving: Calories: 426Total Fat: 25gSaturated Fat: 18gTrans Fat: 0gUnsaturated Fat: 5gCholesterol: 31mgSodium: 122mgCarbohydrates: 49gFiber: 2gSugar: 32gProtein: 4g

    Nutritional information is not always 100% accurate.

    © Miriam
    Cuisine: American / Category: Cookies

    The Best Dairy Free Eggnog with Almond Milk

    December 4, 2019

    glass of the best dairy free eggnog with almond milk and sprinkled nutmeg and a cinnamon stick

    This eggnog recipe is SO yummy and should definitely make it's way into your holiday traditions. It really is the best dairy free eggnog. Made with almond milk and the classic eggs, sugar, and spices, you really can't go wrong. No trick or weird ingredients. Just dairy free and creamy with all those warm holiday spices that you live for!

    Best Dairy Free Eggnog Recipe

    Making my dairy free eggnog recipe has been a goal this entire holiday season. We absolutely love eggnog in our house. I grew up drink so much more of it than I even want to admit when it was Thanksgiving and Christmas time. So of course, I can't even resist buying some whenever I see it in the stores. My kids are now addicted too. I think it would be a year round treat if we could manage to make it that often.

    hand stirring eggnog with a cinnamon stick

    Normally, I love the stuff out of the carton in the stores but one year we got curious and decided to make our own. Woah- homemade eggnog is actual heaven in a cup! It's one of those things, like fresh pasta, or a homemade pie, where the store bought just doesn't come close.

    We drank a lot of that stuff that year. Now we are dairy free, though, so all that cream and milk had to go but my daughter has still been asking for eggnog. Of course this means I had to make a recipe.

    2 glasses of almond milk eggnog with jingle bells and cinnamon sticks

    Homemade Almond Milk Eggnog

    Making this almond milk eggnog is super easy. There is one trick to follow religiously- heat low and slow and be patient. When you are cooking eggs in a liquid mixture like this for the purpose of thickening it up, almost like a custard, heating too fast will just give you scrambled eggs. Trust me, you don't want to be serving or drinking some weird spiced scrambled egg liquid. Gross!

    looking into the cup full of the best dairy free eggnog

    Follow that rule, and you're golden. In a large saucepan, mix your egg yolks (just the yolks, not the whites- save the whites for some meringue cookies), and sugar. Whisk it together until creamy, then add half of your almond milk and whisk until completely mixed in. Turn the burner on low heat and continue whisking until a thermometer reads 180F. This will take around 10 or more minutes depending on your particular stove.

    a red jingle bell between two glasses of eggnog

    If you do wind up accidentally coming out with a grainy texture in your eggnog from over heating too quickly, simply put it in the blender for a minute to smooth it out.

    Once your egg and milk mixture has reached 180F, remove from the heat and slowly stir in the rest of the almond milk. Whisk in your spices and place in a glass jar to keep in the fridge. Let this mixture cool in the fridge for at least 2-3 hours to let it thicken and chill. Enjoy with a shot of rum or brandy, or just plain with some sprinkled nutmeg on top!

    hand reaching for a glass of homemade dairy free eggnog

    Tag us on Instagram @grabthemangos and give us a rating and review right here in the comments! And don't forget to pin and save it for next time!

    This amazing dairy free eggnog recipe uses almond milk with the classic ingredients and spices! So easy and simple to make and so yummy.

    More Sweet recipes for you to love

    • Hot Chocolate Mix - dairy free
    • Gluten Free Gingerbread House
    • Flaky Gluten Free Pie Crust
    • Chickpea Molasses Cookies
    glass of the best dairy free eggnog with almond milk and sprinkled nutmeg and a cinnamon stick

    The Best Dairy Free Eggnog with Almond Milk

    Yield: 4-5 cups
    Prep Time: 5 minutes
    Cook Time: 10 minutes
    Chill Time: 2 hours
    Total Time: 2 hours 15 minutes

    This amazing dairy free eggnog recipe uses almond milk with the classic ingredients and spices! So easy and simple to make and so yummy.

    Ingredients

    • 9 Egg Yolks (just yolks, not whites)
    • ¾ cup Sugar
    • 4 cups Almond Milk
    • 1 teaspoon Nutmeg
    • ½ teaspoon Cinnamon
    • ¼ teaspoon Ginger
    • ¼ teaspoon Cloves

    Instructions

    1. In a medium sauce pan, whisk together your yolks and sugar until creamy.
    2. Add in 2 cups of Almond Milk and whisk until thoroughly combined.
    3. Turn on low heat and continue whisking until a thermometer reads 180F in the mixture (be patient and don't heat too quickly, may take 10-15 minutes depending on your stove).
    4. Once that temperature has been reached, then you can remove from heat and slowly add in the rest of the Almond milk mixing well.
    5. Add your spices and whisk all together.
    6. Store in a jar in the fridge to chill for at least 2-3 hours while it thickens.
    7. Enjoy plain or with a shot of rum or brandy or just a sprinkling of extra nutmeg!
    Nutrition Information:
    Yield: 5 Serving Size: 1
    Amount Per Serving: Calories: 263Total Fat: 10gSaturated Fat: 3gTrans Fat: 0gUnsaturated Fat: 7gCholesterol: 332mgSodium: 23mgCarbohydrates: 38gFiber: 1gSugar: 36gProtein: 6g

    Nutritional information is not always 100% accurate.

    © Miriam
    Cuisine: American / Category: Drinks

    Flaky Gluten Free Pie Crust Recipe (+ dairy free)

    November 26, 2019

    a flaky baked pie crust in a red holiday pie dish

    A light and flaky gluten free pie crust recipe is hard to find. This one is also dairy free and honestly, it's all you need for the rest of your life. Ok so that's a touch dramatic, but it really is such an amazing pie crust recipe. Pie crust can be hard enough, but then take away the gluten and the butter and all you're left with is powder and some water... not great. THIS recipe, though, knocks those preconceived notions of what a gluten free and dairy free pie crust can be.

    Gluten Free Vegan Pie Crust

    This gluten free pie crust is totally dairy free and vegan using just five ingredients- Bob's Red Mill Gluten Free Flour, Almond Flour, Refined Coconut Oil, Iced Water, and a little Sugar (make sure it's a brand like Zulka's Sugar if you want it to be truly vegan). This crust is simple and easy to make and is the same technique as a normal pie crust.

    A bowl for mixing up some pie crust dough with bob's red mill gluten free flour and coconut oil

    Coconut oil acts in much the same way as shortening or butter. If you don't like that coconut flavor though, get the refined, or even triple refined coconut oil which has the same properties but none of the flavor. You can find it at Target or Walmart or, hey, Amazon prime is everyone's best friend.

    How to make a Flaky Pie Crust

    Making this flaky gluten free pie crust recipe is fairly simple, so here are the key pointers/tips:

    • Don't melt your coconut oil. You need your coconut oil to stay in it's soft but solid state so that it can melt in the crust while baking, giving off steam and creating the layers of flaky pie crust.
    • Measure your coconut oil by spooning it into a measuring cup. Really press it in to try to get any potential air bubbles that might be hiding out.
    • Use really really cold ice water. Again, you don't want your coconut oil to melt before hitting the oven.
    • Add a tablespoon more of ice water at a time until you reach an elastic and slightly sticky dough.

    Like I said, this recipe is fairly easy and has many of the same basic techniques of a regular pie crust.

    This recipe makes two pie crusts so make sure to split in half before pressing into your pie plate. A gluten free pie crust does tend to work better if you press the dough into the pie plate to shape and form vs. rolling it out. If you are having any trouble with crumbling pie dough when you roll it out, it's too dry and you should add 1 tablespoon at a time of ice water to the dough, working it in until you reach a better consistency.

    a gluten free and dairy free pie crust pressed into a pie dish

    Depending on what kind of pie you are making, you may proceed with your recipe a little differently. You will either put pie weights in the pie dish on top of your raw crust and bake it alone. Or you will put your filling in and then bake. Make sure to follow whatever pie recipe you are making after you've completed your dough. Enjoy!

    a crimped pie crust ready to bake

    Tag us on Instagram @grabthemangos and give us a rating and review right here in the comments! And don't forget to pin and save it for next time!

    This easy gluten free pie crust recipe is made totally vegan and is so flaky and perfect! Made with bob's red mill flour and almond flour, plus refined coconut oil to give it that same buttery flavor! So good!

    More Sweet recipes for you to love

    • Chickpea Pumpkin Pie
    • Gluten + Dairy Free Cornbread Stuffing with Sausage
    • Gluten Free Gingerbread House
    • Dairy + Gluten Free Green Bean Casserole
    a flaky baked pie crust in a red holiday pie dish

    Flaky Gluten Free Pie Crust Recipe (+ dairy free)

    Yield: 2 pie crusts
    Prep Time: 25 minutes
    Cook Time: 20 minutes
    Total Time: 45 minutes

    This easy gluten free pie crust recipe is made totally vegan and is so flaky and perfect! Made with bob's red mill flour and almond flour, plus refined coconut oil to give it that same buttery flavor! So good!

    Ingredients

    • 2 cups Bob's Red Mill Gluten Free Flour
    • ½ cup Almond Flour
    • 1 tablespoon Sugar
    • 1 cup Refined Coconut Oil
    • 10-12 tablespoon Ice Water

    Instructions

    1. In a large bowl whisk together your gluten free flour, almond flour, and sugar.
    2. Measure your coconut oil (do not melt it!) by spooning it into a measuring cup and pressing down to get rid of any air bubbles.
    3. Add the coconut oil to the flour mixture and using your fingers combine into a crumbly dough.
    4. Add your ice water starting with 10 tablespoon and if you need any more, adding only 1 tablespoon at a time until you have a slightly sticky elastic dough.
    5. This pie crust works really well just pressed into the pie dish for an easy and delicious result. Roll out to make your top. If you are having trouble with crumbling at all, it is too dry and you need to add more water (again 1 tablespoon at a time).
    6. Follow your specific pie's instructions on filling and baking.
    7. If you are baking before filling, then bake for 20-25 minutes at 375.
    Nutrition Information:
    Yield: 8 Serving Size: 1
    Amount Per Serving: Calories: 403Total Fat: 31gSaturated Fat: 23gTrans Fat: 0gUnsaturated Fat: 5gCholesterol: 0mgSodium: 10mgCarbohydrates: 27gFiber: 2gSugar: 2gProtein: 5g

    Nutritional information is not always 100% accurate.

    © Miriam
    Cuisine: American / Category: Dessert

    Gluten Free Cornbread Stuffing with Sausage (dairy free)

    November 24, 2019

    overhead shot of gluten free cornbread stuffing with sausage

    Stuffing is the STAR of Thanksgiving. Change my mind. No, seriously though, this gluten free cornbread stuffing with sausage is actually so good, it may outshine your turkey this year. Made with celery, Italian sausage, fresh herbs, and of course homemade gluten free cornbread. This cornbread stuffing recipe is amazeballz! Did I mention it's also dairy free? Because it definitely is.

    Gluten Free Dairy Free Cornbread Stuffing

    Trust me when I tell you, this cornbread stuffing with sausage is something I would make even if we were not a gluten free or dairy free family. It really is that good! Every single year, my family wants this stuffing multiple times before thanksgiving even arrives.

    • a bowl spilling cornbread cubes out

    You are going to start this recipe with our FAVORITE Gluten Free Cornbread Muffins Recipe (linked). This recipe is easy to make and makes the best little cornbread muffins which work beautifully for this stuffing.

    How do you dry cornbread for stuffing?

    Making a stuffing or dressing from scratch is much easier than it sounds. To dry out your cornbread muffins for stuffing, cut them into bite sized cubes first. The oven should be pre-heated to a lower temperature than normal baking temps (250).

    side view of delicious browned crispy cornbread stuffing

    Spray a baking sheet down with olive oil or nonstick spray and spread the cubes from your muffins out evenly on the baking sheet. Bake for one hour at 250. Lightly toss them around to mix them up in the middle of baking them to make sure they dry out evenly.

    When they are done drying out, you can leave them out on the pan set aside while you prepare the rest of the ingredients. A really good idea for thanksgiving would be to make these the day before and let them sit out overnight to dry out even more. But, this one hour in the oven works like a charm right away too!

    Cornbread and Sausage Stuffing

    Cornbread and savory sausage just sound like they belong together on your plate. A little bit of sweet with a little bit of savory and spices.

    Mild Italian sausage cooking in a skillet with celery

    In a skillet or large frying pan, cook one pound of Mild Italian Sausage, breaking it up into bite sized chunks as it cooks. Add about one cup of chopped celery to the sausage and let it all cook together thoroughly.

    pouring chicken broth and herbs into the stuffing

    When the sausage is done and cooked through, add it and the dried cornbread to a big bowl and toss together. In a separate bowl, beat your eggs, olive oil, chicken broth, garlic, and herbs and spices together. Remember that chicken broth has a good amount of salty flavor already so you may want to add the salt later or just go easy with it.

    close up of the browned cornbread stuffing

    Mix the liquid egg and broth mixture with the cornbread and sausage in the big bowl. Pour everything into a greased baking dish evenly and cover with tin foil. Bake at 350 for 30 minutes. After 30 minutes, remove the tin foil, drizzle two tablespoons of olive oil over the top and bake uncovered for another 30 minutes. It should come out browned on the top and so so yummy smelling! Enjoy!

    spoon for scooping the stuffing out of the dish

    Tag us on Instagram @grabthemangos and give us a rating and review right here in the comments! And don't forget to pin and save it for next time!

    gluten free dairy free cornbread stuffing with sausage

    More Sweet recipes for you to love

    • Chickpea Pumpkin Pie
    • Dairy Free + Gluten Free Green Bean Casserole
    • Gluten Free Gingerbread House (+ cookies)
    • Creamy Dairy Free Hot Cocoa Mix
    overhead shot of gluten free cornbread stuffing with sausage

    Gluten Free Cornbread Stuffing with Sausage (dairy free)

    Yield: 6 people
    Prep Time: 1 hour 20 minutes
    Cook Time: 1 hour
    Total Time: 2 hours 20 minutes

    This gluten free cornbread stuffing is made with sausage and celery plus fresh herbs and spices and is also totally dairy free! The best part of Thanksgiving.

    Ingredients

    • Our Gluten Free Cornbread Muffins - all cubed (linked above and in instructions)
    • 1 lb Mild Italian Sausage
    • 1 cup Chopped Celery
    • 2 cups Chicken Broth
    • ¼ cup Chopped Fresh Parsley
    • ¼ cup Chopped Fresh Thyme
    • 2 Minced Garlic Cloves
    • ¼ cup Extra Virgin Olive Oil (+ 2 tablespoon for drizzling later)
    • Salt and Pepper to taste (note: chicken broth has a good amount of sodium in it so salt lightly at first and add more as needed)
    • 2 Eggs

    Instructions

    1. Make our gluten and dairy free cornbread muffins recipe.
    2. Pre-heat the oven to 250.
    3. Cube your cornbread into bite sized pieces and spread evenly on a greased baking sheet.
    4. Bake for 30 minutes, toss to mix around, and then bake for another 30 minutes (1 hour total).
    5. Once they are done drying out in the oven, place them aside in a large bowl.
    6. Pre-heat the Oven to 350.
    7. Cook your Italian sausage and celery in a skillet or large frying pan over medium heat on the stove top. Cook through.
    8. Once it's cooked through, add the sausage and celery to the dried cornbread and mix together in the bowl.
    9. In a separate bowl, beat your eggs, olive oil, chicken broth, garlic, herbs, and spices, together.
    10. Then add the liquid mixture to the large bowl with the dried cornbread and sausage.
    11. Mix thoroughly and then transfer to a greased baking dish.
    12. Cover with tinfoil and bake for 30 minutes.
    13. Remove the tinfoil and drizzle the 2 tablespoon of Olive Oil over the top and bake uncovered for 30 more minutes.
    14. When it's done serve warm and enjoy!
    Nutrition Information:
    Yield: 6 Serving Size: 1
    Amount Per Serving: Calories: 434Total Fat: 33gSaturated Fat: 10gTrans Fat: 0gUnsaturated Fat: 25gCholesterol: 112mgSodium: 1055mgCarbohydrates: 15gFiber: 1gSugar: 6gProtein: 19g

    Nutritional information is not always 100% accurate.

    © Miriam
    Cuisine: American / Category: Main Dish

    Dairy Free Chickpea Pumpkin Pie (+gluten free pie crust)

    November 18, 2019

    a piece of pumpkin pie on a stack of plates

    Thanksgiving is just around the corner and we are definitely celebrating with this AHHmazing gluten free and dairy free chickpea pumpkin pie. That's right, this homemade pumpkin pie has canned pumpkin puree and a whole can of chickpeas blended in for silky creamy perfection that is still dairy free. Pour all of that yummy mixture on top of a gluten free almond meal crumble crust flavored with ginger and cinnamon. Your guests won't even know that this is a healthy pumpkin pie!

    Almond Meal Gluten Free Pie Crust

    This pie crust is probably one of my favorites. Sure, I love the classic flaky pie crust. But, this one is easily gluten free and quick to make with no chilling or waiting or rolling out. It also gives the pie a crumble texture which is always yummy! Easy peasy!

    glass pie dish with almond meal pie crust

    Right in the pie plate, combine your almond meal with the cinnamon and ginger and mix it up evenly. Then add your olive oil and maple syrup.

    Using just your hands, press the crumble into the bottom of the pie plate nice and evenly. Just like a gram cracker crust, press it firmly to shape it and give it structure. This crust is just for the bottom of the pie. You can slightly press it up the edges, but only minimally. Make sure it is all even.

    Bake the pie crust just like that for about 10 minutes at 375. Let it cool while you make the pie filling!

    close up of the inside cut of chickpea pumpkin pie

    Dairy Free Chickpea Pumpkin Pie

    This recipe is super easy to make. It's not fully vegan because it has eggs in it, but it is fully dairy free and gluten free. So yay! The chickpeas give this classic pie that creamy and silky texture without all the cream.

    Everything goes into the blender making this pie even easier than a regular recipe. Starting with the drained can of chickpeas (save the liquid to make aquafaba whipped cream), add your maple syrup and your almond milk.

    overhead shot of a dairy free chickpea pumpkin pie with plates and forks

    Blend these together, pureeing until the mixture is completely smooth. Then you can add the pumpkin puree, spices, vanilla, and eggs. Blend it all together until smooth.

    Pour the chickpea pumpkin mixture into your cooled pie crust and sprinkle brown sugar on top. Bake in the oven for 30 minutes at 350. When a knife or toothpick inserted one inch from the edge of the crust comes out clean, then it's done! Enjoy with some aquafaba whipped cream and a cup of coffee. YUM!

    hand taking a piece of pumpkin pie

    Tag us on Instagram @grabthemangos and give us a rating and review right here in the comments! And don't forget to pin and save it for next time!

    dairy free and gluten free recipe for chickpea pumpkin pie

    More Sweet recipes for you to love

    • Aquafaba Whipped Cream
    • Skillet Gluten Free Apple Crumble
    • Apple Pie Coffee Cake
    • Chickpea Cardamom Blondies
    a piece of pumpkin pie on a stack of plates

    Dairy Free Chickpea Pumpkin Pie (+gluten free pie crust)

    Yield: 1 pie
    Prep Time: 25 minutes
    Cook Time: 1 hour
    Total Time: 1 hour 25 minutes

    This gluten free and dairy free pumpkin pie recipe is so easy to make and delicious! Made from scratch with maple syrup and chickpeas plus pumpkin puree. SO YUMMY!

    Ingredients

    • Crust:
    • 1 cup Almond Meal
    • 1 tablespoon Extra Virgin Olive Oil
    • 2 tablespoon Maple Syrup
    • 1 teaspoon Cinnamon
    • 1 teaspoon Ground Ginger
    • Filling:
    • 1 can Pumpkin Puree
    • 1 can Chickpeas (drained)
    • ¼ cup Almond Milk
    • ½ cup Maple Syrup
    • 2 teaspoon Cinnamon
    • 1 teaspoon Nutmeg
    • 1 teaspoon Ground Cloves
    • 2 Eggs
    • 1 teaspoon Vanilla
    • Pinch of Salt
    • (Brown Sugar for sprinkling on top)

    Instructions

    1. Pre-heat oven to 375.
    2. Directly in your pie plate, add the almond meal and spices and mix together thoroughly.
    3. Add in your olive oil and maple syrup and mix into a wet crumble.
    4. Press the crumble into the bottom of the pie plate evenly.
    5. Bake for 10 minutes and then leave out to cool.
    6. When the pie crust is done, pre-heat oven to 350.
    7. In a blender, puree the drained chickpeas, almond milk, and maple syrup until silky smooth.
    8. Add the pumpkin puree and the spices, eggs, and vanilla. Blend until smooth.
    9. Pour the pumpkin chickpea mixture into the cooled pie crust.
    10. Bake at 375 for 30 minutes. When a knife or toothpick is inserted 1 inch from the edge of the pie and comes out clean, then it's done!
    11. Let cool and enjoy with some dairy free whipped cream
    Nutrition Information:
    Yield: 6 Serving Size: 1
    Amount Per Serving: Calories: 333Total Fat: 15gSaturated Fat: 2gTrans Fat: 0gUnsaturated Fat: 12gCholesterol: 62mgSodium: 159mgCarbohydrates: 44gFiber: 8gSugar: 26gProtein: 10g

    Nutritional information is not always 100% accurate.

    © Miriam
    Cuisine: American / Category: Dessert

    Gluten Free Dairy Free Gingerbread House Recipe

    November 13, 2019

    a simple decorated gingerbread house with cookie cutters

    If you are gluten free and/or dairy free, or if you just love a healthier version of your Christmas recipes, then you need this gluten free dairy free gingerbread house recipe! This is made with honey, molasses, gluten free flour, and refined coconut oil. All the same warm delicious spices and keeps it's shape perfectly without being refrigerated. You'd never know that this recipe was any different than your grandma's good old gingerbread recipe.

    Healthy Gingerbread House (and cookies)

    This recipe is made with Bob's Red Mill 1-1 Gluten Free Flour (which if you've been following along at all is my favorite). The other parts of this recipe are coconut flour, molasses, triple refined coconut oil, and cinnamon, cloves, and of course ginger.

    • rolled out gingerbread dough and cookie cutters

    The only sweetener in this amazing recipe is honey. And let me tell you, it is so tasty! We were munching on this masterpiece all week long after I shot the pictures for this recipe.

    I really love using triple refined coconut oil as a butter or shortening replacement in recipes. We are gluten AND dairy free which can sometimes mean substituting over half the recipe out and can get tricky. But triple refined coconut oil doesn't taste like coconut at all but acts similar way to butter and shortening in baking.

    girl pressing a christmas tree cookie cutter into gingerbread dough

    How to Make a Gingerbread House

    Making this gluten free dairy free gingerbread recipe is so easy and simple. No weird ingredients or tricks and it doesn't need to be chilled before going into the oven!

    ball of gingerbread dough and bob's red mill gluten free flour

    In a medium bowl, mix together your dry ingredients - gluten free flour, coconut flour, baking soda, salt, and spices. In a large bowl, cream together your wet ingredients - egg, molasses, honey, coconut oil, and vanilla. Pour the dry ingredients into the large bowl with the wet ingredients and form a dough ball. Make sure to get everything fully mixed together. Knead the dough a few times to make sure it's really combined.

    Roll the dough out onto a floured surface (flour the surface with the gluten free flour- not coconut flour for the best results). You want the dough to be about ¼ inch thick for building a gingerbread house. If you are making cookies, thicker will be a softer cookie and thinner will be crunchy.

    hand lifting up a gingerbread cookie cut out

    Using your own template or the template we have made below (it's so cute!), cut out the shapes and place them on a baking sheet lined with parchment paper. Bake at 350 for 10-12 minutes for large house pieces and 8-9 minutes for cookies.

    Make sure to let it cool for at least 30 minutes after baking. If you try to decorate or assemble while it's still warm, the icing will just melt off. Yikes!

    girl putting gum drops onto a gluten free dairy free gingerbread house

    Frost together using some royal icing as it's "glue" and decoration. Our favorite royal icing recipe is The Spruce Eats recipe (linked). Have fun decorating your homemade gluten free, dairy free gingerbread house!

    Gingerbread House Design

    Get your own gingerbread house design now!

    Thank you!

    Be sure to look in your spam folder, sometimes we get dropped in there!

    Tag us on Instagram @grabthemangos and give us a rating and review right here in the comments! And don't forget to pin and save it for next time!

    This easy ginger bread recipe is totally gluten free and dairy free and so easy to make! With honey and molasses this recipe is healthy too but still so tasty. Print off the design and have your own gingerbread house kit right now!

    More Sweet recipes for you to love

    • Chickpea Molasses Cookies
    • Gluten Free Almond Cookies
    • Gluten Free Pumpkin Cinnamon Rolls
    • Homemade Hot Chocolate Mix
    a simple decorated gingerbread house with cookie cutters

    Gluten Free Dairy Free Gingerbread House

    Yield: 1 house & some cookies
    Prep Time: 45 minutes
    Cook Time: 10 minutes
    Cool Time: 30 minutes
    Total Time: 1 hour 25 minutes

    This easy ginger bread recipe is totally gluten free and dairy free and so easy to make! With honey and molasses this recipe is healthy too but still so tasty. Print off the design and have your own gingerbread house kit right now!

    Ingredients

    • 2 ½ cups Bob's Red Mill Gluten Free Flour
    • ¼ cup Coconut Flour
    • 1 teaspoon Baking Soda
    • 1 teaspoon Ginger
    • 1 teaspoon Cinnamon
    • ½ teaspoon Ground Cloves
    • Pinch of Salt
    • 1 Egg
    • 4 tablespoon Molasses
    • ½ cup Honey
    • ⅓ cup Refined Coconut Oil
    • 1 teaspoon Vanilla

    Instructions

    1. Pre-heat the oven to 350.
    2. In a medium mixing bowl, combine your dry ingredients- flour, coconut flour, baking soda, salt, and spices.
    3. In a large mixing bowl, combine your wet ingredients- egg, molasses, honey, coconut oil, and vanilla. Mix well!
    4. Pour the dry mixture into the wet mixture and combine into a dough. Knead a few times to make sure it is really well combined.
    5. On a floured surface roll the dough out to about ¼ inch thick for the gingerbread house. Cookies can be thicker for a softer cookie or thinner for a crunchy cookie.
    6. Using your own design or the design we made above, cut out your pieces using a sharp knife and place them on a baking sheet lined with parchment paper.
    7. Bake gingerbread house pieces for 10-12 minutes until the edges are slightly browned. Cookies bake for 8-9 minutes until edges are slightly browned.
    8. Let everything cool for at least 30 minutes before applying frosting/icing otherwise it will melt off.
    9. Assemble your gingerbread house with our favorite Royal Icing recipe from The Spruce Eats and decorate with candies and more frosting! Enjoy!
    Nutrition Information:
    Yield: 12 Serving Size: 1
    Amount Per Serving: Calories: 174Total Fat: 7gSaturated Fat: 5gTrans Fat: 0gUnsaturated Fat: 1gCholesterol: 16mgSodium: 127mgCarbohydrates: 26gFiber: 1gSugar: 17gProtein: 2g

    Nutritional information is not always 100% accurate.

    © Miriam
    Cuisine: American / Category: Dessert

    Dairy Free + Gluten Free Cornbread Muffins

    November 6, 2019

    honey being drizzled over a gluten free cornbread muffin

    Skip the dinner rolls and make these amazing dairy free and gluten free cornbread muffins! These are so easy to make and so so yummy! I seriously would eat these all day. We are definitely making these on Thanksgiving. Drizzle these little muffins with some honey or maple syrup and eat alongside soups, chili, or even with your morning coffee. YUM!

    showing the inside texture of cornbread muffins

    Gluten Free Cornbread Muffins

    These amazing little muffins are completely gluten free. Corn muffins are normally made with all purpose flour and corn meal together. These are made instead with Bob's Red Mill 1-1 GF Flour and almond flour mixed with the corn meal instead. This makes a perfect texture and a super moist cornbread.

    The big question though- do you put maple syrup or honey on your cornbread? I've always used honey to douse my cornbread in but I am not against maple syrup either. I mean, can you go wrong really?

    Dairy Free Cornbread

    Ok, so most cornbread recipes keep their moisture with milk in the batter. This recipe uses almond milk and extra virgin olive oil to lock in that moisture. It works like a charm. No one wants a super dry cornbread muffin!

    a bunch of gluten free cornbread muffins with drizzled honey

    Making these adorable, but more importantly DELICIOUS, gluten free cornbread muffins is so easy. In a mixing bowl combine your gluten free flour, almond flour, and corn meal and whisk together well. Almond flour can clump sometimes so be sure to get those out. Add in your coconut sugar (regular sugar works as well), a pinch of salt, and baking powder and whisk together.

    In a glass measuring cup, whisk together your almond milk, olive oil, and egg. Then pour it in with the dry ingredients. Combine thoroughly into a thick batter.

    3 muffins stacked

    Cornbread Muffins

    I will always maintain that making muffins instead of a loaf of cornbread is always better. However, I do like it made traditionally in a skillet as well. But with kids especially, muffins is the best!

    In a muffin or cupcake tin you have two options. Either line the tins with paper cupcake/muffin liners, or spray and grease the insides. Either works!

    cute little cornbread muffin with honey

    Scoop about ¼ cup of batter into each tin. Note: different size tins might mean more or less batter. They should be filled about half way so they have room to rise up. Bake at 400 for 20 minutes until the edges are golden brown. Let them cool before removing from the tin. Enjoy with some honey or maple syrup or even plain!

    hand reaching for a muffin

    Tag us on Instagram @grabthemangos and give us a rating and review right here in the comments! And don't forget to pin and save it for next time!

    These amazing gluten free and dairy free cornbread muffins will have you skipping the dinner rolls and drooling for more! Drizzle in honey or maple syrup and enjoy with soups and chili's or even just by themselves.

    More Sweet recipes for you to love

    • Dairy Free Butternut Squash Soup
    • Dairy Free White Chicken Chili
    • Gluten Free Nachos
    • Cilantro Lime Smashed Potatoes
    honey being drizzled over a gluten free cornbread muffin

    Dairy Free + Gluten Free Cornbread Muffins

    Yield: 12-16
    Prep Time: 15 minutes
    Cook Time: 20 minutes
    Total Time: 35 minutes

    These amazing gluten free and dairy free cornbread muffins will have you skipping the dinner rolls and drooling for more! Drizzle in honey or maple syrup and enjoy with soups and chili's or even just by themselves.

    Ingredients

    • 1 cup Bob's Red Mill GF Flour
    • ¼ cup Almond Flour
    • ¾ cup Corn Meal
    • ¼ cup Coconut Sugar (regular sugar works too)
    • 2 teaspoon Baking Powder
    • 1 cup Almond Milk
    • ¼ cup Extra Virgin Olive Oil
    • Pinch of Salt
    • 1 Egg

    Instructions

    1. Pre-heat the oven to 400.
    2. In a large mixing bowl, whisk together the gluten free flour, almond flour, and corn meal, making sure to get all the clumps out.
    3. Whisk in the coconut sugar, baking powder, and salt.
    4. In a glass liquid measuring cup, whisk together the almond milk, olive oil, and egg.
    5. Pour the liquid mixture into the bowl with the dry ingredients and combine into a thick batter.
    6. Line cupcake tin with paper liners or spray with oil to prevent sticking.
    7. Pour about ¼ cup of batter into each tin. They should be about half way filled to leave room for rising.
    8. Bake for 20 minutes until the edges are golden brown.
    9. Let cool before removing and enjoy!
    Nutrition Information:
    Yield: 12 Serving Size: 1
    Amount Per Serving: Calories: 130Total Fat: 7gSaturated Fat: 1gTrans Fat: 0gUnsaturated Fat: 5gCholesterol: 16mgSodium: 102mgCarbohydrates: 15gFiber: 1gSugar: 1gProtein: 3g

    Nutritional information is not always 100% accurate.

    © Miriam
    Cuisine: American / Category: Bread

    Maple Pumpkin Pie Oatmeal

    November 3, 2019

    bowls of pumpkin pie oatmeal with pecans and tiny pumpkins and maple syrup

    Maple pumpkin pie oatmeal just sounds like fall doesn't it? The perfect recipe to have at the beginning of November in my opinion. This will give your taste buds a small taste of that amazing pumpkin pie flavor without over indulging before thanksgiving actually gets here. I'm pretty sure that we have eaten this breakfast almost every day this past week. It's so easy, simple, and just delicious warm and full of pumpkin and spices. Paired a hot cup of coffee, this breakfast is on point.

    Healthy Oatmeal for Breakfast

    This maple pumpkin oatmeal breakfast is full of gluten free rolled oats (we use Aldi's Live G Free brand), maple syrup, pecans, warm fall spices, and of course some pureed pumpkin. No refined sugar in this recipe, and totally vegan. WIN!

    pouring maple syrup into a bowl full of oatmeal and pumpkin

    After being sick this past week with bronchitis (lord help me through this Minnesota winter), all I want are warm and comforting, delicious, healthy foods like this. Pumpkin is high in Vitamin C, potassium, fiber, and antioxidants. Super good for this sick time of year!

    There are a few ways to make your oatmeal base. You can make it the way you normally like to make your plain oatmeal and simply add the extras in this recipe in. You can follow whatever your particular bag of rolled oats says to do to make a single serving. Or, you can follow our simple directions that I use anytime I make a single bowl of traditional rolled oats in the microwave for me or my fam.

    close up of a bowl of pumpkin pie oatmeal

    Maple Pumpkin Pie Oatmeal Recipe

    In a microwave safe bowl, add your oats and either water or almond milk works well, and a pinch of salt. Microwave this for 2 minutes. Super easy peasy right? If you like it a little more soupy, you are good to go. If you like it a little more solid then just let it sit out of the microwave for another minute before stirring up.

    a spoonful of maple pumpkin pie oatmeal and pecans

    Add in you pumpkin puree, cinnamon and allspice, pecans, and maple syrup. Mix it all together and go to town! Seriously, the best fall weather, November breakfast for every day of the week 😉

    Tag us on Instagram @grabthemangos and give us a rating and review right here in the comments! And don't forget to pin and save it for next time!

    This healthy, quick, vegan and gluten free pumpkin pie oatmeal is full of pecans, maple syrup, and of course pumpkin puree and warm fall spices! Made in the microwave to be extra quick and easy.

    More Sweet recipes for you to love

    • Carrot Cake Overnight Oats
    • Gluten Free Dairy Free Pumpkin Cinnamon Rolls
    • Apple Pie Coffee Cake - Gluten Free, Dairy Free
    • Banana Oatmeal Pancakes
    bowls of pumpkin pie oatmeal with pecans and tiny pumpkins and maple syrup

    Maple Pumpkin Pie Oatmeal

    Yield: 1 serving
    Prep Time: 2 minutes
    Cook Time: 2 minutes
    Cool Time: 1 minute
    Total Time: 5 minutes

    This healthy, quick, vegan and gluten free pumpkin pie oatmeal is full of pecans, maple syrup, and of course pumpkin puree and warm fall spices! Made in the microwave to be extra quick and easy.

    Ingredients

    • ¼ cup Gluten Free Traditional Rolled Oats
    • ½ cup Water or Almond Milk
    • ¼ cup Pumpkin Puree
    • ½ teaspoon Cinnamon
    • ½ teaspoon Allspice
    • 2-3 tablespoon Maple Syrup
    • Handful of Pecans

    Instructions

    1. In a microwave safe bowl, add you oats and either water or almond milk.
    2. Microwave on high for 2 minutes.
    3. If you like it more soupy, it's ready to go. If you want it more solid, let it sit on the counter for 1 extra minute.
    4. When you are ready, add your pumpkin puree, spices, and maple syrup.
    5. Stir it all together and then add a handful of pecans for a little crunch and texture!
    6. Enjoy!
    Nutrition Information:
    Yield: 1 Serving Size: 1
    Amount Per Serving: Calories: 1094Total Fat: 49gSaturated Fat: 5gTrans Fat: 0gUnsaturated Fat: 41gCholesterol: 0mgSodium: 38mgCarbohydrates: 158gFiber: 17gSugar: 85gProtein: 18g

    Nutritional information is not always 100% accurate.

    © Miriam
    Cuisine: American / Category: Breakfast

    Gluten free Dairy free Green Bean Casserole

    October 23, 2019

    a dish full of green bean casserole next to a spoonful of green bean casserole

    Who doesn't love the all important, savory, American thanksgiving staple- Green Bean Casserole? We love this dish on thanksgiving in our house, but this year we are making this gluten free dairy free green bean casserole. Honestly after taste testing this one and scarfing down the entire finished product throughout one day while photographing it, I have to say this is better than the original. While I love some trash canned soup mixed in with my veggies and baked with fried things on top as much as the next American celebrating thanksgiving, this homemade, "real ingredients" recipe is just so much tastier.

    Gluten Free Fried Onions

    The best part of this entire dish is definitely not the green beans (although I love green beans), it's those fried french onions that layer the top of the dish. So good! Also not very healthy, and dipped in batter and fried so not gluten free.

    a sheet pan of onions drizzled with olive oil and a bowl of seasonings

    In this recipe we bake them to get nice and crispy and make them gluten free. Use rice crumbs ( I found mine at trader joe's), and garlic, seasoned salt, everything but the bagel seasoning (also at trader joe's and amazing on scrambled eggs), and some sage as the coating on your onions. This coating with a little bit of olive oil gets the onions nice and crispy and so full of flavor. Bake them spread out on a baking sheet at 400 for about 15 minutes. While they bake you can make your dairy free cream of mushroom soup.

    onion slices on a baking sheet coated in rice crumbs and seasonings

    Dairy Free Cream of Mushroom Soup

    Onto the sauce. A traditional green bean casserole needs some cream of mushroom soup which is usually made with cream and most people just get it from a can at the store and dump it in. Gross. This recipe has a homemade, much easier than you think, dairy free version of cream of mushroom soup. This makes the green bean casserole dairy free.

    a skillet full of dairy free cream of mushroom soup

    In a skillet or sauce pan, with a little bit of olive oil, saute your diced up mushrooms, diced onion, and minced garlic. Cook this up on medium heat for about 5 minutes or so until the onions are translucent and the mushrooms cooked through. Then add the coconut flour and toss to combine. This will help the cream of mushroom soup to thicken nicely. Heat this mixture up and add in your chicken broth. It will immediately start to thicken up slightly. Stir it to combine well. Finally, add in your can of creamy coconut milk. (We use Thai's Kitchen Coconut Milk.) Let this mixture cook on a low simmer for about 10 minutes and add salt and pepper to taste.

    Gluten free Dairy free Green Bean Casserole

    Finally it's time to put this all together! In a baking dish or a dutch oven, put your green beans in first then pour your homemade cream of mushroom soup over the top and toss together. Take those amazing crispy baked onions and layer them on the top. An optional, but recommended, topping is some crumbled bacon, because why not!?

    • ceramic bowl full of green beans
    • pouring cream of mushroom soup over the green beans
    • baked green bean casserole
    • taking a big scoop of green bean casserole

    Bake this in the oven at 350 for 30 minutes. It should be bubbling and crisp on the top. Let it cool and then dig in and enjoy!

    Tag us on Instagram @grabthemangos and give us a rating and review right here in the comments! And don't forget to pin and save it for next time!

    This easy recipe for gluten free, dairy free green bean casserole is so delicious! A classic thanksgiving dish made even better and a lot healthier.

    More Sweet recipes for you to love

    • Gluten Free Almond Cookies
    • Dairy Free White Chicken Chili
    • Dairy Free Butternut Squash Soup
    • Gluten Free Sweet Potato Gnocchi
    a dish full of green bean casserole next to a spoonful of green bean casserole

    Gluten free Dairy free Green Bean Casserole

    Yield: 5-6 people
    Prep Time: 40 minutes
    Cook Time: 30 minutes
    Total Time: 1 hour 10 minutes

    This easy recipe for gluten free, dairy free green bean casserole is so delicious! A classic thanksgiving dish made even better and a lot healthier.

    Ingredients

    • Onion Topping:
    • 1 Yellow Onion
    • ⅓ cup Rice Crumbs
    • 2 teaspoon Garlic Powder
    • 1 teaspoon Seasoned Salt
    • 1 teaspoon Everything but the Bagel Seasoning
    • 1 teaspoon Ground Sage
    • 2 tablespoon Olive Oil
    • Cream of Mushroom Soup:
    • 2 cups Diced White Mushrooms
    • 1 Diced Yellow Onion
    • 3 tablespoon Olive Oil
    • 3 Minced Garlic Cloves
    • 2 tablespoon Coconut Flour
    • ½ cup Chicken Broth
    • 1 Can Thai Kitchen's Coconut Milk
    • Salt + Pepper to taste
    • 4 cups Cut Green Beans (fresh or de-thawed if frozen)

    Instructions

    1. Pre-heat the oven to 400.
    2. Slice your yellow onion into thin, short slices.
    3. Combine the rice crumbs and the spices together in a bowl.
    4. Spread the onions on a baking sheet and drizzle with the olive oil, then spread and gently toss with the spices and rice crumbs until coated thoroughly.
    5. Bake for 15 minutes and set aside when done.
    6. While the onions bake, in a skillet or sauce pan, saute the mushrooms, diced onion, and minced garlic cloves with the olive oil. Cook for about 10 minutes on medium heat.
    7. Once the onions are looking more clear and translucent, add the coconut flour and mix thoroughly.
    8. Add the chicken broth and stir well. Then add the coconut milk and let it simmer for about 10 minutes while it thickens slightly.
    9. Add salt and pepper to taste.
    10. Pre-heat oven to 350.
    11. In a dutch oven or baking dish, place your green beans first, then pour your cream of mushroom soup over the top and combine. Finally, add the crispy onions over the top and bake for 30 minutes. *optional- add some crumbled bacon on top*
    12. Let it cool when it's done baking and enjoy!
    Nutrition Information:
    Yield: 6 Serving Size: 1
    Amount Per Serving: Calories: 345Total Fat: 28gSaturated Fat: 15gTrans Fat: 0gUnsaturated Fat: 11gCholesterol: 0mgSodium: 654mgCarbohydrates: 23gFiber: 5gSugar: 7gProtein: 6g

    Nutritional information is not always 100% accurate.

    © Miriam
    Cuisine: American / Category: Main Dish

    Gluten Free Almond Cookies

    October 21, 2019

    stack of almond cookies with slivered almonds on top

    These gluten free almond cookies are also dairy free and yet so buttery-tasting and delicious! Trust me, these are addictive. So easy to make, with almond and vanilla extract. These cookies are basically a gluten free and dairy free soft chewy sugar cookies with almonds. Honestly, heaven in a cookie is a better way to describe them. Just give these a try and you'll never go back!

    Gluten Free Almond Flour Cookies

    These cookies are made with only almond flour which makes them so soft and the texture amazing. It also complements the whole almond flavor of the cookie.

    glass of milk with almond cookies and almond slivers

    Making these cookies is quick and easy. They are also dairy free and yet taste so buttery because of how you incorporate the coconut oil. I used triple refined coconut oil to keep the coconut taste out of the cookie. By keeping the coconut oil solid instead of melting it, it acts almost like shortening or butter would in a cookie. Because the coconut oil taste isn't there though, when it's mixed with the almond, vanilla, and sugar, the cookie comes out tasting almost buttery (which is always a good thing).

    hand holding an eaten almond cookie

    Making Almond Flour Sugar Cookies

    These are basically soft gluten free sugar cookies with almond flavoring. Made just like a normal cookie, start by combining the dry ingredients like the almond flour, salt, and baking soda. Then in a separate bowl, combine the wet ingredients like the sugar, eggs, almond milk, solid coconut oil, and vanilla and almond extract.

    Once the wet ingredients have been creamed together with small (dime sized) chunks of the coconut oil still solid in the batter, combine with the dry ingredients. Scoop with two tablespoons or a cookie scooper onto a baking sheet lined with parchment paper and bake for 10 minutes. The tops of these cookies don't look very browned coming out of the oven but you don't want to over bake. The bottoms should look golden instead.

    spread of gluten free almond cookies and a glass of milk

    Before baking feel free to sprinkle with slivered almonds to make these cookies all prettied up! Once they are done baking, let them cool for at least 15 minutes before moving or eating. They are soft a still gooey coming out of the oven so let them cool and set. After that enjoy!

    Tag us on Instagram @grabthemangos and give us a rating and review right here in the comments! And don't forget to pin and save it for next time!

    This easy gluten free almond cookie recipe is made with Almond Flour and is also totally dairy free! A delicious soft and chewy sugar cookie with almond flavoring.

    More Sweet recipes for you to love

    • Chickpea Molasses Cookies
    • Gluten Free Chocolate Marshmallow Cookies
    • Apple Pie Coffee Cake
    • Gluten Free Pumpkin Cinnamon Rolls
    stack of almond cookies with slivered almonds on top

    Gluten Free Almond Cookies

    Yield: 18-20 cookies
    Prep Time: 12 minutes
    Cook Time: 10 minutes
    Cooling Time: 15 minutes
    Total Time: 37 minutes

    This easy gluten free almond cookie recipe is made with Almond Flour and is also totally dairy free! A delicious soft and chewy sugar cookie with almond flavoring.

    Ingredients

    • 3 cups Almond Flour
    • 1 teaspoon Baking Soda
    • Pinch of Salt
    • 2 Eggs
    • ¼ cup Almond Milk
    • 1 teaspoon Vanilla Extract
    • 1 teaspoon Almond Extract
    • 1 cup Sugar
    • ½ Refined Coconut Oil *see notes*

    Instructions

    1. Pre-heat oven to 375.
    2. In a medium mixing bowl, combine the dry ingredients (almond flour, baking soda, salt).
    3. In a large mixing bowl, cream together the wet ingredients (coconut oil, almond milk, vanilla, almond extract, sugar, and eggs).
    4. Make sure not to over beat the wet mixture. Try to keep the coconut oil from fully melting so there are still small chunks (dime sized or so) of it in the batter.
    5. Combine the bowls together by adding the dry ingredients to the wet ingredients.
    6. Scoop tablespoon sized scoops onto a baking sheet lined with parchment paper (about 1.5 inches apart) and bake for 10 minutes.
    7. Optional: you can sprinkle the tops with slivered almonds before baking.
    8. Let the cookies cool for at least 15 minutes after baking to let them set. Enjoy!

    Notes

    *To measure the coconut oil while keeping it solid, use a spoon to scoop and press into a ½ cup measuring cup*

    Nutrition Information:
    Yield: 18 Serving Size: 1
    Amount Per Serving: Calories: 165Total Fat: 10gSaturated Fat: 1gTrans Fat: 0gUnsaturated Fat: 9gCholesterol: 21mgSodium: 86mgCarbohydrates: 15gFiber: 2gSugar: 12gProtein: 5g

    Nutritional information is not always 100% accurate.

    © Miriam
    Cuisine: American / Category: Dessert

    Roasted Butternut Squash Soup - dairy free

    October 16, 2019

    bowls of creamy dairy free roasted butternut squash soup

    Who doesn't want a thick, creamy, savory roasted butternut squash soup in the fall and winter cold? Making it dairy free is so simple because a roasted butternut squash is already so creamy and silky when blended. This recipe is also gluten free and just overall a healthy hearty soup. You can easily make it as thick or thin as you'd like and this soup is no fuss, easy and delicious!

    Roasting Butternut Squash

    I think it's both wonderful and kind of funny that even in a time where we can buy whatever food we want (relatively) at any time of year, we still heavily lean into seasonal foods. Why? Because they taste richer and more flavorful during their season and they remind us of that season's comforts when we eat.

    a butternut squash cut in half and roasted with oil and salt

    Butternut squash is one of the best squashes in my opinion. It is flavorful, not bitter or too earthy, and just turns into a silky delicious fall treat when roasted. I mean doesn't the just the name even sound delicious "roasted butternut squash." Yes!!

    Roasting a whole squash may sound a little daunting if you've never done it. Trust me, it is so easy! Simply, pre-heat your oven to 400. Cut the squash in half the long way down and scoop out all of the seeds and "guts." Brush on some Extra Virgin Olive Oil and sprinkle with salt on a baking pan. Roast in the oven for 45 minutes. So easy right?!

    close up of roasted butternut squash

    Dairy Free Butternut Squash Soup

    Personally I don't think you ever need any cream or dairy in this type of soup because the squash becomes so silky and creamy on it's own after it's been roasted and pureed.

    close up of a bowl of butternut squash soup with decorative pumpkins

    After you've roasted up your squash, let it cool for a while before handling. Once you're ready, scoop out the squash meat (is it called meat...?) and place it all in a blender. Add two cups of chicken broth and blend on the mix setting at first to break everything up, and then on puree to really get it smooth.

    • blender full of roasted butternut squash
    • pureed silky smooth in a blender

    In a pan on the stove top, saute your diced onions, celery, and smashed garlic for about 3-5 minutes to get the flavors really coming out. Add the spices and saute for another 2 minutes mixing all those flavors and smells together. When done, add the veggies to your squash in the blender and puree until smooth all the way through.

    Pour your blended roasted butternut squash soup into a stock pot and add one more cup of chicken broth. Here is where you can play around with the soup's thickness. If you want it more thinned out, add a little more chicken broth until you get to where you want to be. Once you've found your desired consistency, add two bay leaves and let it simmer on low heat, stirring every so often (every 15 minutes or so), for about an hour at least. You can always let it cook longer if you want more of those flavors to seep in or if you're just not quite ready to eat yet! Enjoy 🙂

    hand scooping up butternut squash soup

    Tag us on Instagram @grabthemangos and give us a rating and review right here in the comments! And don't forget to pin and save it for next time!

    This easy, healthy roasted butternut squash soup is made in the blender to be silky smooth and creamy! Totally dairy free and gluten free and the best savory recipe for an autumn soup.

    More Sweet recipes for you to love

    • Sweet Onion Chicken Noodle Soup
    • Dairy Free White Chicken Chili
    • Dairy Free, Gluten Free Pumpkin Cinnamon Rolls
    • Gluten Free Sweet Potato Gnocchi
    bowls of creamy dairy free roasted butternut squash soup

    Roasted Butternut Squash Soup - dairy free

    Yield: 5-6 people
    Prep Time: 1 hour 30 minutes
    Cook Time: 1 hour
    Total Time: 2 hours 30 minutes

    This easy, healthy roasted butternut squash soup is made in the blender to be silky smooth and creamy! Totally dairy free and gluten free and the best savory recipe for an autumn soup.

    Ingredients

    • 1 Butternut Squash
    • 3 cups Chicken Broth
    • 1 Red Onion
    • 3 Celery Stalks
    • 2-3 Garlic Cloves
    • 2 tablespoon Extra Virgin Olive Oil
    • 2 teaspoon Seasoned Salt
    • 1 teaspoon Nutmeg
    • 2 teaspoon Sage
    • 2 teaspoon Black Pepper
    • 2 Bay Leaves

    Instructions

    1. Pre-heat your oven to 400.
    2. Cut your butternut squash in half the long way down and scoop out the seeds and "guts"
    3. Place on a baking sheet with the skin side down and brush olive oil across and sprinkle with salt.
    4. Roast for 45 minutes and then let cool. While it cools, dice up your veggies and using the bottom of a cup, smash your garlic.
    5. Once you can handle it safely, scoop the squash out of the skin and into a blender.
    6. Add 2 cups of chicken broth and blend on the mix setting first to break things up, then on puree until it gets silky smooth.
    7. In a pan on the stove, saute your diced veggies and smashed garlic for 3-5 minutes in a little olive oil.
    8. Add your spices to the pan and saute for another few minutes to get the flavors mixed together.
    9. Add the veggies and spices to the blender with the squash and puree until completely smooth.
    10. Pour the blended soup into a stock pot on the stove and add another cup of chicken broth (plus more if you would like it thinner).
    11. Add 2 bay leaves and simmer for an hour stirring every so often (every 15 minutes or so).
    12. Enjoy with croutons, extra salt, or whatever you like best 🙂
    Nutrition Information:
    Yield: 5 Serving Size: 1
    Amount Per Serving: Calories: 95Total Fat: 6gSaturated Fat: 1gTrans Fat: 0gUnsaturated Fat: 5gCholesterol: 3mgSodium: 1186mgCarbohydrates: 10gFiber: 3gSugar: 3gProtein: 2g

    Nutritional information is not always 100% accurate.

    © Miriam
    Cuisine: American / Category: Main Dish

    Gluten Free Sweet Potato Gnocchi (+dairy free)

    October 14, 2019

    girl holding a bowl of gluten free dairy free homemade sweet potato gnocchi

    This gluten free sweet potato gnocchi recipe is so easy to make, delicious, light and fluffy, and also dairy free! We love this in soups, with sauces, or our favorite- pan fried with olive oil, sage, and garlic. However you make it in the end, this recipe for fresh homemade sweet potato gnocchi is the best! Some gluten free flour, almond flour, eggs, and creamy coconut milk mixed with one roasted sweet potato.

    Sweet Potato Gnocchi Recipe

    Making this is so easy especially with this one tip: roast your sweet potato ahead of time. If you know you'll be craving some of this amazing gluten free sweet potato gnocchi sometime in the week, roast your sweet potato ahead of time. This makes the whole process so quick and easy.

    ingredients for sweet potato gnocchi

    Roasting the sweet potato also gives this recipe a whole lot of flavor. The caramelized top of the sweet potato is so delicious and brings this homemade gnocchi over the top. If you decide to make it ahead of time, just store it in the fridge in a Tupperware until you are ready to use it. This also helps because the roasted potato is fully cooked and soft but totally cooled down.

    Making Gluten Free Gnocchi

    Gnocchi is one of my favorite dinners to make. Going gluten free did NOT change this. Still need my beautiful Italian dinners people! So this recipe is made with Bob Red Mill's 1-1 gluten free flour and Almond flour. This combination gives it a fluffy structure but a super savory and soft texture.

    The creamy coconut milk added in replaces what normally is ricotta cheese for a creamy, melt in your mouth flavor. Still dairy free and so delicious! My favorite brand to use is the Thai Kitchen's coconut milk because it is SO creamy.

    There are two ways to make gnocchi. On a flat surface mixing everything together by hand and have some fun with it getting down and dirty. Or in a bowl which works well too. Eventually, after mixing these wonderful ingredients together, you will have an orange dough ball that has the texture of sticky playdough.

    • hands making a well in the flour
    • hands combining the sweet potato and flours
    • hands pouring in the egg and cream mixture to the flour and potato mixture

    When mixing the ingredients together, start by combining the roasted sweet potato and the flours as much as possible. Then create a second well in the mixture and pour in the beaten eggs and coconut milk. It may get a bit squishy and messy here but it comes together fairly easily.

    orange ball of gnocchi dough

    Making sure your surface is nicely floured with the gluten free flour, cut this gnocchi dough ball into sections and roll each section out into a long snake. This is my kids favorite thing to help with because of this process right here!

    • cutting the gnocchi dough into sections
    • rolling the gnocchi sections into long snakes

    Slightly flatten the snake of dough and then cut pieces off bit by bit making your gnocchi. Ta dahhh!! There you have it! If you want to store it for a little later, make sure it is pretty well floured so none of the pieces stick together and then place in a tupperware and store in the fridge until you are ready to use.

    pieces of sweet potato gnocchi

    Tag us on Instagram @grabthemangos and give us a rating and review right here in the comments! And don't forget to pin and save it for next time!

    This homemade gluten free sweet potato gnocchi is so light, fluffy, and easy to make! Totally gluten free and dairy free, make it pan fried, tossed with sauce, or even in soups. Pinterest Pin.

    More Sweet recipes for you to love

    • Regular Classic Potato Gnocchi
    • Dairy Free White Chicken Chili
    • Vegan Roasted Red Pepper Sauce
    • Gluten Free Apple Pie Coffee Cake
    girl holding a bowl of gluten free dairy free homemade sweet potato gnocchi

    Gluten Free Sweet Potato Gnocchi (+dairy free)

    Yield: 4 people
    Prep Time: 1 hour
    Cook Time: 7 minutes
    Total Time: 1 hour 7 minutes

    This homemade gluten free sweet potato gnocchi is so light, fluffy, and easy to make! Totally gluten free and dairy free, make it pan fried, tossed with sauce, or even in soups.

    Ingredients

    • 1 Large Sweet Potato
    • 1 Egg
    • ⅓ cup Thai Kitchen's Coconut Milk
    • 1 ½ cup Bob's Red Mill 1-1 Gluten Free Flour
    • ½ cup Almond Flour
    • (Extra Gluten Free Flour for dusting)

    Instructions

    1. Pre-heat the oven to 400.
    2. Cut your sweet potato in half and brush olive oil on each half and sprinkle with salt.
    3. Roast for 45 minutes or until a fork goes through the center easily.
    4. Let cool completely and then mash thoroughly with a fork. (can be done beforehand and kept in the fridge in a tupperware until ready for use)
    5. On a flat surface (or in a bowl), combine the flours and create a well in the middle (pictured above).
    6. Add the mashed sweet potato to the center and begin to combine the flour with the sweet potato until a sort of dough starts to form.
    7. Create a well once again in the center and add your cream and beaten egg.
    8. Combine all together thoroughly until an orange sticky dough forms (almost like playdough).
    9. Dusting the surface well with gluten free flour, cut into slices.
    10. Take each slice and roll into a long "snake."
    11. Flatten slightly to give it the right shape, and then cut bite size pieces off.
    12. You can store your gnocchi in the fridge, making sure to dust with flour well so that the pieces don't stick together, until you are ready to make. Or you can make right away.
    13. Boil for 5-7 minutes, pan fry with olive oil, or add to soups- whatever you use it for enjoy this delicious sweet potato gnocchi 🙂
    Nutrition Information:
    Yield: 4 Serving Size: 1
    Amount Per Serving: Calories: 290Total Fat: 13gSaturated Fat: 5gTrans Fat: 0gUnsaturated Fat: 7gCholesterol: 47mgSodium: 37mgCarbohydrates: 37gFiber: 4gSugar: 4gProtein: 9g

    Nutritional information is not always 100% accurate.

    © Miriam
    Cuisine: Italian / Category: Main Dish

    Gluten Free Pumpkin Cinnamon Rolls

    October 11, 2019

    cinnamon rolls in a skillet with glaze

    I finally, FINALLY, have a cinnamon roll recipe on the blog- dairy free, gluten free pumpkin cinnamon rolls. This has been a goal since the beginning of Grab The Mangos. Why? Because cinnamon rolls are life. I LOVE cinnamon rolls more than anything in the morning with a nice cup of hot coffee and some good music. These are made with pumpkin and are so perfect for this fall weather and everything pumpkin.

    Gluten Free, Dairy Free, Cinnamon Rolls

    Making gluten free pumpkin cinnamon rolls is a bit tricky. This has taken me a while to get to a point where I am satisfied and happy with the way these turned out. They are soft in the roll and gooey in the center the way cinnamon rolls should be.

    cinnamon roll swirls

    This recipe for cinnamon rolls uses, yeast, gluten free flour, and almond flour as well as coconut oil and almond milk to keep it gluten free and dairy free. Trust me they are still ridiculously delicious!

    The key with making gluten free breads and rolls and baked goods with yeast in them is to give them plenty of time to rise. Personally I love overnight cinnamon rolls the best anyways because you get to wake up and just pop the pan in the oven and relax. The kitchen is left alone and you don't have to do anything other than smell all the smells while it bakes. That is exactly what these cinnamon rolls do!

    close up of maple glaze on cinnamon rolls

    Easy Pumpkin Cinnamon Rolls

    Start by mixing your yeast with the flour, almond flour, and sugar. Heat the almond milk, water, and coconut oil to a warm temperature. Now, when dealing with yeast, you do not want to kill it with a hot liquid so make sure that the milk mixture doesn't get hotter than 110F. Right between 105 and 110F is the best temperature for rising yeast.

    Once your milk mixture is warm, mix it slowly in with the flour and yeast mixture. Add two eggs to the dough and combine thoroughly to form a really nice elastic dough. Let this sit for about 10 minutes to let the dough rest so it is easier to roll out.

    putting flour down on the table
    rolling out dough

    Roll out your dough on a floured surface with the gluten free flour. Make it a rectangle shape so you can roll it up the long way after spreading the pumpkin filling on.

    spreading pumpkin filling out

    The pumpkin filling is pure pumpkin puree, brown sugar, almond flour, cinnamon, allspice, and nutmeg. It tastes just like a bite of pumpkin pie! Spread it on the rolled-out dough nice and even.

    pumpkin filling spread over dough
    rolled up pumpkin cinnamon roll dough

    Roll it up the long way careful not to rip the dough. Doing little bits at a time all the way down the ends helps to get it going. Once it's completely rolled up, use a bread knife to slice 1.5-2 inch thick pieces. Place them on a greased skillet or pan and cover with plastic wrap to rise overnight at room temperature.

    In the morning when you're ready to eat an amazing pumpkin cinnamon roll, take the plastic wrap off and bake them at 350 for 15-18 minutes. Let them cool for a little bit and then slather them with maple icing and enjoy!

    a bite of a cinnamon roll

    Tag us on Instagram @grabthemangos and give us a rating and review right here in the comments! And don't forget to pin and save it for next time!

    pinterest pin for pumpkin cinnamon rolls

    More Sweet recipes for you to love

    • Carrot Cake Over Night Oats
    • Gluten Free Skillet Apple Crumble
    • Chocolate Coconut Bread
    • Apple Zucchini Bread
    cinnamon rolls in a skillet with glaze

    Gluten Free Pumpkin Cinnamon Rolls

    Yield: 18-20 rolls
    Prep Time: 30 minutes
    Cook Time: 15 minutes
    Total Time: 45 minutes

    These easy homemade gluten free pumpkin cinnamon rolls are so YUMMY! Totally gluten free and dairy free and so easy to make 🙂

    Ingredients

    • Dough:
    • 2 ½ Cups of Bob Red Mill's 1-1 Gluten Free Flour
    • ¼ Cup Almond Flour
    • 2 ½ teaspoon Yeast
    • ¼ Cup Sugar
    • Pinch of Salt
    • ½ Cup Almond Milk
    • ¼ Cup Water
    • ¼ Cup Coconut Oil
    • 2 Eggs
    • Filling:
    • ½ Cup Pumpkin Puree
    • ⅓ Cup Brown Sugar
    • 1 tablespoon Almond Flour
    • 1 teaspoon Cinnamon
    • 1 teaspoon Nutmeg
    • 1 teaspoon Allspice
    • Icing:
    • 2 Cups Powdered Sugar
    • 4 tablespoon Maple Syrup
    • 1 tablespoon Almond Milk

    Instructions

    1. In a large mixing bowl combine the flour, almond flour, sugar, yeast, and salt.
    2. In a medium sauce pan, heat the milk, water, and coconut oil to about 105-110F (warm but not hot).
    3. Mix the milk mixture into the flour mixture until a shaggy dough forms, then mix your eggs in to form an elastic dough.
    4. Let the dough rest for about 10 minutes.
    5. Roll it out into a rectangle on a floured surface.
    6. Mix up your filling in a bowl and spread it evenly across the dough.
    7. Roll up slowly and carefully the long way.
    8. Using a bread knife, cut 1.5-2 inch slices all the way down and place them in a greased skillet or pan.
    9. Cover in plastic wrap and let it rise overnight on the counter at room temp.
    10. When you are ready to bake, pre-heat the oven to 350 and bake for 15-18 minutes.
    11. Let them cool and then slather with the icing! Enjoy!
    Nutrition Information:
    Yield: 10 Serving Size: 1
    Amount Per Serving: Calories: 290Total Fat: 9gSaturated Fat: 5gTrans Fat: 0gUnsaturated Fat: 3gCholesterol: 37mgSodium: 33mgCarbohydrates: 51gFiber: 2gSugar: 38gProtein: 4g

    Nutrition information isn’t always 100% accurate.

    © Miriam
    Cuisine: American / Category: Breakfast

    Apple Pie Gluten Free Coffee Cake

    October 9, 2019

    red delicious apples with gluten free apple pie coffee cake

    You read that right! This recipe is for super moist gluten free apple pie coffee cake that will fill every single fall dream you have and is a great use for all those apples you've been picking. This gluten free coffee cake is so easy to make and is also dairy free. Topped with an apple pie filling layer and a dairy free, gluten free streusel topping. Are you drooling for this weekend and this cake with a cup of coffee yet?

    Gluten Free Coffee Cake

    A lot of coffee cake recipes out there are full of yummy things like sour cream or yogurt and of course butter and flour. This one knocks them out of the water and doesn't have any of that. It's soft, moist (yes moist- deal), so delicious, and I mean- topped with apple pie? Does it get any better?

    a close up piece of gluten free apple pie coffee cake

    This coffee cake is made with Bob Red Mill's 1-1 gluten free flour blend and a little coconut flour for the perfect crumb and density. Some almond milk and apple cider vinegar together make this cake so full of flavor and replace the sour cream that a lot of good coffee cakes have.

    There are 3 layers, all gluten free and dairy free, in this cake. Layer number 1 is a warm cinnamon cake. Layer number 2 is a delicious and easy apple pie filling. And the final layer is a brown sugar and molasses streusel topping. SO GOOD RIGHT?

    layers of apple pie and coffee cake

    Apple Pie Coffee Cake

    Making this for a weekend brunch or cozy breakfast is the best idea and honestly you should be whipping this up this weekend right after apple picking.

    The first layer of this cake is the cinnamon cake layer. Combine the gluten free flour, baking soda, baking powder, coconut flour, cinnamon, nutmeg, and salt in a medium mixing bowl. Blend it all together well with a whisk so there are no lumps. In separate large mixing bowl, combine the almond milk, apple cider vinegar, olive oil, eggs, and vanilla.

    a bite of cinnamon gluten free coffee cake

    Once you've done this, start to add the dry ingredients to the wet ingredients to form the batter. In a cake pan, greased and lined with parchment paper, pour the batter in and set aside while you make your apple pie layer.

    I used red delicious for this recipe and it turned out super well! Slice up about 4-5 apples into thin slices. In a bowl add your lemon juice, brown sugar, coconut flour, and apple pie spices. Evenly place the apples over the top of the batter. Lastly the brown sugar and molasses streusel.

    This streusel is not traditional because it has no butter (I know, sad day) but instead has a little molasses which honestly adds a really amazing flavor punch. Sprinkle it over the top evenly and pop this apple pie coffee cake in to bake at 350 for 40-45 minutes. Enjoy!

    take a bite of coffee cake

    Tag us on Instagram @grabthemangos and give us a rating and review right here in the comments! And don't forget to pin and save it for next time!

    pinterest pin for apple pie gluten free coffee cake

    More Sweet recipes for you to love

    • Gluten Free Apple Bread with Zucchini
    • Chocolate and Coconut Bread - gluten free
    • Chickpea Molasses Oatmeal Cookies
    • Aquafaba Dairy Free Whipped Cream
    red delicious apples with gluten free apple pie coffee cake

    Apple Pie Gluten Free Coffee Cake

    Yield: 1 cake
    Prep Time: 30 minutes
    Cook Time: 40 minutes
    Total Time: 1 hour 10 minutes

    This amazing gluten free and dairy free coffee cake is topped with an apple pie filling and a streusel topping! Perfect for weekend breakfasts and brunch.

    Ingredients

    • Cake Layer:
    • 1 ¾ cup Bob Red Mill's 1-1 Gluten Free Flour
    • 1 cup Sugar
    • 1 teaspoon Baking Soda
    • ½ teaspoon Baking Powder
    • 1 cup Almond Milk
    • 2 tablespoon Apple Cider Vinegar
    • ¾ cup Olive Oil
    • 3 Eggs
    • 1 teaspoon Vanilla
    • 1 teaspoon Cinnamon
    • 1 teaspoon Nutmeg
    • Apple Pie Filling Layer:
    • 4-5 Red Delicious Apples
    • 2 tablespoon Brown Sugar
    • 3 tablespoon Coconut Flour
    • 1 teaspoon Nutmeg
    • 1 teaspoon Cinnamon
    • 1 teaspoon Allspice
    • 1 teaspoon Cloves
    • 1 tablespoon Lemon Juice
    • Streusel Layer:
    • ¼ cup Brown Sugar
    • ¼ Bob Red Mill's 1-1 Gluten Free Flour
    • 1 tablespoon Molasses
    • Optional Icing:
    • 1 cup Powdered Sugar
    • 2-3 tablespoon Almond Milk

    Instructions

    1. Pre-heat the oven to 350.
    2. Make the cake layer first:
    3. In a medium mixing bowl, combine the dry ingredients- flour, baking soda, baking powder, salt, and spices.
    4. In a separate large mixing bowl, combine the wet ingredients- sugar, almond milk, apple cider vinegar, olive oil, eggs, and vanilla.
    5. Slowly add the dry mix of ingredients to the large mixing bowl full of wet ingredients.
    6. Mix thoroughly and pour into a greased and parchment lined cake pan.
    7. Set aside.
    8. Make the Apple Pie filling:
    9. Peel and thinly slice your apples and place in a bowl.
    10. Toss with the rest of the filling ingredients and evenly place the apples across the cake batter in the pan.
    11. Make the streusel:
    12. In a small bowl, combine the streusal ingredients with your fingers until it resembles a traditional streusel.
    13. Sprinkle over the top of the apple pie coffee cake and bake at 350 for 40-45 minutes.
    14. Enjoy drizzled with the optional icing or without!
    Nutrition Information:
    Yield: 8 Serving Size: 1
    Amount Per Serving: Calories: 688Total Fat: 25gSaturated Fat: 4gTrans Fat: 0gUnsaturated Fat: 20gCholesterol: 76mgSodium: 260mgCarbohydrates: 110gFiber: 6gSugar: 75gProtein: 7g

    Nutritional information isn't always 100% accurate.

    © Miriam
    Cuisine: American / Category: Dessert

    Gluten Free Dairy Free White Chicken Chili

    October 6, 2019

    2 bowls of creamy white chicken chili with avocados

    This gluten free dairy free white chicken chili is my fall and winter dream in a bowl. Just sitting under a blanket, watching the leaves fall or snow fall and eating bowl after bowl of this delicious, super easy, white chicken chili. The best part- it's dairy free and naturally gluten free but still so comforting. Can you say WIN?!

    Dairy Free White Chicken Chili

    Shredded chicken breast, chicken stock, and Thai Kitchen's Coconut Milk (my favorite), plus lime and a handful of spices, makes the best white chicken chili I've ever had. It's zesty, creamy, a little spicy, and so so savory good!

    chili bowls with thai kitchen coconut milk

    The coconut milk is what really sells this soup. I promise, you don't taste coconut at all. Just a super savory chili. It does help to cut through the spice and broth to create this lightly creamy flavor and consistency.

    Healthy White Chicken Chili

    This recipe is super simple and easy to make! In a large stock pot, add Extra Virgin Olive Oil (about 2 Tbsps), and your diced veggies- red onion, green bell pepper, de-seeded Jalapeno, fire roasted tomatoes, and shredded carrot.

    spoonful of white chicken chili with peppers and tomatoes

    Saute your veggies up with your spices to really get the flavor going in the pot for a few minutes until they start to brown.

    We love using Trader Joe's Chili Lime seasoning on so many things but especially in this chili. It adds the perfect amount of zest and spice!

    Add chicken broth, de-thawed chicken breasts, pinto beans, and 2 bay leaves. Let this cook for one hour until the chicken is tender and cooked through. Then you can take the chicken breasts out and shred on a cutting board using two forks.

    2 bowls of chili with avocados and thai kitchen coconut milk

    Place that beautiful juicy shredded chicken back into the pot with everything and add your lime juice and coconut milk. Stir completely and serve this amazing gluten free dairy free white chicken chili up!

    Top with some avocado slices, an extra lime wedge, or whatever your favorite chili topping are.

    a bowl of white chicken chili with lime wedges

    Tag us on Instagram @grabthemangos and give us a rating and review right here in the comments! And don't forget to pin and save it for next time!

    pinterest pin for gluten free dairy free white chicken chili

    More Sweet recipes for you to love

    • Sweet Onion Chicken Noodle Soup
    • Chicken Gyro Lettuce Wraps with DF Tzatziki Sauce
    • Dairy Free Loaded Chicken Nachos
    • Coconut Broccoli Cheddar Soup
    2 bowls of creamy white chicken chili with avocados

    Gluten Free Dairy Free White Chicken Chili

    Yield: 5-6 people
    Prep Time: 20 minutes
    Cook Time: 1 hour 10 minutes
    Total Time: 1 hour 30 minutes

    This super easy, healthy, gluten free, and dairy free creamy white chicken chili is so savory and delicious! Perfect for cold evenings and warm blankets 🙂

    Ingredients

    • 3 Chicken Breasts
    • 2 tablespoon Extra Virgin Olive Oil
    • 1 Jalapeno (de-seeded)
    • 1 Green Bell Pepper
    • 1 Red Onion
    • 1 Can Fire Roasted Tomatoes
    • 1 Carrot
    • 1 Can Pinto Beans (drained)
    • 2 tablespoon Seasoned Salt
    • 2 tablespoon Chili Lime Seasoning
    • 1 tablespoon Chili Powder
    • 1 Lime (juiced)
    • 2 32oz Cartons of Chicken Broth
    • 2 Bay Leaves
    • 1 Can Thai Kitchen Coconut Milk

    Instructions

    1. In a large stock pot or soup pot, combine your diced and de-seeded jalapeno, diced green bell pepper, diced red onion, fire roasted tomatoes, and shredded carrot with the olive oil and saute until cooked through and starting to brown.
    2. Add seasoning and toss throughout.
    3. Stir in the chicken broth and add 2 bay leaves, pinto beans, and your chicken breasts.
    4. Cook at a simmer for 1 hour until the chicken is tender and cooked through thoroughly.
    5. Take the chicken out and shred on a cutting board with 2 forks.
    6. Place the chicken back in the pot, remove the bay leaves, and add the lime juice, and coconut milk stirring well.
    7. Serve with avocados or an extra lime wedge and enjoy!
    Nutrition Information:
    Yield: 7 Serving Size: 1
    Amount Per Serving: Calories: 277Total Fat: 19gSaturated Fat: 12gTrans Fat: 0gUnsaturated Fat: 5gCholesterol: 50mgSodium: 2513mgCarbohydrates: 9gFiber: 2gSugar: 3gProtein: 20g

    Nutritional information is not always 100% accurate.

    © Miriam
    Cuisine: American / Category: Main Meals

    Chocolate Coconut Bread - Gluten Free, Dairy Free

    October 1, 2019

    a loaf of chocolate bread covered in coconut

    This chocolate coconut bread is so easy, yummy, and I mean does it get any better than chocolate and coconut? This bread uses coconut flour as well as Bob Red Mill's 1-1 gluten free flour blend and has coconut flakes inside as well as toasted on top with chocolate chips. Have I sold you on this bread yet? Maybe the fact that it is totally gluten free and dairy free will convince you!

    Coconut Flour

    So you may be wondering, why not just dump some coconut flour in this recipe and call it a day. Well coconut flour is one of my favorite flours to work with because of the unique texture it adds to anything baked. But, it also is SO absorbent that you need much much less of it than regular flour as well as more eggs to make it work. Basically, as with all gluten free options- there is a science to it and as long as you know how they work generally, you'll be just fine.

    overhead shot of chocolate bread covered in toasted coconut with chocolate chips

    So now you know this tip: coconut flour in baked goods needs to be a smaller amount with double the eggs.

    I decided to use some coconut flour in this recipe because, like I said, the texture is so good in baked goods. A yummy coconut texture with coconut flakes but a chocolatey flavor all around. UM YES!

    Chocolate Coconut Loaf

    Alright, my kids are asleep, I'm staring at a computer screen, and just dreaming of making this bread loaf again... maybe I will in the morning. But first let me show you my secrets!

    close up of the coconut on top of chocolate loaf

    How to make dairy free buttermilk

    First things first, this loaf gets it extra amazing flavor and texture from a little dairy free COCONUT buttermilk. That's right, coconut everything.

    After pre-heating the oven to 350, in a glass measuring cup, combine some coconut milk and Apple Cider Vinegar. This makes buttermilk- dairy free of course. The buttermilk in this recipe will react with the baking soda (think middle school science fair volcano) and create that beautiful rise for the bread without needing yeast while also showing off that chocolate flavor even more.

    a piece of chocolate coconut bread outside the loaf

    Set aside your coconut buttermilk while you combine the dry ingredients in one bowl, and the wet in another. Once they are ready to be combined into one big beautiful chocolate coconut loaf, add that magical buttermilk right into the mix.

    Finally, add your shredded coconut and fold all together. Bake in a greased and parchment lined bread pan for 40-50 minutes until done.

    slices of chocolate coconut bread

    Best part, 5 minutes before the bread is done, take it out to add more shredded coconut and dark chocolate chips to the top of the loaf. The coconut will get nice a golden tasted and the chocolate chips with slightly melt. Beauty in a bread!

    Let it cool before cutting into and enjoy with copious amounts of coffee in the morning like all great people do 😉

    hand picking up a piece of gluten free chocolate bread

    Tag us on Instagram @grabthemangos and give us a rating and review right here in the comments! And don't forget to pin and save it for next time!

    pinterest pin for chocolate coconut bread

    More Sweet recipes for you to love

    • Gluten Free Apple Zucchini Bread
    • Chocolate Peanut Butter Cookie Dough
    • Chickpea Molasses Cookies
    • 3 Ingredient Vegan Fudge Brownies
    a loaf of chocolate bread covered in coconut

    Chocolate Coconut Bread - Gluten Free, Dairy Free

    Yield: 1 loaf
    Prep Time: 20 minutes
    Cook Time: 45 minutes
    Total Time: 1 hour 5 minutes

    This chocolate coconut bread recipe is loaded with everything coconut (even coconut buttermilk) and is easy and simple to make! Gobble up your new favorite gluten free and dairy free bread.

    Ingredients

    • ½ cup Bob Red Mill's 1-1 ratio Gluten Free Flour
    • ½ cup Cocoa Powder
    • 1 teaspoon Baking Powder
    • ½ teaspoon Baking Soda
    • ¼ cup Coconut Milk (Thai's Kitchen brand is our favorite)
    • 2 tablespoon Apple Cider Vinegar
    • 3 Eggs
    • 1 cup Sugar
    • 1 teaspoon Vanilla
    • ½ cup Extra Virgin Olive Oil
    • 1 cup Coconut Flakes (plus more for topping)
    • Dark Chocolate Chips (for topping)

    Instructions

    1. Pre-heat the oven to 350.
    2. In a glass liquid measuring cup, combine the coconut milk and the apple cider vinegar to create your dairy free buttermilk and set aside.
    3. In a mixing bowl, combine the flour, coconut flour, cocoa powder, baking powder, and baking soda.
    4. In a separate large mixing bowl, combine the eggs, buttermilk mixture, sugar, vanilla, and olive oil.
    5. Slowly add the dry ingredients to the wet ingredients in the large mixing bowl and combine thoroughly.
    6. Add the coconut flakes and fold throughout the mixture.
    7. Pour into a greased bread pan lined with parchment paper and bake for 45-50 minutes until done.
    8. When there is 5 minutes left for the bread to bake, add your coconut flakes to the top and a handful of dark chocolate chips and finish baking.
    9. Let it cool and enjoy!
    Nutrition Information:
    Yield: 8 Serving Size: 1
    Amount Per Serving: Calories: 414Total Fat: 22gSaturated Fat: 8gTrans Fat: 0gUnsaturated Fat: 13gCholesterol: 70mgSodium: 200mgCarbohydrates: 49gFiber: 3gSugar: 32gProtein: 6g

    Nutrition information is not always 100% accurate.

    © Miriam
    Cuisine: American / Category: Bread

    Easy Chicken Gyros with Dairy Free Tzatziki Sauce

    September 30, 2019

    a platter of lettuce holding chicken gyros

    So the title of this post is a bit of a mouthful but honestly, you won't be thinking about that when you eat up these chicken gyros with dairy free tzatziki sauce! This is hands down one of my favorite recipes. There is a place down the road that I love to door dash in the middle of the night that has AMAZING chicken gyros. This recipe though might beat it. Same amazing gyro and tzatziki flavor, but this recipe makes it gluten free and dairy free.

    Dairy Free Tzatziki Sauce

    Chicken gyros are one of my all time favorite foods. I just love the flavors! However, whenever we go out we usually don't wind up getting them because it's never gluten free or dairy free in store. At home though, they are just as amazing with this easy recipe.

    dairy free tzatziki sauce in a pouring glass

    Tzatziki sauce is one of the best things there is. It goes so well with everything, is healthy, and umm have I mentioned is delicious? Traditionally, tzatziki sauce is made with yogurt, but in my recipe we use coconut milk. This worked better than I even thought it would. The result is definitely a sauce and not a thick dip like yogurt might give you. It is perfect for dipping veggies, though, and even more perfect for drowning your salads and gyros in.

    One can of full fat coconut milk, preferably the Thai Kitchen brand, which is my new obsession, a cucumber, lemon juice, garlic, and salt and pepper. That's all it takes. It is so rich, creamy, and easy to make (be right back- drooling). I used my blender to blend it all together getting it really well combined and breaking up the cucumber very easily.

    Easy Chicken Gyros

    The chicken part of this meal could not be more easy. Only 4 spices and you have a delicious aromatic and flavor packed chicken. I used seasoned salt, chili powder, cumin, and dried parsley flakes.

    close up of easy chicken gyros

    Cook your chicken pieces with olive oil and these spices up in a pan until they are done through. I like to cut my chicken bite size first to really get that seasoning all over as well as help it cook faster and easier.

    Gluten Free Gyro Lettuce Wraps

    You can definitely use this recipe in some soft and chewy pita bread instead of lettuce wraps. But, if you are gluten free like we are, lettuce wraps or even all together in a lettuce bowl works super well instead.

    We like to use either romaine lettuce for these or some butter lettuce works too. Whatever you have available or whatever you like better.

    red onion and tomatoes topping lettuce wraps

    To top your chicken gyros, we love things like red onions, tomatoes, olives, fresh green peppers, avocados, and of course your dairy free tzatziki sauce you just made!

    Tag us on Instagram @grabthemangos and give us a rating and review right here in the comments! And don't forget to pin and save it for next time!

    pinterest pin for chicken gyros and dairy free tzatziki sauce

    More Sweet recipes for you to love

    • Loaded BBQ Chicken Nachos - Dairy free and Gluten free
    • Asian Chicken Tacos
    • Creamy Cilantro Sauce - Dairy free
    • Roasted Veggie Bacon Pasta Salad - Dairy free and Gluten free
    a platter of lettuce holding chicken gyros

    Easy Chicken Gyros with Dairy Free Tzatziki Sauce

    Yield: 5-6 Gyros
    Prep Time: 15 minutes
    Cook Time: 10 minutes
    Total Time: 25 minutes

    This dairy free and gluten free take on classic Greek chicken gyros and tzatziki sauce is so easy to make and so delicious! Make into lettuce wraps or a gyro bowl. Tasty either way!

    Ingredients

    • Gyro Chicken:
    • 2-3 Chicken Breasts (cut to be bite size)
    • 1 tablespoon Seasoned Salt
    • 1 teaspoon Chili Powder
    • 1 teaspoon Cumin
    • 1 teaspoon Parsley Flakes
    • DF Tzatziki Sauce:
    • 1 can Coconut Milk (Thai Kitchen brand is best)
    • 1 Cucumber
    • 2 Cloves of Garlic
    • 2 tablespoon Lemon Juice
    • 1 tablespoon Parsley Flakes
    • Salt and Pepper to taste
    • Other Topping Ideas:
    • Red Onions
    • Black Olives
    • Tomatoes
    • Avocado

    Instructions

    1. In a large frying pan or cast iron skillet cook up your cut up chicken breasts with a drizzle of Extra Virgin Olive Oil and the spices over medium heat until cooked through.
    2. In a blender combine the sauce ingredients all together, adding as much salt and pepper as you like at the end.
    3. Assemble your chicken gyros either in the traditional pita bread or in a piece of romaine or butter lettuce, or as a salad in a bowl tossed all together.
    4. Drizzle the tzatziki sauce over the top and gobble up 🙂

    Notes

    The tzatziki sauce will keep in the fridge in a jar for about a week. Use on salads or to dip veggies into!

    Nutrition Information:
    Yield: 6 Serving Size: 1
    Amount Per Serving: Calories: 431Total Fat: 28gSaturated Fat: 17gTrans Fat: 0gUnsaturated Fat: 10gCholesterol: 79mgSodium: 1204mgCarbohydrates: 17gFiber: 4gSugar: 4gProtein: 30g

    Nutritional Information is not always 100% accurate.

    © Miriam
    Category: Main Dish

    Aquafaba Whipped Cream - dairy free, gluten free

    September 23, 2019

    stiff peaks in dairy free whipped cream

    Holy whipped cream! Have you ever heard of aquafaba whipped cream? Or just aquafaba in general? If you haven't, don't worry. I had never heard of this beauty until a few weeks ago. When you are suddenly gluten free and dairy free in your household, a whole new world seems to open up to you that you didn't even know existed. It's crazy!

    What is Aquafaba?

    So what is aquafaba? Well bare with me here while I explain. Simply put, it's the liquid that remains after soaking chickpeas or other beans and legumes. It has the same enzymes and structure that egg whites have. I know you may already be thinking, "wow. gross." BUT, this stuff is magic when you can't have dairy or if you are vegan. You can make whipped cream with it, meringue with it, even meringue cookies with it. This recipe, though, is for our favorite dairy free whipped cream!

    little hand taking a taste of vegan whipped cream

    Trust me, aquafaba whipped cream does not taste like chickpeas. Well, ok, it does by itself. But when we are done with it, it tastes like fluffy magic especially topping our homemade Hot Chocolate.

    Dairy Free Whipped Cream

    Let's make some whipped cream! This whipped cream is made the same as normal whipped cream. That's the beauty of this recipe. Only one little ingredient difference- that's it!

    hand mixer beating aquafaba into whipped cream

    I like to just save the liquid whenever I make a recipe involving chickpeas like my Chickpea Cardamom Blondies or my Chickpea Molasses Cookies. This way I have it on hand whenever we want whipped cream and it minimizes waste- always a plus.

    In a large mixing bowl pour your can of aquafaba (chickpea liquid) in and using an electric hand mixer start beating it with a whisk attachment on low to medium speed. You are going to be beating this stuff for at least 7 minutes or so. Start low and speed up from there as it starts to thicken and turn white and fluffy.

    testing the white peaks for whipped crea

    Just like a normal meringue or whipped cream, you can stop once stiff white peaks form. After that happens, add your vanilla and powdered sugar. Add the powdered sugar 1 tablespoon at a time while beating to avoid weighing the fluffy mixture down by dumping it all in at once. This way too, you can taste test how much sugar you want. A little less than ⅓ cup or a little more depending on your taste preference.

    whisk coming out of the bowl of aquafaba whipped cream

    As soon as you feel it's perfectly sweetened, use it to top hot chocolate, coffee, dairy free ice cream, pies, brownies, or anything else you like to use whipped cream for! Enjoy 🙂

    Tag us on Instagram @grabthemangos and give us a rating and review right here in the comments! And don't forget to pin and save it for next time!

    pinterest pin for aquafaba whipped cream

    More Sweet recipes for you to love

    • Hot Chocolate Mix - Dairy Free
    • Chickpea Blondies
    • Chickpea Molasses Cookies
    • Flourless Mug Cake
    stiff peaks in dairy free whipped cream

    Aquafaba Whipped Cream - dairy free, gluten free

    Yield: 1 bowl full
    Prep Time: 10 minutes
    Total Time: 10 minutes

    This aquafaba whipped cream is so simple and easy to make! A totally dairy free, vegan, whipped cream made from chickpea liquid to top your hot chocolate, coffee, cakes, and anything else!

    Ingredients

    • 1 can Chickpea Liquid (Aquafaba)
    • ⅓ cup Powdered Sugar (make sure it's vegan if you need to)
    • 1 teaspoon Vanilla Extract

    Instructions

    1. In a large mixing bowl, pour in the liquid (not chickpeas) from your can of chickpeas.
    2. Using a electric mixer with the whisk attachment, beat the liquid starting on low-medium and eventually moving up to a higher speed as it thickens.
    3. Beat for around 7 minutes, until stiff white peaks form.
    4. Once that's done, add in your vanilla and the powdered sugar 1 tablespoon at a time while continuing to beat with mixer. Feel free to add less or more sugar than ⅓ cup depending on your taste preference.
    5. Enjoy this dairy free silky whipped cream on hot chocolate, pie, or anything else!
    6. Store in the fridge for about a week but note that it will turn back into liquid and you can just beat it back to whipped cream again as needed.
    Nutrition Information:
    Yield: 7 Serving Size: 1
    Amount Per Serving: Calories: 60Total Fat: 1gSaturated Fat: 0gTrans Fat: 0gUnsaturated Fat: 0gCholesterol: 0mgSodium: 2mgCarbohydrates: 12gFiber: 2gSugar: 6gProtein: 2g

    Nutritional information isn't always 100% accurate.

    © Miriam
    Cuisine: American / Category: Dessert

    Loaded BBQ Chicken Nachos - Dairy Free

    September 21, 2019

    pan full of loaded bbq chicken nachos

    These loaded BBQ chicken nachos are completely dairy free and completely delicious. They still have that saucy tangy taste because of the BBQ sauce and some nutritional yeast tossed in. My kids and hubby who normally refuse to eat anything that is technically "fake cheese" because, let's be real, it's normally crap, absolutely gobbled up the whole pan of these nachos. Trust me, if you are dairy free like us, or just want to cut back on dairy, these nachos are the way to go!

    Game Day Nachos!

    We are hard core Vikings fans in our family and it runs deep in my hubby's family especially. So fall Sundays are a big deal every year. Every football Sunday is basically like thanksgiving every time. In our house, all the appetizers, treats, snacks, and drinks come out for the afternoon. This usually means lots of unhealthy crazy food and then a very light simple dinner later that night.

    nacho chips with bbq pulled chicken on top

    When we went dairy free and gluten free in our family though, the game day appetizers had to switch up. This meant trying out dairy free nachos! Ya gotta have the nachos baby!

    Enter these amazing dairy free loaded BBQ chicken nachos.

    taking a bite of loaded up nachos

    Loaded BBQ Chicken Nachos

    Ok so how to you get super tasty, loaded up nachos without all the cheese and dairy? This recipe has loads of peppers, onions, and BBQ pulled chicken. Using your favorite BBQ sauce (ours is usually a brown sugar BBQ sauce or a Carolina Gold type of BBQ sauce), make a simple BBQ pulled chicken layer on top of your nachos. PRO TIP: when you are done cooking your chicken through, place it in a bowl and shred using your electric beaters. Super easy, saves your fingers, and much quicker.

    Layer your BBQ pulled chicken on top of your corn tortilla chips. Layer #2, veggies. A layer of diced and seeded jalapenos (if those are too hot for you, green bell pepper works great too), then a layer of diced tomatoes, and a layer of diced red onion.

    • sprinkling peppers onto bbq chicken nachos
    • sprinkling tomatoes onto nachos
    • sprinkling red onion onto nachos
    • sprinkling nutritional yeast onto nachos

    Finally, nutritional yeast. Now this ingredient is the key to these nachos. Sprinkling some over the top and letting it mix with all the juices of the veggies and BBQ sauce is what gives it that hint of cheesy tangy flavor. I normally do not really like nutritional yeast. It has to be the right dairy free substitute for the meal I'm making. But for this recipe is works perfectly!

    Once you've layered all of this up, feel free to add bacon bits, olives, lettuce, etc. And dig in while you watch the game or hey, I don't judge if you're just there for the food 😉

    close up of dairy free loaded bbq chicken nachos

    Tag us on Instagram @grabthemangos and give us a rating and review right here in the comments! And don't forget to pin and save it for next time!

    pinterest pin for Loaded BBQ chicken Nachos dairy free

    More Sweet recipes for you to love

    • Bacon Wrapped Asparagus
    • Cilantro Lime Smashed Potatoes
    • Oven Baked French Fries
    • Bacon Roasted Veggie Pasta Salad
    pan full of loaded bbq chicken nachos

    Loaded BBQ Chicken Nachos - Dairy Free

    Yield: 5 people
    Prep Time: 20 minutes
    Cook Time: 15 minutes
    Total Time: 35 minutes

    This dairy free nachos recipe is so full of flavor and so easy to make, you won't even miss the cheese! Perfect for game day appetizers.

    Ingredients

    • Gluten Free Corn Tortilla Chips
    • 2 Large Chicken Breasts
    • 1 Red Onion
    • 1 Red Tomato
    • 2 Jalapenos (diced and seeded) *SEE NOTES*
    • ¼ cup - ½ cup Your Favorite BBQ Sauce
    • 2-3 tablespoon Nutritional Yeast

    Instructions

    1. Baked or on the stove top, cook your chicken breasts completely through.
    2. In a large bowl, place the chicken breasts and beat with an electric beater until fully shredded (or shred by hand with forks).
    3. Add ¼ cup of your favorite BBQ sauce or ½ cup if you like it more saucey!
    4. On a large pan, lay out your corn tortilla chips.
    5. Layer the BBQ pulled chicken on top.
    6. Next layer 1 whole diced red onion.
    7. Then 2 Jalapeno Peppers- diced and de-seeded.
    8. And finally, 1 whole red tomato, diced.
    9. Finish by sprinkling 2-3 tablespoon Nutritional Yeast over the top.
    10. ENJOY!

    Notes

    *can use a green bell pepper (diced) if jalapenos are too spicy for you*

    Nutrition Information:
    Yield: 5 Serving Size: 1
    Amount Per Serving: Calories: 178Total Fat: 3gSaturated Fat: 1gTrans Fat: 0gUnsaturated Fat: 2gCholesterol: 41mgSodium: 336mgCarbohydrates: 19gFiber: 3gSugar: 11gProtein: 20g

    Nutritional Information is not always 100% accurate.

    © Miriam
    Cuisine: American / Category: Side Dishes

    Homemade Hot Chocolate Mix - Dairy Free

    September 18, 2019

    cocoa mix in a mason jar and mug of hot chocolate

    This homemade hot chocolate mix is dairy free, only 3 ingredients, can be made in seconds, and so perfect for having a hot cup of cocoa on hand whenever you want. Just add some hot water, or my personal preference, hot oat milk (almond milk is also delicious), and stir in this homemade mix for the best hot chocolate ever. We make this mix over any of the store bought packs every time. It makes quite a lot, lasts a while, and just tastes way better. Plus, I know exactly what's in it.

    Sweet, Simple, and Dairy Free

    Ok, so the greatest thing about this hot chocolate mix is that you can make a jar full and put it on the counter for whenever you want some. I mean, it's 11:08pm in Minneapolis, everyone is sleeping, and I have just quietly made homemade, real hot chocolate for myself to drink while I watch "Harlots" on Hulu and write up this post.

    Now before you think, why the heck are you awake that late? Honey, this is nothing. Keeping up with 2 kids and a full time food blog is a lot of work and I need my simple sweet treats like this real hot cocoa to keep me going at night!

    close up of a tablespoon of hot chocolate mix and a mug

    This hot chocolate mix is great because it's got the right amount of cocoa to still taste great with dairy free milk. A lot of times, the store bought mixes are too watery for me and then taste so weird with something like oat milk, which is what we have on hand in our house. We also love that this is made from real ingredients. No fillers, no thickeners, and no stupid crazy weird ingredients.

    How to Make Dairy Free Homemade Hot Chocolate Mix

    Super easy peasy. In a mason jar or whatever container you want really, but I find mason jars to be such a staple in our house, combine your ⅔ cup of unsweetened cocoa powder, 1 cup of sugar, and a pinch of salt. And voila, you have a mix that is perfectly sweetened and chocolatey.

    over head shot of rich hot cocoa mix and a mug of whipped cream

    We prefer to use cacao versus unsweetened cocoa powder. The difference? Cacao is unprocessed cocoa powder. I think the taste is much richer, but either option works well.

    When you are ready to make a mug of hot chocolate, heat your milk or water and add 2 Tbsps of mix per mug. If you are making a lot, the whole jar of mix makes about 6-7 cups of hot chocolate. Enjoy with some whipped cream, marshmallows, or some dairy free whipped cream!

    Tag us on Instagram @grabthemangos and give us a rating and review right here in the comments! And don't forget to pin and save it for next time!

    pinterest pin homemade hot chocolate mix dairy free

    More Sweet recipes for you to love

    • Gluten Free Chocolate Mug Cake
    • Aquafaba Whipped Cream - dairy free, gluten free
    • Chickpea Molasses Cookies with Icing
    • Carrot Cake Overnight Oats
    cocoa mix in a mason jar and mug of hot chocolate

    Homemade Hot Chocolate Mix - Dairy Free

    Yield: 6-7 cups
    Prep Time: 3 minutes
    Cook Time: 3 minutes
    Total Time: 6 minutes

    This simple hot chocolate mix is so chocolatey and easy to make! With no powdered milk, this recipe is totally gluten free, dairy free, and vegan. Tastes amazing with dairy free milk too!

    Ingredients

    • ⅔ cup Unsweetened Cocoa Powder or Cacao
    • 1 cup Cane Sugar
    • Pinch of Salt
    • Milk of Choice (Oat Milk, Almond Milk, etc...)

    Instructions

    1. In a mason jar, combine the ingredients together well and store until you want hot chocolate.
    2. When you want hot cocoa, heat your milk of choice in a mug in the microwave or on the stove top.
    3. Add 2 tablespoon of the mix to your hot milk and stir well.
    4. Enjoy with whipped cream or marshmallows!

    Notes

    About 1.5 minutes- 2 minutes will usually heat the milk enough in the microwave.

    Nutrition Information:
    Yield: 7 Serving Size: 1
    Amount Per Serving: Calories: 146Total Fat: 1gSaturated Fat: 0gTrans Fat: 0gUnsaturated Fat: 0gCholesterol: 0mgSodium: 19mgCarbohydrates: 34gFiber: 2gSugar: 29gProtein: 2g

    Nutritional Information is not always 100% accurate.

    © Miriam
    Cuisine: American / Category: Drinks

    Chickpea Molasses Cookies- Gluten free, Dairy free

    September 16, 2019

    close up of a cookie with icing

    These chickpea molasses cookies are easy to make, filled with molasses and maple syrup, and are completely gluten free, dairy free, and sugar free. The only refined sugar is in the icing on top, but even that is still dairy free icing! Woah right? These are soft, chewy, and so ready for the holidays coming up soon. They just taste like cozy if you know what I mean. I made an entire batch just this morning and they are gone. I mean obliterated within the hour.

    Chickpea Cookies

    Most of the time, if you see chickpea cookies listed, they just used chickpea flour. These cookies though get their amazing soft and doughy texture from the whole can of chickpeas that get blended up in them. I LOVE using chickpeas in baking and especially in desserts.

    a bunch of molasses cookies with a bowl of icing

    Chickpeas are so full of protein, making these cookies a totally healthy treat for you. I honestly would let my kid have these for breakfast knowing she was getting more protein and less sugar than a regular pancake or waffle breakfast. How crazy is that to think about?

    I used the same method for these chickpea cookies that I used in my Cardamom Blondie recipe. By draining the chickpeas and blending them with some olive oil, you get a really creamy and soft base for these cookies.

    spoon drizzling icing onto a cookie

    No Sugar, Just Maple Syrup

    So like I said, these chickpea molasses cookies are filled with rich molasses and have no sugar. Just some maple syrup, which if you ask me, complements the molasses flavor even more than refined white sugar could. Combining the maple syrup, cinnamon and allspice, and molasses makes the warmest doughy-est softest drop cookie ever. Trust me 😉

    molasses cookie with a bite taken out of it

    The only sugar in this whole recipe is the optional icing. I love icing on my cookies, and because my husband and kids begged for the icing, we of course had the icing on ours. Just some powdered sugar, a little vanilla, and some oat milk makes an amazing dairy free icing for all of your holiday cookies. So let's make these cookies!

    Tag us on Instagram @grabthemangos and give us a rating and review right here in the comments! And don't forget to pin and save it for next time!

    pinterest pin

    More Sweet recipes for you to love

    • Chickpea Cardamom Blondies
    • Peanut Butter Chia Seed Cookie Dough
    • Gluten Free Chocolate and Marshmallow Cookies
    • Carrot Cake Overnight Oats
    close up of a cookie with icing

    Chickpea Molasses Cookies- Gluten free, Dairy free

    Yield: 18-24 cookies
    Prep Time: 25 minutes
    Cook Time: 9 minutes
    Total Time: 34 minutes

    These soft and chewy molasses cookies are gluten free and dairy free, made with chickpeas and maple syrup! Healthy and delicious and iced with a dairy free icing. Best, easy recipe!

    Ingredients

    • 1 ¾ cups Bob Red Mill's 1-1 Gluten Free Flour
    • 1 can Chickpeas (drained)
    • ½ cup Olive Oil
    • ⅓ cup Molasses
    • ½ cup Maple Syrup
    • 1 cup Gluten Free Rolled Oats
    • 2 teaspoon Cinnamon
    • 1 teaspoon Allspice
    • 1 teaspoon Baking Powder
    • 2 Eggs
    • For the Icing:
    • 1 cup Powdered Sugar
    • 1 teaspoon Vanilla Extract
    • 2 tablespoon Oat Milk (or your choice of milk)

    Instructions

    1. Pre-heat the oven to 375.
    2. In a blender, blend the drained chickpeas and olive oil together until smooth and creamy.
    3. In a large mixing bowl, combine the molasses, maple syrup, and eggs.
    4. Mix in the chickpea puree and combine thoroughly.
    5. Add your flour, oats, spices, and baking powder to the bowl and mix until fully combined into a soft dough.
    6. On a baking sheet lined with parchment paper, drop the cookies (using a spoon or a cookie scooper) about an inch or so apart.
    7. Bake for 9-10 minutes.
    8. While they bake, make your icing if you are going to ice them, by mixing together all the icing ingredients.
    9. Once the cookies are done, let them cool before coating them in icing and enjoying!
    Nutrition Information:
    Yield: 20 Serving Size: 1
    Amount Per Serving: Calories: 172Total Fat: 7gSaturated Fat: 1gTrans Fat: 0gUnsaturated Fat: 5gCholesterol: 19mgSodium: 66mgCarbohydrates: 26gFiber: 2gSugar: 15gProtein: 3g

    Nutritional Information is not always 100% accurate.

    © Miriam
    Cuisine: American / Category: Dessert

    Roasted Veggie Pasta Salad with Bacon

    September 13, 2019

    gluten free pasta and roasted veggies

    This roasted veggie pasta salad is loaded with roasted vegetables and bacon and it has an amazing homemade white wine vinaigrette mixed in with it. Basically, this pasta salad is savory, gluten-free, dairy-free, and so delicious! You will want to bring it to every party and family gathering.

    bowl of roasted veggie pasta salad with bacon and vinaigrette

    Pasta Salad with Cooked Vegetables

    I love, absolutely and completely, pasta. Any pasta dish, I will be there ready and waiting to gobble it up. It's the same with my kids. We just love it. We now get the Live G Free brand of gluten free pasta at Aldi's. Definitely our favorite brand of gluten free pasta! It doesn't get slimy when cooked and still tastes like regular traditional pasta.

    This pasta salad is my favorite way to make pasta salad. I am not a fan of raw broccoli. I'll just be honest- it's like eating shredded chewed up paper to me. Just no. If I have to eat raw broccoli for some reason, you best believe it's drowning in ranch dressing. But, I love roasted broccoli. Cooked broccoli in general is my jam, but for this recipe, roasted with olive oil and a little seasoning salt and black pepper is the only way to go.

    Gluten Free Pasta Salad

    Ever since we went fully gluten free back in June for my daughter's sake mostly, we actually have been living healthier over all. Honestly, I don't think we'd go back to the way our diets were before June even if she suddenly was ok eating gluten again. We just automatically have been eating more meats, veggies, and fruits instead of bread with every meal like we used to.

    hand pouring the white wine vinaigrette into the pasta salad

    I normally give up the heavy carbs like breads and pasta when I'm pregnant. If I don't, as I learned with my first baby, I will blow up like a balloon. No joke, so swollen- yikes! But giving up a lot of that all together as a family has really helped us get more creative and naturally healthier with our meals.

    We every so often, though, still love our pasta. Enter- Aldi's Live G Free brand. I love, LOVE, this little section in Aldi's where I can get my 4 year old some cookies that she brings with her to family and friend functions so that she is never left out of dessert time. They also have our favorite gluten free pasta as I mentioned before.

    Roasted Veggie Pasta Salad

    This is one of our favorite pasta salad dishes. Roast up your broccoli, sliced carrots, and red onions with a drizzle of olive oil and some salt and pepper either in a toaster oven set to bake at 425 for 10-15 minutes, or in your regular oven at 425 for 10-15 minutes. While the veggies are roasting up, boil your pasta. We used one bag of the gluten free Live G Free Rotini. While the pasta boils, fry up your bacon until crispy and break or chop into small pieces.

    close up of roasted veggies in rotini

    In a mason jar, combine your extra virgin olive oil, white wine vinegar, minced garlic, cumin, seasoned salt, Italian seasoning, paprika, honey, and some black pepper. Put the lid on and shake it all up really well until the honey is fully dissolved into the mixture.

    It is optional to add black olives but if you don't, do you even have taste buds? I'm just asking for scientific purposes.

    Combine and toss everything in a large bowl together and taste the magic that is this roasted veggie pasta salad with bacon!

    Tag us on Instagram @grabthemangos and give us a rating and review right here in the comments! And don't forget to pin and save it for next time!

    pinterest pin for roasted veggie pasta salad with bacon

    More Sweet recipes for you to love

    • Watermelon Salad
    • Cilantro Lime Garlic Smashed Potatoes
    • Bacon Wrapped Asparagus with Balsamic Glaze
    • Oven Baked Salt and Vinegar French Fries
    • Roasted Buffalo Cauliflower
    gluten free pasta and roasted veggies

    Roasted Veggie Pasta Salad with Bacon

    Yield: enough for ~5 people
    Prep Time: 25 minutes
    Cook Time: 15 minutes
    Total Time: 40 minutes

    This easy, healthy, gluten free, pasta salad recipe with bacon and roasted veggies is so so yummy! You will want to bring this to every event 🙂

    Ingredients

    • 1 Bag of Gluten Free Rotini (Live G Free at Aldi's or another brand)
    • 1 cup Broccoli
    • 1 cup Sliced Carrots
    • ½ cup Diced Red Onion
    • 1 cup Crispy Chopped Bacon
    • For the Vinaigrette:
    • ¼ cup Extra Virgin Olive Oil
    • ¼ cup White Wine Vinaigrette
    • 1 teaspoon Minced Garlic
    • 1 teaspoon Seasoned Salt
    • 1 teaspoon Paprika
    • 1 teaspoon Italian Seasoning
    • 1 teaspoon Cumin
    • 1 tablespoon Honey

    Instructions

    1. In a large pot, cook your pasta according to the instructions on the bag.
    2. Either in a toaster oven set to bake at 425, or in a regular oven at 425, roast the broccoli, carrots, and red onion drizzled in olive oil and sprinkled with salt and pepper to taste.
    3. Roast your veggies in either type of oven for 10-15 minutes depending on how roasted you like your veggies.
    4. Cook up a cup of chopped bacon until crispy.
    5. While everything cooks, in a mason jar, mix your Olive Oil, white wine vinegar, honey, and seasonings.
    6. Placing the cap on the jar, shake it well.
    7. Once everything is done cooking, combine in a large bowl and toss with the vinaigrette and enjoy!
    Nutrition Information:
    Yield: 5 Serving Size: 1
    Amount Per Serving: Calories: 414Total Fat: 29gSaturated Fat: 7gTrans Fat: 0gUnsaturated Fat: 20gCholesterol: 45mgSodium: 1160mgCarbohydrates: 20gFiber: 3gSugar: 7gProtein: 18g

    Not all Nutritional information is always accurate.

    © Miriam
    Cuisine: American / Category: Salads

    Cilantro Lime Garlic Smashed Potatoes

    September 10, 2019

    a pan full of garlic smashed potatoes

    Garlic smashed potatoes are my new obsession. Healthy, gluten free, dairy free, and vegan, and just so so good! I love pretty much every and any way to make and eat a potato. French fries are my go to, potato chips, mashed potatoes, baked potatoes, you name it. But these smashed potatoes might be stealing my top spot for how to eat potatoes. Especially because these are so easy to make and even my four year old gobbled them up! We made our version with garlic, cilantro, and lime and it was amazing.

    Crispy Garlic Smashed Potatoes

    We used cream potatoes in our recipe and they got pretty crispy around the edges but stayed creamy in the centers. If you want something that's more crispy in general, use red potatoes instead. I, however, thought the cream potatoes were perfect!

    hand holding up a smashed potatoe

    A cream potato is just a potato (usually golden or red- we used golden) that has been harvested before maturity so they are still small, extra soft, and creamy. I love these potatoes for meals like this or even for mashed potatoes. In this recipe they are extra easy too because they smash so well.

    Cilantro Lime Potatoes

    Adding cilantro and lime to these garlic smashed potatoes really kicked it up a notch. These are so perfect for football Sunday appetizers. Our family is made up of die hard Vikings fans and football is an event every single Sunday in the fall. We make all the appetizers and yummy snack foods, and hang out laughing and having fun and whether you are watching or not, you have purple and gold on and you're eating delicious food together. That's fall Sundays in our house.

    close up of potatoes with cilantro and lime

    With some fresh chopped cilantro, a little olive oil, one whole squeezed lime, garlic, and salt and pepper, these potatoes are really no fuss and come together easily. We love to either dip our in ranch or add a dollop of sour cream. Even plain they are so yummy!

    Smashed Potatoes Recipe

    Making smashed potatoes is a two step easy process. First you boil the potatoes. Make sure they don't get too soft, but just soft enough to smash easily. Then you press them flat and bake them to get crisp.

    We used small gold cream potatoes and boiled them for 20 minutes which was perfect. After boiling them, let them dry out for about 10 minutes so that water doesn't mix in with them when you smash them.

    hand smashing a potato with a mason jar

    On parchment paper smash them flat using the bottom of a mason jar or something similar that will press them evenly flat. The parchment paper really helps to make sure they don't stick while they get crisp in the oven.

    Stir the cilantro, garlic, lime juice, and olive oil in a small bowl and pour over the top of the smashed potatoes, brushing it to spread it out evenly. Bake them for 40 minutes at 375. Sprinkle with salt and pepper and let them rest for at least 10 minutes before trying to lift them off the pan to make sure they set and won't fall apart too much. Enjoy!

    Tag us on Instagram @grabthemangos and give us a rating and review right here in the comments! And don't forget to pin and save it for next time!

    Pinterest Pin for cilantro lime garlic smashed potatoes

    More Sweet recipes for you to love

    • Peanut Butter Chia Seed Cookie Dough
    • Peach Jalapeno Salsa
    • Buffalo Roasted Cauliflower
    • Oven Baked Salt and Vinegar French Fries
    a pan full of garlic smashed potatoes

    Cilantro Lime Garlic Smashed Potatoes

    Yield: 20
    Prep Time: 25 minutes
    Cook Time: 40 minutes
    Total Time: 1 hour 5 minutes

    These garlic smashed potatoes with cilantro and lime are totally gluten free and vegan! Super easy to make and delicious. Perfect for Sunday football appetizers 🙂

    Ingredients

    • 1.5 lbs (about 15 small potatoes) Cream Potatoes
    • ¼ cup Extra Virgin Olive Oil
    • ¼ Fresh Chopped Cilantro
    • 1 Whole Lime Juiced
    • 2 teaspoon Minced Garlic (about 2 cloves)
    • Salt and Pepper

    Instructions

    1. In a large pot, boil enough water to cover the potatoes over high heat.
    2. Once boiling, reduce the heat slightly so it doesn't spill over, and cook for 20 minutes until tender.
    3. While they boil, mix the garlic, cilantro, lime, and olive oil in a small bowl and pre-hest the oven to 375.
    4. When the potatoes are done, drain and let them dry out for at least 10 minutes.
    5. Using the bottom of a mason jar or a flat similar object, press the potatoes flat on a parchment lined baking sheet.
    6. Coat the smashed potatoes in the cilantro lime mixture and bake in the oven for 40 minutes until they are crispy enough for you.
    7. Sprinkle with salt and pepper to taste and let them rest when they are done for about 10 minutes.
    8. Enjoy!
    Nutrition Information:
    Yield: 10 Serving Size: 1
    Amount Per Serving: Calories: 74Total Fat: 5gSaturated Fat: 1gTrans Fat: 0gUnsaturated Fat: 5gCholesterol: 0mgSodium: 32mgCarbohydrates: 6gFiber: 1gSugar: 0gProtein: 1g

    Nutritional information is not always 100% accurate.

    © CradleKitchen
    Cuisine: American / Category: Sides

    Carrot Cake Overnight Oats

    September 4, 2019

    a jar of overnight oats and carrots and cinnamon

    This carrot cake overnight oats recipe is one of our favorite ways to make overnight oats. This trendy breakfast is so nice to have on those mornings where you just need to grab something and go! Think early morning, get the kids out the door, but still give them a great breakfast in the car. This is that kind of recipe. Make it in their own little snack jars and you've got a great, "holy crap what time is it, get your butt out the door!" breakfast that isn't McDonald's or cafeteria mysteries. Oh, and did I mention it tastes like spiced carrot cake?

    Overnight Oats

    So what the heck are overnight oats? Well come out from under your rock and enjoy the necessity that is overnight oats in this day and age. With how fast life moves these days (I could go on a real rant about this fast paced life thing), we still need a healthy breakfast in the mornings. When I wake up I want to know that no matter how late my hubby's running for work, or how tired I am from being up all night doing whatever the heck mom's do all night I still want to know that I can just reach into my fridge and grab everybody INCLUDING ME (I am totally guilty of forgetting to eat), a healthy filling and delicious breakfast!

    spoonful of overnight oats with shredded carrot and cinnamon and cloves

    Annnnd in comes the overnight oats trend. This is a thing that people are generally obsessed with that I can get on board with for the reasons stated above. Here's what you need for basic overnight oats:

    • Gluten Free Rolled Oats (my favorite is at Aldi's in their Live G Free brand)
    • Chia Seeds
    • Oat Milk (or your choice of milk)
    • Honey (or Maple Syrup)

    Mix all of these together in a mason jar or bowl, cover and let it sit in the fridge for 2 hours or overnight for a basic plain overnight oats breakfast.

    overhead of a jar of cinnamon and carrots in oatmeal

    Carrot Cake Overnight Oats Recipe

    Carrot cake is one of the best cake flavors and you can fight me on this but I will win. I mean, it's got all the best warm spices, it has the vegetable that no ones really likes but somehow tastes amazing so it's healthy-ish? And who can pass up the perfect cake for a healthy heaping of cream cheese frosting. The BEST.

    Now, I have a weakness and it is dessert for breakfast. You can see where this is going. I love having cakes and pies and all the donuts for breakfast in the morning with a nice warm cup of coffee. There is just no better way to start the morning for me. A piece of apple pie and coffee is the best way to pull me out of bed.

    2 jars of carrot cake overnight oats

    I really wanted to just keep scarfing down oodles of sugar and carbs every morning, but eventually I realized that I would have to hide this dessert for breakfast thing from my children (because I love them) so I had to come up with something healthier. Enter this gem of a recipe that keeps the dessert for breakfast but also keeps us healthy!

    Using that base from above, add ground cinnamon, ground cloves, and one shredded carrot. Boom! So easy and just let it sit overnight for a delicious breakfast of champions in the morning!

    Tag us on Instagram @grabthemangos and give us a rating and review right here in the comments! And don't forget to pin and save it for next time!

    pinterest pin for carrot cake overnight oats

    More Sweet recipes for you to love

    • Banana Oat Pancakes
    • Extra Fluffy Pancakes
    • Gluten Free Apple Zucchini Bread
    a jar of overnight oats and carrots and cinnamon

    Carrot Cake Overnight Oats

    Yield: 1 serving
    Prep Time: 5 minutes
    Fridge Time: 2 hours
    Total Time: 2 hours 5 minutes

    This carrot cake overnight oats recipe is so yummy! Easy to make, healthy, and right in a mason jar ready to go wherever you're going 😉

    Ingredients

    • ½ cup Gluten Free Rolled Oats
    • ¾ cup Oat Milk
    • 1 tablespoon Chia Seeds
    • 1 tablespoon Honey (or Maple Syrup)
    • 1 Shredded Carrot
    • ½ teaspoon Ground Cinnamon
    • ½ teaspoon Ground Nutmeg

    Instructions

    1. Mix all the ingredients together in a mason jar or container of choice and place, covered, in the refrigerator for at least 2 hours or overnight.
    2. When you are ready to eat, mix thoroughly again and top with optional nuts, yogurt, more honey or maple syrup, raisins... etc. Enjoy!
    Nutrition Information:
    Yield: 1 Serving Size: 1
    Amount Per Serving: Calories: 403Total Fat: 7gSaturated Fat: 1gTrans Fat: 0gUnsaturated Fat: 5gCholesterol: 0mgSodium: 53mgCarbohydrates: 79gFiber: 12gSugar: 35gProtein: 9g

    Nutrition information is not always 100% accurate.

    © CradleKitchen
    Cuisine: American / Category: Breakfast

    Gluten Free Apple Bread (with Zucchini)

    August 28, 2019

    Overhead shot of zucchini apple bread loaf with apple slices on top

    This is hands down one of my favorite sweet bread recipes. Gluten free apple bread is so perfect for fall (it's still August I know). With fall just around the corner and the weather already turning chilly over here, I just had to whip up some of this bread to share. Totally gluten free and no crazy ingredients!

    Zucchini Bread

    This is technically a zucchini bread if you want to know the truth. I came up with this amazing zucchini bread recipe a while ago. My husband-roomie-father of my children-complete other half- whatever you want to call him, absolutely LOVES zucchini bread and it is one of the only things he gets a little picky about. For a long time his mom was the only one who made the best zucchini bread. Now I feel like I've finally come up to par with her recipe.

    sliced close up of zucchini apple bread

    I added apples to this particular version of my zucchini bread and added the gluten free part of course, with Bob Red Mill's 1-1 ratio Gluten Free Flour (my favorite blend). Zucchini bread is already just so full of those warm fall spices and flavors, adding apples seemed perfect! With cinnamon, nutmeg, and allspice, this bread is our favorite breakfast in the fall. Sit outside with a sweater, no make up, a cup of coffee and some of this bread. Midwest heaven has it you.

    Gluten Free Apple Bread

    Apple bread is one of my favorite treats in the fall. I, of course, love anything that shovels butter into my mouth so this bread is a winner for me. After apple picking with two kids and my husband, we tend to come home with so many apples and I hate letting food go to waste. Not about that wasteful life over here. So we make lots of apple recipes.

    Front of the loaf of apple zucchini bread with apple slices on top

    This bread is super simple and easy. Using about a cup of grated zucchini (1 big zucchini or 2 small ones usually), and 1 ½ cups of chopped and peeled apples, this recipe has a lot of moisture in it. Make sure when you chop your apples, they are bite size. You want them big enough to be noticeable but small enough that they won't weigh down and sink to the bottom of the bread.

    Homemade Apple Zucchini Bread

    In a large mixing bowl, combine the wet ingredients- sugar, brown sugar, vanilla, eggs, olive oil, apples, and zucchini. In a separate, medium mixing bowl, whisk together the dry ingredients- flour, baking powder, salt, and spices. A really nice part about this bread is that it's also dairy free. Win!

    looking at the texture of the apple bread

    Once the separate bowls are mixed, combine them together by adding the dry ingredients to the large wet ingredient bowl. Stir thoroughly combining to make sure that there won't be any dry ingredient pockets in the mixture. Pour into a greased bread pan and bake for about an hour and a half at 350. Depending on your oven and the elevation of where you live, you may need to bake your bread a tad longer. Check to see if it's done by poking a tooth pick or butter knife in the center. If it comes out clean, it's done. If it's still fairly gloopy, bake for 5-10 more minutes until it does come out clean.

    Let your bread cool for a while so it can set and is easier to cut into. Enjoy with a load of butter slapped on top and gobble up with some coffee 🙂

    Tag us on Instagram @grabthemangos and give us a rating and review right here in the comments! And don't forget to pin and save it for next time!

    pinterest pin for gluten free apple bread with zucchini

    More Sweet recipes for you to love

    • Skillet Apple Crumble
    • Honey Oat Bread (not gluten free)
    • Strawberry Popsicles
    • Tahini Granola
    Overhead shot of zucchini apple bread loaf with apple slices on top

    Gluten Free Apple Bread (with Zucchini)

    Yield: 1 loaf
    Prep Time: 20 minutes
    Cook Time: 1 hour 30 minutes
    Total Time: 1 hour 50 minutes

    This homemade gluten free apple bread is made with zucchini, cinnamon, nutmeg, and is so so moist! Super easy to make and perfect for fall 🙂

    Ingredients

    • 2 ½ cups Bob Red Mill's 1-1 ratio Gluten Free Flour
    • 1 teaspoon Baking Powder
    • Pinch of Salt
    • 1 teaspoon Cinnamon
    • 1 teaspoon Nutmeg
    • 1 teaspoon Allspice
    • ¾ cups White Sugar
    • ¼ cup Brown Sugar
    • 2 Eggs
    • ½ cup Olive Oil
    • 1 cup Grated Zucchini (1 large zucchini OR 2 small zucchini)
    • 1 ½ cups Chopped and Peeled Apples (2-3 apples)
    • 1 teaspoon Vanilla Extract

    Instructions

    1. Pre-heat the oven to 350.
    2. In a large mixing bowl, combine the wet ingredients- sugars, zucchini, apples, olive oil, vanilla, and eggs.
    3. In a separate medium mixing bowl, combine the dry ingredients- flour, baking powder, salt, and spices.
    4. Add the medium bowl of dry ingredients to the large bowl of wet ingredients and combine thoroughly into a thick batter.
    5. Pour batter into a greased bread pan.
    6. Bake at 350 for 1 ½ hours until cooked through. Check by poking a tooth pick or a butter knife all the way to the bottom in the center of the loaf and if it comes out clean it is done. If it is fairly gloopy, bake for 5-10 more minutes until done.
    7. Let cool before cutting and enjoy!
    Nutrition Information:
    Yield: 8 Serving Size: 1
    Amount Per Serving: Calories: 305Total Fat: 15gSaturated Fat: 2gTrans Fat: 0gUnsaturated Fat: 12gCholesterol: 47mgSodium: 99mgCarbohydrates: 40gFiber: 1gSugar: 26gProtein: 4g

    Nutrition Information isn't always accurate.

    © CradleKitchen
    Cuisine: American / Category: Bread

    Strawberry Popsicles with Oat Milk

    August 22, 2019

    a strawberry milk popsicle with a bite taken out of it and some sliced strawberries around it

    There are still a few hot days ahead of us this summer and I am determined to use them up filled with summer activities. One of those activities being, eating way to many of these scrumptious strawberry popsicles. These are extra creamy and delicious. Even my daughter pointed out, they taste like the creamy ones from the store but better and dairy free!

    strawberry slices with oats and popsicles

    Strawberry Popsicles

    Living in Minnesota, August comes and instead of dreading the hot weather, I start dreading what's coming up. I love fall weather as much as the next basic girl but here in Minnesota, Fall/Autumn is basically like a Sunday evening. It's kind of relaxing because it's technically your day off, but all you can think about is how much you don't want to go to work the next morning. Winter in Minnesota is like Monday morning at work plus a migraine.

    Well these strawberry popsicles honestly help take your mind off the looming winter ahead because they just ooze delicious summer time vibes. The best part about these pops though is that they are dairy free (you wouldn't know it) which means they won't hurt any sensitive tummies.

    stacked strawberry popsicles with a bite taken out of one

    Strawberry Oat Milk

    I personally think that oat milk is a great milk to bake and make food with. I don't drink it straight or anything personally, but I LOVE it in my Chai tea lattes. So good!

    We buy the big 6 carton case of organic Oat Milk from Costco, but any oat milk (homemade included) will work great. This recipe is super simple. In a medium sauce pan, combine your oat milk, fresh cut strawberries, sugar (maple syrup works as well), and a splash of vanilla. Bring to a boil for about 20 seconds. You basically just want to get it boiling and then turn the heat off to let it cool. Make sure it doesn't go too crazy and boil over (guilty over here). Keep stirring continuously to get that sugar to dissolve into the pink milk. Those fresh strawberry juices will seep into the oat milk too giving it that dusty rose color.

    hand holding a bitten strawberry oat milk popsicle

    Let the pink strawberry milk cool down completely before filling your popsicle molds and freezing. Feel free to add a few fresh strawberry slices to the molds with the milk. This addition of some fresh, un-boiled, strawberry slices just gives these popsicles that pop of color and a nice bite of strong strawberry flavor! Freeze for at least 6 hours or overnight. Once you are ready to eat them, just follow your popsicle mold instructions on how to get them out and enjoy your new favorite summer treat!

    Tag us on Instagram @grabthemangos and give us a rating and review right here in the comments! And don't forget to pin and save it for next time!

    Strawberry popsicles with Oat Milk pinterest pin

    More Sweet recipes for you to love

    • Infused Strawberry Iced Tea
    • Peach Jalapeno Salsa
    • Maple Brown Sugar Dry Rub
    • Zucchini Noodles with Shrimp
    a strawberry milk popsicle with a bite taken out of it and some sliced strawberries around it

    Strawberry Popsicles with Oat Milk

    Yield: 8-10 popsicles
    Prep Time: 10 minutes
    Cook Time: 3 minutes
    Freeze Time: 6 hours
    Total Time: 6 hours 13 minutes

    These homemade strawberry popsicles are completely dairy free and vegan! Using fresh strawberries and oat milk, these are amazingly creamy and delicious. A perfect summer treat!

    Ingredients

    • 2 cups Oat Milk
    • ½ cup Sugar (or Maple Syrup)
    • 1 cup Fresh Sliced Strawberries
    • 1 teaspoon Vanilla Extract

    Instructions

    1. In a medium sauce pan, stir together all of the ingredient and bring to a boil.
    2. Once boiling, turn the heat off completely and let the mixture cool. (Keep stirring until the bubbles really start to go down)
    3. Let it cool for an hour at least before pouring into your popsicle molds.
    4. You can add (optional) more fresh sliced strawberries to the molds for even more strawberry!
    5. Freeze for 6 hours or overnight.
    6. Follow your popsicle mold instructions for how to get them out and enjoy!
    Nutrition Information:
    Yield: 8 Serving Size: 1
    Amount Per Serving: Calories: 89Total Fat: 0gSaturated Fat: 0gTrans Fat: 0gUnsaturated Fat: 0gCholesterol: 0mgSodium: 3mgCarbohydrates: 22gFiber: 1gSugar: 18gProtein: 1g

    Nutrition is not 100% accurate because everyone uses slightly different products.

    © CradleKitchen
    Cuisine: American / Category: Dessert

    Peach Jalapeno Salsa- Sweet and Spicy

    August 20, 2019

    jalapeno and peach salsa in a cute pink cup with peach slices around it

    This peach jalapeno salsa recipe is so so yummy! I mean we go through a couple jars per month during peach season. It goes so well with some tortilla chips, on any kind of taco, or even as a great marinade. The perfect summer blend of sweet and spicy. Super quick and easy to make, healthy and of course gluten free 😉

    Peach Jalapeno Salsa

    This salsa is definitely a medium heat salsa. Maybe that's too much for you, or not enough- either way we have your option here. Jalapenos are, in my opinion, an incredibly misunderstood pepper. People who don't like spice think they will explode in fire when eating them. Or, the opposite, you love them and don't even bother de-seeding them as you throw them into your fire breathing mouth.

    lay out of tortilla chips and peach and jalapeno salsa

    I am right down the middle. I love spice and spicy food, but I also like to actually taste flavor. So too much spice can kill it for me. I prefer my jalapenos without seeds so that you get a fire-y kick with every bite but you don't start chugging milk after 5 seconds of eating.

    The seeds are where the heat and spice are in a jalapeno. The capsaicin in peppers is what causes that burning sensation in your mouth if you don't have enough tolerance built up. The capsaicin is actually the peppers natural defense. The dryer the pepper, the more stressed out it will be, and the hotter the sensation will be when eating it. Cool right? Kind of a sad day for the pepper though, when you realize it's heat comes from it's stress. Rough stuff!

    close up of peach and jalapeno salsa with fresh peach slices

    Making Homemade Salsa

    Homemade salsa is always the best salsa. There's just an element (love? I don't know) that really comes through when it's made by hand in a home kitchen.

    Peach salsa and other fruity salsa's, like pineapple and mango, are my absolute favorite. As I sit here writing up this post, I am actually eating chips with THIS peach jalapeno salsa. No joke. I'll even let you in on a little secret- favorite snack combo: Spicy chips and salsa, followed by Oreos. Sounds so weird right? Salty and spicy followed by sweet is honestly the only way to live life.

    hand about to eat some chips and peach salsa

    This recipe is super straightforward. A green bell pepper, a jalapeno pepper, half of a lime, two peaches, a tablespoon of honey, fresh cilantro, and some salt and pepper to taste is all you'll need.

    Things to remember/Tips:

    • Mild peach salsa- no jalapeno pepper, instead a red bell pepper.
    • Medium peach salsa- (the way I prefer it) Jalapeno de-seeded and rinsed.
    • Hot and Firey- the jalapeno and seeds and everything get tossed right in. (I did try this and had to jug a ton of Oat milk (all I had) while my 3 year old laughed at me.

    Make sure to dice everything up nice and small so that it all can fit on a chip together instead of just one piece of pepper getting shoveled into your mouth. Enjoy your new favorite summer salsa!

    close up of a spoonful of jalapeno peach salsa and sliced peaches

    Tag us on Instagram @grabthemangos and give us a rating and review right here in the comments! And don't forget to pin and save it for next time!

    This is such a yummy peach salsa recipe! With bell peppers and jalapeno for an added spicy kick.  So easy and quick to make and great on everything from chicken and pork to fish and tacos, or just with some tortilla chips!

    More Sweet recipes for you to love

    • Roasted Buffalo Cauliflower
    • Quick Pickled Red Onions
    • Strawberry Sweet Iced Tea
    • Salt and Vinegar French Fries
    jalapeno and peach salsa in a cute pink cup with peach slices around it

    Peach Jalapeno Salsa - Sweet and Spicy

    Yield: 1- 16oz Mason Jar
    Prep Time: 15 minutes
    Total Time: 15 minutes

    This is such a yummy peach salsa recipe! With bell peppers and jalapeno for an added spicy kick. So easy and quick to make and great on everything from chicken and pork to fish and tacos, or just with some tortilla chips!

    Ingredients

    • 2 fresh ripe Peaches
    • 1 Jalapeno Pepper
    • 1 Green Bell Pepper
    • 1 Tablespoon of Honey
    • ½ a Lime
    • ¼ cup Fresh Cilantro
    • Salt and Pepper to taste

    Instructions

    1. Dice the green bell pepper nice and small. (able to fit on a chip)
    2. Take the seeds out of the jalapeno pepper and rinse clean and dice small as well. (See Notes)
    3. Skin and dice the peaches.
    4. Add all of these diced ingredients in a bowl together and add the Honey, the juice from half of a Lime, and the cilantro (finely chopped).
    5. Add salt and pepper to taste and enjoy!

    Notes

    Mild Salsa- no jalapeno, instead a red bell pepper

    Medium Salsa- exactly this recipe.

    Hot Hot Salsa- Keep the seeds and everything in!

    Nutrition Information:
    Yield: 12 Serving Size: 1
    Amount Per Serving: Calories: 21Total Fat: 0gSaturated Fat: 0gTrans Fat: 0gUnsaturated Fat: 0gCholesterol: 0mgSodium: 25mgCarbohydrates: 5gFiber: 1gSugar: 4gProtein: 0g

    Nutrition information isn't always 100% accurate because people use slightly different ingredients.

    © CradleKitchen
    Cuisine: American / Category: Snacks

    Crunchy Thai Chicken Salad with Peanut Dressing

    August 16, 2019

    close up if chicken thighs on crunchy greens with peanut dressing

    This Thai chicken salad with peanut dressing is mouth wateringly good. I mean, I am dreaming about the left overs right now (of which there are none- because we ate it all). Shaved Brussels sprouts, chopped kale, and shredded cabbage make up this crunchy salad. Add some grilled chicken thighs and the best Thai peanut dressing you've ever tasted, and you have this dreamy Asian salad!

    Crunchy Asian Salad

    So this salad is beyond belief yummy. Bonus, it's also incredibly easy to make. The only thing you're cooking is some juicy crispy chicken thighs. This salad will knock that boring side salad you've been eating right off the table.

    hand pouring peanut sauce over thai chicken salad

    What makes this salad crunchy? The same thing that makes it super healthy. Only three greens- kale, cabbage, and brussels sprouts. All finely chopped and tossed in together to give this salad that extra crunch and boost of healthy greens. Once you've tossed the greens together, grill up your chicken thighs.

    I like to keep this part super simple. There is already so much flavor going on in this salad so packing in too much more would just muddle things in my opinion. With some sesame seed oil in the pan, place your chicken thighs in to sear on medium-high heat. Once the skin is crispy on both sides, turn the heat down to medium-low and let it cook through fully. You can always add some salt and pepper but that's really all these thighs need.

    side shot of the bowl of thai salad with peanut sauce dripping down

    Thai Peanut Dressing

    Thai peanut dressing is honestly one of my favorite things to make and add to meals. We love this meal because it's completely gluten free too! This dressing is super easy to make. Just pop everything into the blender or your bullet blender and pull out the greatest sauce ever!

    The key to this sauce is the green dragon hot sauce from Trader Joe's. Just a dash of this adds so much flavor to anything. It doesn't get too spicy don't worry. My 3 year old said this was her new favorite salad ever. Not a lot of 3 year olds will say that about any dish with green food in it. So you know it's amazing 😉

    thai peanut dressing

    Once you've grilled your chicken, blended up your sauce, and tossed all the greens, you can add all three components together to form your amazing salad. We love to serve this with an extra lime wedge to drizzle over the top for a dash of extra zing.

    Tag us on Instagram @grabthemangos and give us a rating and review right here in the comments! And don't forget to pin and save it for next time!

    pinterest pin for thai chicken salad

    More Sweet recipes for you to love

    • Buffalo Roasted Cauliflower
    • Asian Chicken Tacos
    • Lemon Fried Rice
    • Watermelon Salad
    close up if chicken thighs on crunchy greens with peanut dressing

    Crunchy Thai Chicken Salad with Peanut Dressing

    Yield: 4 people
    Prep Time: 25 minutes
    Cook Time: 12 minutes
    Total Time: 37 minutes

    This thai chicken salad with peanut dressing is going to become a staple during your week! Grilled chicken and crunchy greens drizzled with a homemade gluten free, healthy, peanut sauce. SO GOOD!

    Ingredients

    • SALAD:
    • 2 cups Shredded Cabbage
    • 2 cups Chopped Kale
    • 2 cups Shaved Brussels Sprouts
    • PEANUT SAUCE:
    • ⅓ cup Peanut Butter
    • 1 tablespoon Honey
    • ¼ cup Gluten Free Soy Sauce (Tamari)
    • ¼ cup Water
    • 1-2 Garlic Cloves
    • ½ Lime juiced (about 1 Tbsp)
    • ½ tablespoon Sesame Oil or Olive Oil
    • 1 tablespoon Green Dragon Hot Sauce
    • CHICKEN:
    • 2-3 Chicken Thighs

    Instructions

    1. In a large bowl toss your chopped kale, shaved brussels sprouts, and shredded cabbage.
    2. In a skillet over medium-high heat, sear your chicken thighs on both sides in sesame oil until crispy. Then cook through on medium-low heat until done.
    3. While the chicken cooks, place the peanut sauce ingredients into a blender (I use a bullet blender) and blend until smooth.
    4. Place sliced grilled chicken thighs over the greens and drizzle as much sauce over as you'd like and serve with an extra lime wedge. Enjoy!
    Nutrition Information:
    Yield: 4 Serving Size: 1
    Amount Per Serving: Calories: 472Total Fat: 30gSaturated Fat: 7gTrans Fat: 0gUnsaturated Fat: 21gCholesterol: 125mgSodium: 1280mgCarbohydrates: 25gFiber: 6gSugar: 10gProtein: 33g

    Everyone's ingredients and portion sizes are different so this nutrition information may not be 100% accurate.

    © CradleKitchen
    Cuisine: Thai / Category: Salads

    Gluten Free Chocolate and Marshmallow Cookies

    August 13, 2019

    chocolate cookies with toasted marshmallow on top

    These gluten free chocolate and marshmallow cookies are beyond delicious! I mean, it's all in the title isn't it? Gooey chocolate cookies with chocolate chips in them topped with toasted gooey marshmallows. Double gooey, double goodness! And on top of all that, they are of course gluten free and come with a dairy free option as well. Time to freaking jump up and down for joy.

    Chocolate Marshmallow Cookies

    These cookies are a bit like rocky road cookies minus the nuts. As much as I love nuts in my desserts (don't judge), I love these cookies just as they are with just oodles of chocolate and a big toasted marshmallow.

    group of chocolate cookies with marshmallows and chocolate chips

    Making these cookies is super easy. They are delicious and full of cocoa and chocolate chips. Definitely don't skip the chocolate chip addition. They really take it to that s'mores level of good with that melted chocolate. The best thing about these cookies is how they still taste amazing even after storing them. You can always pop them into the microwave for 10 seconds but even straight out of a Tupperware, they taste gooey and amazing still.

    The dough for these cookies resembles a regular chocolate chip cookie dough. However, if you decide to go the dairy free route (or have to) the cookies are still amazing but the dough gets a bit greasy feeling. I wound up using my hands instead of spoons to get it on the baking sheet. They bake up really well either way though. If you are using a triple filtered coconut oil, you won't taste any oil flavor or coconut flavor come through.

    Gluten Free Cookies

    Of course these cookies are gluten free because this blog is now gluten free and honestly it's been a big transition. I have to say though, I love experimenting with these new flours and ingredient substitutions to make gluten free recipes that are still indulgent.

    hand pulling a chocolate marshmallow cookie apart slowly

    Gluten free gets a bad rap doesn't it? People think it means eating stale cardboard all the time and just smiling through it as though you like it. Well I'm here to say that you can eat the most decadent and delicious meals and desserts on a gluten free diet still. These cookies prove that! These are our favorite way to eat some gluten free s'mores.

    I used Bob's Red Mill 1-1 ratio gluten free flour for this recipe. It is one of the only gluten free flour mixes that I've found is actually a 1-1 ratio. A lot of other companies that claim to have a good equal ratio flour like this, I haven't had much success with. More often than not the recipe turns out too thick in consistency. Bob's Red Mill though came through like a rock star.

    Making Chocolate Cookies

    Just like a normal cookie recipe, you will need two bowls. In the larger bowl mix the wet ingredients- butter (or coconut oil), eggs, sugar, brown sugar, and vanilla. In the medium bowl, mix the dry ingredients- flour, baking powder, and salt. This really helps to ensure that things mix evenly together and you won't get a clump of baking powder in one of your cookies.

    close up of a chocolate cookie and marshmallow

    Mix the dry medium bowl into the wet larger bowl slowly until your cookie dough forms. Fold in the chocolate chips evenly. On a baking sheet lined with parchment paper, scoop your cookies onto the pan with enough room to flatten them out. Bake them for 4 minutes at 350. Take the cookies out of the oven and using a spoon, press a crater and flatten them in the middle. Place a regular sized marshmallow in the center where you flattened the cookie and bake for another 6 minutes. Once they are done, let them cool slightly and then dig in to these gooey delicious treats!

    Tag us on Instagram @grabthemangos and give us a rating and review right here in the comments! And don't forget to pin and save it for next time!

    a bunch of chocolate cookies and a scoop of cookie dough

    More Sweet recipes for you to love

    • Vegan Fudge Brownies
    • Chia Seed Peanut Butter Cookie Dough
    • Chickpea Cardamom Blondies
    chocolate cookies with toasted marshmallow on top

    Gluten Free Chocolate and Marshmallow Cookies

    Yield: 15-18 cookies
    Prep Time: 15 minutes
    Cook Time: 10 minutes
    Total Time: 25 minutes

    These amazing chocolate and marshmallow cookies are gluten free and can be dairy free as well! Super simple and easy to make and an absolutely drool worthy sweet treat.

    Ingredients

    • 2 cups Bob's Red Mill 1-1 Ratio Gluten Free Flour
    • ⅔ cup Cocoa Powder
    • ½ teaspoon Baking Powder
    • Pinch of Salt
    • ¾ cup Brown Sugar
    • ¾ cup Sugar
    • 1 cup Butter (softened) or Triple Filtered Coconut Oil (if dairy free)
    • 2 Eggs
    • 1 teaspoon Vanilla Extract
    • 1 cup Chocolate Chips
    • Regular Sized Marshmallows

    Instructions

    Preheat the oven to 350 F.

    In a large mixing bowl, cream together the wet ingredients- brown sugar, sugar, butter (or coconut oil), eggs, and vanilla.

    In a separate medium bowl, combine the dry ingredients- flour, cocoa powder, baking powder, and salt.

    Slowly add the dry mixture to the wet mixture and combine thoroughly until a soft cookie dough forms. Don't forget to scrape the sides with a spatula to get everything in there!

    Scoop your cookies onto a baking sheet lined with parchment paper at least 1-2 inches a part.

    Bake for 4 minutes.

    After 4 minutes, take them out of the oven and using a spoon gently press a crater into the center of each cookie flattening it slightly.

    Place one regular sized marshmallow in the center and pop back into the oven for 6 more minutes.

    Once they are done, let them cool slightly before digging in. Enjoy!

    Notes

    If you are doing the dairy free version, be sure to use Triple Filtered Coconut Oil to reduce the coconut and oil flavor in the cookie. The dough will be slightly greasy but the baked cookie won't 🙂

    Nutrition Information:
    Yield: 18 Serving Size: 1
    Amount Per Serving: Calories: 287Total Fat: 16gSaturated Fat: 12gTrans Fat: 0gUnsaturated Fat: 2gCholesterol: 21mgSodium: 32mgCarbohydrates: 34gFiber: 2gSugar: 21gProtein: 3g

    Nutrition information isn't always 100% accurate because people use slightly different products.

    © CradleKitchen
    Cuisine: American / Category: Dessert
    pinterest pin gluten free chocolate and marshmallow cookies

    Roasted Buffalo Cauliflower

    August 6, 2019

    a pan of buffalo roasted cauliflower

    This roasted buffalo cauliflower recipe is so delicious, easy, and addicting. I mean honestly, there is no breading chicken, frying it up, tossing it in sauce, blah blah blah. Too much work when all you want is some yummy buffalo bites right? My kids even eat this stuff up. Just toss the cauliflower in your homemade buffalo sauce and roast it up. Dip in whatever dip you like (ranch, blue cheese, etc) and go to town eating an entire head of cauliflower like it was nothing. (Ahem, I may do this as lunch all the time).

    Roasted Cauliflower Recipes

    Ok, there are so many ways to roast up some delicious cauliflower and I'm positive I will have more recipes for this on this blog, but this buffalo roasted cauliflower is truly my favorite!

    Simple to make, quick and easy, and oh my- look at that. It's a healthy way to shovel ranch dressing into my mouth. Yeah, you know that's what this is. I love buffalo and ranch or buffalo and blue cheese flavors together and, hey, if cauliflower can make that happen, I will take it.

    close up of roasted cauliflower with buffalo sauce

    Roasting Cauliflower

    So this is a short and sweet post because this is a short and sweet recipe. No fuss, just the best dang cauliflower you've ever had. And this coming from someone who hates cauliflower generally. When it is raw, let's be honest, it's like eating cardboard. But this bland vegetable can be made into super delicious snacks and sides so easily!

    This buffalo cauliflower recipe is only 3 ingredients plus of course the cauliflower. Combine your Frank's Hot Sauce and sour cream in a large bowl. Add in the olive oil and cauliflower bites and toss it all together well. Bake it the oven until the cauliflower has gotten just roasted looking with a few caramelized ends.

    roasted cauliflower

    Pull it out of the oven and let it cool before going to down in some ranch or blue cheese dressing or even plain!

    Tag us on Instagram @grabthemangos and give us a rating and review right here in the comments! And don't forget to pin and save it for next time!

    If you love this recipe, try out these others:

    • French Fries with Salt and Vinegar
    • Peanut Butter Cookie Dough
    • Strawberry Sweet Iced Tea
    a pan of buffalo roasted cauliflower

    Roasted Buffalo Cauliflower

    Yield: 4 people
    Prep Time: 5 minutes
    Total Time: 5 minutes

    These easy baked cauliflower bites are so yummy! Healthy, roasted, gluten free and amazing with dips. What more could you want from a snack? 🙂

    Ingredients

    • 1 head Cauliflower , cut into bites
    • ¼ cup Frank's Red Hot Sauce
    • ¼ cup Sour Cream
    • 2 tablespoon Olive Oil

    Instructions

    1. Pre-heat the oven to 425.
    2. In a large mixing bowl, combine the hot sauce and sour cream. Then add in the cauliflower bites and the olive oil and toss well.
    3. Bake in the oven for 20-25 minutes until roasted through and the tips are browned.
    4. Let cool and enjoy!
    © CradleKitchen
    Cuisine: American / Category: Sides

    "Wet" Maple Brown Sugar Dry Rub

    August 1, 2019

    a blend of spices and maple syrup and brown sugar

    This is my go to rub for pork loin, chicken, wings, and honestly anything BBQ'd including veggies. It is so easy, simple, and perfectly savory, sweet, with just a dash of spicy. This maple brown sugar dry rub is actually a little wet because of the maple syrup and the Worcestershire sauce that get mixed into it. It rubs into the meat and veggies super well this way and caramelizes beautifully. I've even put this in steak tacos and it was AMAZING!

    Homemade Dry Rub

    Making your very own dry rubs and marinades is the only way to go in my opinion. You get to really experiment with all the flavors and choose the spice level, the sweetness, all of it, yourself.

    close up of wet dry rub

    This particular maple brown sugar dry rub is our absolute favorite. So of course I had to share it 😉 We mostly use this rub mixture for pork loin or for ribs. We actually came up with it after a series of tests on our grilled pork loin which I am working on getting up on the blog soon. It gets some cuts into the middle, rub placed all over and through it, and then wrapped in bacon and grilled up. Are you drooling yet?

    So this rub is more wet than full on dry rub. It has two liquid ingredients making it more of paste than your traditional dry rub. It goes on and clings to the meat or veggies super well though because of this and caramelizes with the juices in the meat because of the sugars in the maple and brown sugar. I'm drooling just thinking about it.

    Making Maple Brown Sugar Dry Rub

    So making this maple brown sugar dry rub or "wet" rub as it technically is, is so simple. Everything goes into a bowl or jar and you mix it all together. Apply it to your meat of choice and cook it up either in the oven until the meat is done, or on the grill (our favorite choice). This rub also works well on meat in the crock pot.

    spices and brown sugar in a jar

    We have used this on just about everything. I honestly am already thinking of using it on the turkey at thanksgiving (I am always thinking ahead about food). I have even, like I said, put it in some steak tacos. Just add a can of diced tomatoes and instead of taco seasoning, add this rub and your tacos will be so savory, sweet, and delicious.

    Tag us on Instagram @grabthemangos and give us a rating and review right here in the comments! And don't forget to pin and save it for next time!

    If you love this recipe, be sure to try out:

    • Salt and Vinegar Baked French Fries
    • Crock Pot Pulled Pork (add this rub to the pork before cooking)
    • Chia Peanut Butter Cookie Dough for dessert!
    a blend of spices and maple syrup and brown sugar

    Maple Brown Sugar Dry Rub

    Yield: 1 jar
    Prep Time: 5 minutes
    Total Time: 5 minutes

    This dry rub recipe is so quick, easy, and amazing on any meat or veggie! Try it for ribs, pork, chicken wings, or even steaks. Takes 5 minute to mix it up and apply it to your food of choice.

    Ingredients

    • 2 tablespoon Brown Sugar
    • 1 tablespoon Pure Maple Syrup
    • 1 tablespoon Worcestershire Sauce
    • 2 teaspoon Seasoned Salt
    • 1 teaspoon Garlic Powder
    • 1 teaspoon Cumin
    • 1 teaspoon Paprika
    • 1 teaspoon Italian Seasoning
    • Dash Cayenne Pepper, adjust according to your tolerance

    Instructions

    1. Combine all the ingredients together into a paste in a bowl or jar and apply to your meat or veggies of choice before cooking. Enjoy!
    Nutrition Information:
    Yield: 1 jar Serving Size: 1 Servings
    Amount Per Serving: Calories: 182Total Fat: 1gSaturated Fat: 0gTrans Fat: 0gUnsaturated Fat: 1gCholesterol: 0mgSodium: 3222mgCarbohydrates: 45gFiber: 2gSugar: 36gProtein: 2g

    Nutritional information is not always 100% accurate.

    © CradleKitchen
    Cuisine: American
    • « Go to Previous Page
    • Page 1
    • Page 2
    • Page 3
    • Page 4
    • Page 5
    • Go to Next Page »

    Primary Sidebar

    gluten free recipes

    Vegan Quinoa Bowl in a white bowl

    Vegan Quina Bowls

    Reuben dip in a cast iron skillet with a wood woven charger under the pan

    Ultimate Reuben Dip - With Deli Corned Beef

    glass of the best dairy free eggnog with almond milk and sprinkled nutmeg and a cinnamon stick

    The Best Dairy Free Eggnog with Almond Milk

    bowls of creamy dairy free roasted butternut squash soup

    Roasted Butternut Squash Soup - dairy free

    I'm Renee and welcome! Grab the Mangos focuses on affordable, simple, and easy-to-make recipes. Let's make delicious food together with easy steps and simple ingredients so you have one less stress in your life.

    More about me →

    NEW RECIPES

    • Christmas Tree Cupcakes on a white wood surface.
      Christmas Tree Cupcakes
    • Wood bowl of Christmas Trail Mix.
      Christmas Trail Mix: The Ultimate Holiday Snack Mix
    • Apple cider donut Bundt cake on a wood cake stand.
      Apple Cider Bundt Cake (Gluten Free Option Included)
    • pumpkin spice syrup in a jar with a lid and tag and a jar without a lid.
      Homemade Pumpkin Spice Syrup Recipe: A Perfect Fall Treat

    TREADING RECIPES

    • stack of heath bar cookies with one bite taken out.
      Heath Bar Cookies
    • holding a wood bowl of gnocchi.
      Best Gnocchi Recipe
    • mahi mahi in a cast iron skillet with mango chunks and cilantro
      Hawaiian Style Mahi Mahi Recipe
    • rolled out pizza dough
      Super Easy Pizza Dough

    Footer

    ↑ back to top

    About

    • About
    • Privacy Policy
    • Disclaimer

    Newsletter

    • Sign Up! for emails and updates

    Contact

    • Contact

    As an Amazon Associate, I earn from qualifying purchases.

    Copyright © 2020 Brunch Pro on the Brunch Pro Theme